Modal G & M Codes for Your CNC [What They Do & How to Use Them]

a graphic of a cnc machine with text that says learn g code today modal codes

What is a modal command?

Modal commands are a type of CNC code that stay active once turned on until the code is either turned off or switched to another code in the same group.

For example, if left cutter compensation is turned on with G41 it will stay on until either the G42 code switches the machine to right cutter compensation or the G40 command is used to turn off cutter compensation altogether.

Want to learn more about CNC G Code?

Why and how are modal commands used?

Modal commands are useful because they increase productivity. 

Modal commands can save time for the CNC programmer and make the CNC program smaller.

Using modal codes allows you to not have to write the same code repeatedly. This also has the added benefit of making the program easier to read.

By using modal commands you set the machine modes once and then switch them as needed.

A good example of this is your unit mode.

Most programs will be written in either inches or millimeters. It is not common for a program to switch between the two unit types. 

Using modal commands allows you to use the G20 code and set the machine in inch mode at the start of the program and leave it on.

Without the capability to use modal commands, you would need to tell the machine that every new line of code was in inches. 

This would make for a very busy, hard to read program with a bunch of codes repeated throughout.

Modal commands make the programming easier to create and easier to read.

Remember you can only have one modal command from the same group active at a time. 

Also, there are some commands which are one-shot codes. This means they only affect the line they are used on.

The various modal groups are shown below.

Modal command groups

To really drive the point home, remember:

You can only have one modal code active from each group. 

If you use G20 to put the machine in inch mode and then use the G21 command to put the machine in metric mode, they are not both active. The G20 command gets turned off when the G21 command is turned on.

Some of the groups of codes have a cancel command which can be used to turn all codes in the same group off. 

Not every code group has a cancel command though. 

For instance, you will always be in either G20 (inches) or G21 (mm). It is not possible to turn both off. One or the other must be active.

If a code group has a cancel command, it is discussed in the individual group sections below.

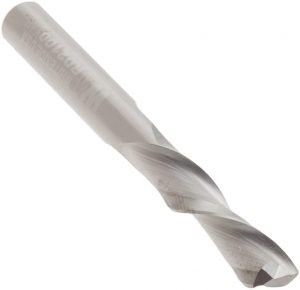
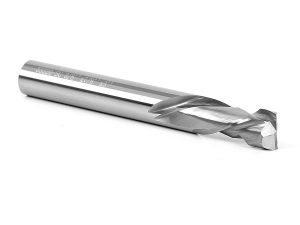
Movement [G00, G01, G02, G03]

One of the most frequently used group of codes is movement codes.

CNC machines need to move to cut, drill, and grind parts along with many other functions.

Many times, large portions of your CNC program will be exclusively movement codes as the machine performs its cutting operations.

In the movement group of codes there are four different codes:

You move with G01, G02 and G03 to make cutting movements to make all kinds of shapes and cuts on the part, but what about G00?

G00 is rapid movement and is used to move the machine as quickly as possible when it is not in the process of cutting.

Moving rapidly reduces the total machining time, otherwise known as cycle time. While this might not make a huge difference for making one part in your garage, shaving a minute off each part for an order of 1,000 pieces really adds up.
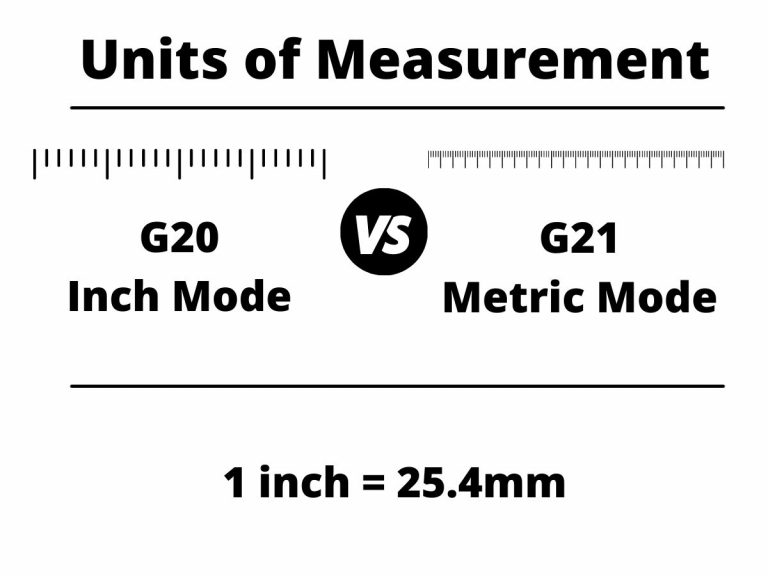
a comparison of the type of movement created with G00, G01, G02 and G03 cnc g codes

Units [G20, G21]

comparison of units of measurement for cnc programming

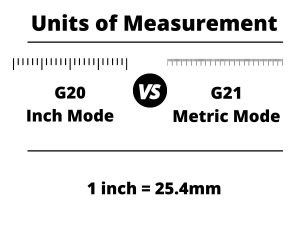
We talked about it above but the codes used to set your units are very important.

G20 sets the machine in imperial units (inches) and G21 sets the machine in metric units (mm).

Switching between units is not advised. Set your units and stick with them.

Cutter compensation [G40, G41, G42]

Cutter compensation is a mode that allows the machine to adjust for the size of the cutting tool.

This allows the same program to be used with multiple different cutting tools. Without cutter compensation, you would need to write a new program each time you had a new cutter.

illustration that shows how a CNC will act when there is no cutter compensation mode active

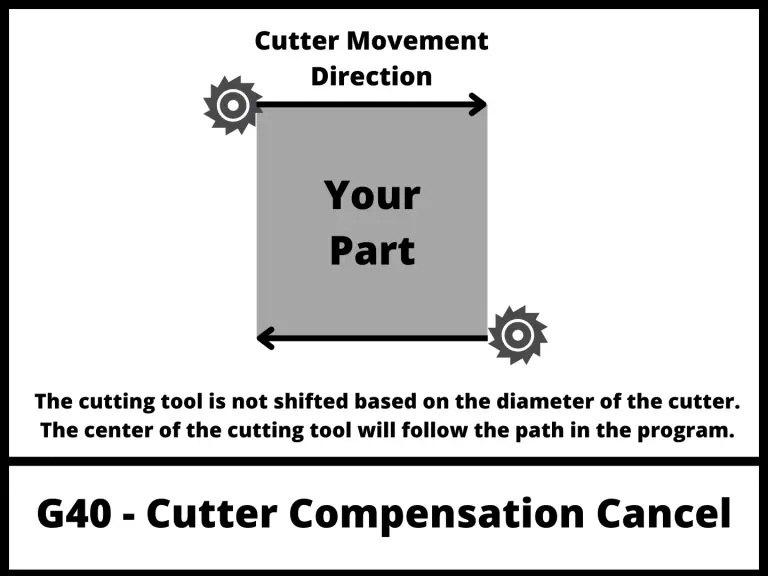
The first code in the group is the cutter compensation cancel command, G40. When this code is active, the CNC will move the center of the cutting tool along the tool path listed in the program.

This is useful when you want to drill a hole at a specific location.

The two cutter compensation modes which cause the machine to adjust the tool path are:

illustration that shows how a CNC will act when using cutter compensation left with the G41 code
illustration that shows how a CNC will act when using cutter compensation right with the G42 code

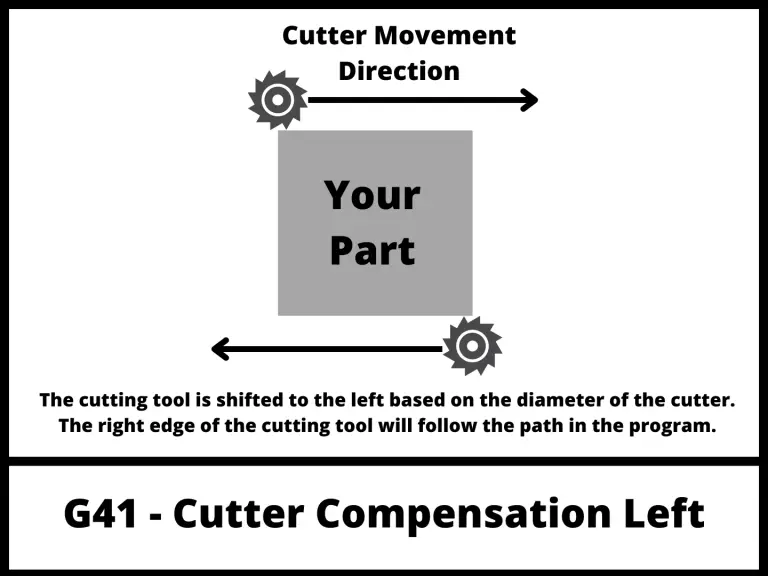
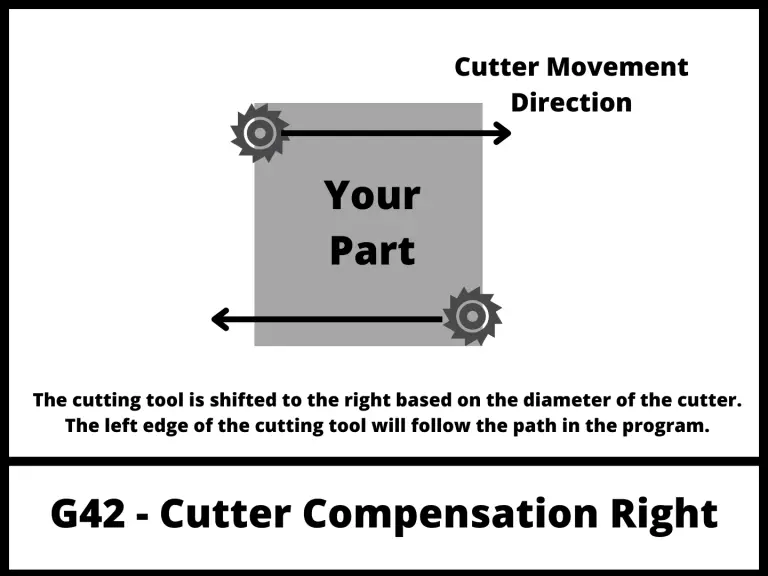
Both modes adjust the path of the cutting tool so that the edge of the cutter follows the toolpath of the program.

G41 is used when climb milling and G42 is used when conventional milling.

G41 is used far more often than G42.

Both G41 and G42 take into account the D offset value to tell the CNC how much to adjust the tool path. 

The D offset value is listed when turning on cutter compensation. For example, to turn on left cutter compensation with the first D offset the line of code would be:

G41 D1

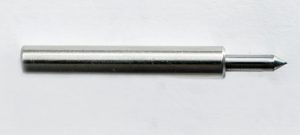
Tool length compensation [G43, G49]

an illustration of a cnc machine that shows how a g43 code offsets the program

Just like the diameter of the cutter needs to be accounted for, so does the length of the cutting tool.

G43 is the code to turn on tool length compensation. 

This code is used along with an H offset value which is stored in the CNC controller similar to the D offsets used in cutter compensation.

Tool length compensation is used for many of the same reasons cutter compensation with G41 and G42 is used. 

It allows the machine to adjust for the length of the cutting tool and not require a new program to be created each time the tool is changed.

Technically, G43 is for positive tool length compensation and G44 is for negative tool length compensation.

For anyone just learning about modal commands, they should ignore G44 for the time being. 

G44 is not used often and is not something that a beginner can expect to deal with.

Focus on G43 and G49 when first learning CNC programming.

Speaking of G49. G49 is the code to cancel tool length compensation. 

Remember cancel just means turn it off.

You might think that you would need to turn off tool length compensation much like you would with cutter compensation, but this is rarely true.

Instead, the machine will switch between tools by using different H offsets for different length cutters.

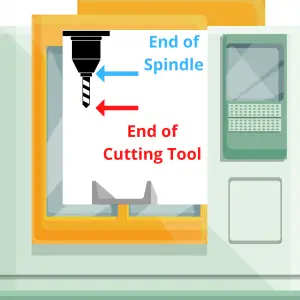
When tool length compensation is off using a G49 code, the machine will move the tip of the spindle to each new location instead of the tip of the cutter. 

Because you will almost always have a cutting tool in your spindle, tool length compensation with G43 is almost always on.

Fixture/work offset [G54-G59]

Fixture offsets, sometimes called work offsets are how the machine knows where your part is located in the machine.

They tell the machine the zero location in the three axes (X, Y, & Z). The machine will execute the program based on this zero location.

Using work offsets allows you to easily set up for a different part or even use one program to run multiple parts at once. 

You can tell the machine the location of your first part by using G54, run your program then set the work offset to G55 so the machine knows where the second part is and proceed to run the same program again.

visual to show cnc work offsets G54-G59 with the zero locations shown

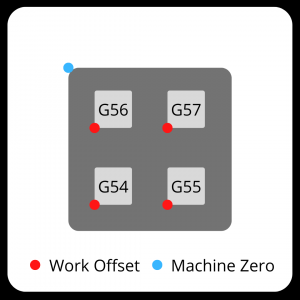
Just like your D and H offsets allow flexibility in your CNC programming and setup, work/fixture offsets with G54-G59 do the same.

It should be noted that G54 through G59 are the most common work offsets used and can be found on most machines. 

In addition to these six offsets, most machines (especially new models) will be able to use many more offsets. How they are used varies from machine to machine so check your machine manual.

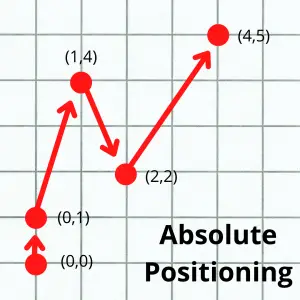
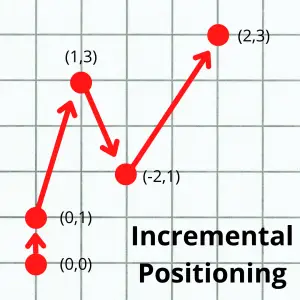
Positioning mode [G90, G91]

Positioning modes tell the CNC machine how to interpret each new location it is given.

There are two types of positioning modes which can be used:

Absolute positioning with G90 tells the machine that all dimensions are measured from the datum/origin (0,0,0). This is a fixed point in the machine that will not change unless the work offset is changed.

Incremental positioning with G91 tells the machine that each new location becomes the zero location (0,0,0).

The pictures below show the same tool path in both positioning modes. The coordinate location of each new move is listed in parentheses ().

graph paper example of absolute positioning with multiple points as examples
graph paper example of incremental positioning with multiple points as examples

Canned cycles [G80, G81, G82, G83, G84, G85, G86, G87, G88, G89]

Canned cycle are modal commands which are used for programming repetitive CNC operations.

They have the benefit of making your CNC program both shorter and easier to read and understand.

Canned cycles are a big topic on their own so I will only include a brief description of what each code is used for. If you need more information about any of the individual canned cycles, then click the links below:

Plane returns [G98, G99]

Plane returns tell the machine how to act after finishing a canned cycle. 

The two options are:

G98 returns to the point where the canned cycle was started. 

G99 returns to the R plane, which is the point where the controlled feedrate (not rapid) started.

visualization of how a cnc machine moves using g98 and g99 codes shows motion of travel for the machine

The R plane is lower than the initial point. This can allow for shorter machining time because the machine is not travelling as far.

Often a series of holes will be drilled and both G98 and G99 return codes will be used in the process.

The G99 code gets used when the machine is able to stick close to the part and move to the next hole.

The G98 code is used when the machine needs to retract further, for instance if you needed to avoid a clamp or something else in the way of your cutter.

G98 retracts further and takes longer but is generally the safer option.

You should be careful using both G98 and G99 though.

Pay close attention to the initial point (your Z height when starting the canned cycle) and your R plane (set with the R code in your canned cycle callout).

The initial point should be set at a level that is higher than any objects in the machine such as the part itself, clamps, fixtures, etc.

Plane selection [G17, G18, G19]

There are 3 codes that tell the machine which plane to work in:

  • G17 for the XY plane
  • G18 for the XZ plane
  • G19 for the YZ plane

Most programs will be written using the G17 code and work in the XY plane.

Modal M codes

In addition to the modal G codes listed above, there are also modal M codes available for controlling various machine functions.

These modal M codes work in the same way as the G codes. Once they are used, they will stay on until canceled or switched to another code in the same group.

Spindle commands [M03, M04, M05]

Spindle direction

This group of modal commands controls the CNC spindle. They are:

Coolant [M07, M08, M09]

The next group of modal M codes controls the machines use of coolant.

Mist coolant is usually a combination of coolant and compressed air but this can vary from machine to machine and sometimes you may find that it is only compressed air or not even available on your specific machine.

Flood coolant is the normal CNC coolant mode where the machine floods the cutting tool and workpiece with coolant.

M07 modal command turns on the mist coolant and it will be directed to the material cutting.

Other modal commands

There are many other modal commands which can be used for CNC programming. 

They vary by machine and not all machines will have each type of modal code.

The codes laid out here are the most common modal commands and will give anyone trying to learn CNC programming a good start towards learning the ins and outs of modal commands.

Frequently asked questions about modal codes

Modal vs one shot codes

While there are a lot of modal codes, not every CNC code is modal.

There are also one-shot (non-modal) commands as well. These codes only affect the line they are used on.

A couple of the commonly used one-shot codes are:

What happens if I don’t set a modal code?

When the CNC machine starts up it sets the machine to various default modes as set in the setup parameters of the machine.

It is never advised to rely on the startup modes of the machine to create your program. It is always better to call out any needed codes specifically in your program.

If you don’t set a modal command, the machine will remain in the default modes as set in the system parameters.

Want to learn more about CNC G Code?

CNC Offsets Explained [D, H and Work Offsets]

a graphic of a cnc machine with text that says learn g code today offsets

What is a CNC offset?

Offsets are the adjustments that the CNC machine will make based on different features of the machine.

There are three types of offsets:

  • Diameter offsets
  • Height offsets
  • Work offsets

Want to learn more about CNC G Code?

Types of CNC offsets

Each of the three offset types has a specific purpose. 

They each allow for flexibility when running your program. This includes allowing you to use the same program even if you need to change cutting tools.

Height (H) offsets

illustration of a cnc cutting tool that shows what an H offset is

The height offset refers to the location difference between the spindle and the cutting tool.

This difference in location is stored in the machines offset library. Height offsets are usually stored in the same number location as the tool.

mach 3 tool offset table
Example offset library

For instance, T01 (tool 1) and H01 (height offset 1) or T05 (tool 5) and H05 (height offset 5).

This makes it easier to match up the necessary offset with the correct tool.

The G43 code is used to turn on tool length compensation using an H offset.

For example, G43 H01 turns on tool length comp with the first H offset.

Once tool length compensation is turned on with the G43 code, it will stay on until it is turned off with the G49 cancel code or switched to a new H offset such as H02 or H05.

Diameter (D) offsets

illustration of a cnc cutting tool that shows what an D offset is

While H offsets adjust for the length of the cutter, D offsets compensate for the diameter of the cutting tool.

D offsets are also stored in the machines offset library. D offsets are usually stored in the same number location as the tool they are used with.

T04 (tool 4) and D04 (diameter offset 4) would usually be matched together.

G41 and G42 are the two cutter compensation modes that are used with D offsets.

They tell the machine to adjust the path of the cutter so that the edge of cutter follows the path given in the CNC program. G41 shifts the cutter left and G42 shifts the cutter right.

illustration that shows how a CNC will act when using cutter compensation left with the G41 code
illustration that shows how a CNC will act when using cutter compensation right with the G42 code

With cutter compensation off using the G40 code, the machine will move the center of the cutter along the path in the program. 

This can make it difficult to get the correct size, especially when using different or multiple cutters.

illustration that shows how a CNC will act when there is no cutter compensation mode active

Telling the machine the size of the cutters with your D offsets allows it to account for them and run the same program with different tools ang get the same size part. 

If you didn’t have cutter compensation, then you would need to create a new version of the program every time you wanted to use a new tool.

Just like tool length compensation with G43, cutter comp with G41 and G42 are modal commands so those adjustments will stay on until switched or turned off with the G40 code.

Work offsets (G54-G59)

Work offsets are basically the stored location of your part in the machine. 

You use them to set the XYZ zero location when working in absolute positioning mode.

There are multiple work offsets available. 

The six most common are G54 through G59. Most machines will also have others available, but the format varies from machine to machine.

visual to show cnc work offsets G54-G59 with the zero locations shown

Fanuc controls are one of the most common controllers. If they allow additional work offsets, the Fanuc format for using them is G54.1 P1, G54.1 P2 and so on. The P number is the additional offset.

In most cases the six offsets of G54 through G59 that are common on all machines will be more than enough.

One benefit of having multiple work offsets is how easy they make it to run multiple parts at once. You can set the work offset for multiple parts and run the same program with a new work offset each time.

This works well when you a fixture that holds multiple parts in your CNC.

Where are offsets stored?

Offsets are stored in the tool offset table or library.

This tool table allows you to describe the different dimensions of the tool that will affect the program.

This includes the tool radius or diameter (D offset) and its length (H offset).

Offset Library
Tool offset library on an Okuma CNC machine

Some machines allow you to store the H and D offsets together in one offset. In this example, tool T01 would use both H01 and D01 as offsets. 

Other machines may require the offsets to be stored individually. 

When the offsets are stored individually, the programmer should maintain a system so that the offset numbers used are consistent. 

In other words, the first H offset would always be stored in the 01 location and the first D offset would always be stored in the 51 location.

Having a system like this will help prevent errors in your program.

Want to learn more about CNC G Code?

CNC Spindle Controls Explained [M03, M04, M05 and More]

a graphic of a cnc machine with text that says learn g code today spindle controls

Getting started with CNC spindle controls

The most basic codes to control your CNC spindle are:

But there is more to controlling your CNC spindle than simply turning it on and off.

For instance, most CNC machines have multiple ways to turn the spindle off and each way has it’s own use case. 

Controlling the spindle speed is another function that has multiple modes. Choosing the wrong one could potentially be disastrous. 

Learn the ins and outs of controlling your spindle below.

picture of the inside of a cnc machine with the spindle identified

Want to learn more about CNC G Code?

Codes for turning your spindle on

There are two CNC commands for turning the spindle on, M03 and M04.

The S code is used together with these codes to set the speed of the spindle.

Spindle direction

M03 [spindle on, clockwise]

The M03 code turns the spindle on in a clockwise direction at a set speed.

The speed is set with the most recent S code.

Clockwise rotation with M03 is the most common spindle rotation direction when CNC machining. 

Clockwise rotation is used with right hand cutting tools.

M04 [spindle on, counterclockwise]

The M04 code turns the spindle on in a counterclockwise direction at a set speed. 

Just like M03, the set speed is the value used with the most recent S code.

M04 is used with left hand cutting tools.

Counterclockwise spindle rotation is much less common than clockwise. 

This is especially true for machining centers (mills). For lathes, M03 is still more common but M04 gets more use.

Codes for turning your spindle off

The M05 code is the only code that just turns the spindle off.

However, there are other codes listed below that turn off multiple machine functions and the spindle is included in those functions.

M05 [spindle off]

The M05 code is used to stop the spindle.

It is normally used when there is a tool change or other change in the machining process.

When the spindle is turned back on with an M03 or M04 code after being stopped, the spindle will return to the same speed it was previously set at with the last S code.

M00 [program stop]

The M00 code is called a program stop. It stops the current program in the middle of running.

Using the M00 code turns off the following functions:

  • Movement of all axes
  • Spindle rotation
  • Coolant flow
  • The machine pauses reading the program

When the M00 code is used, nothing is reset. In other words, any active modes or parameters will stay as they are.

The program is merely paused when it reads the M00 code.

fanuc cnc control panel with cycle start button highlighted
Cycle start button on a Fanuc control panel

The machine will resume reading the program when the cycle start button is pressed after the program stop has occurred.

One thing to keep in mind is that the machine doesn’t turn on functions when cycle start is pushed. 

If the M00 code turns something off such as the spindle, it will need to be turned back on in the program.

M01 [optional stop]

The M01 code is called an optional stop. 

It stops the current program in the middle of running, but only if the optional stop switch or button is on.

If the optional stop switch is not on, then the machine will ignore any M01 codes it reads and continue running the program like normal.

haas cnc control panel with optional stop button highlighted
Optional stop button on a Haas CNC

When the machine reads an M01 code and the optional stop switch is on, it will turn off the following functions:

  • Movement of all axes
  • Spindle rotation
  • Coolant flow
  • The machine pauses reading the program

When the M01 code is used, nothing is reset. Same as with the M00 code.

In other words, any active modes or parameters will stay as they are. The program is merely paused when it reads the M01 code.

The machine will resume reading the program when the cycle start button is pressed after the program stop has occurred.

One thing to keep in mind is that the machine doesn’t turn on functions when cycle start is pushed. 

If the M01 code turns something off such as the spindle, it will need to be turned back on in the program.

M30 [program end]

The M30 code ends the program. 

This makes it different from M00, M01 or M05.

M00 and M01 shut down various machine functions and pause the program.

M30 shuts down machine functions and ends it. 

Pressing cycle start after an M30 code will start the entire program over again.

How to set spindle speeds

CNC spindle speeds are set using the S code.

S code

Using the S code sets the spindle speed that will be used whenever the spindle is turned on. The units are revolutions per minute (RPM).

The same spindle speed value will be maintained until it is changed.

Below is a small section of code with comments in parentheses that show what will happen as the machine reads the code.

M03 S3000   (Spindle On CW, Speed = 3,000 RPM)

M05              (Spindle Off)

M04              (Spindle On CCW, Speed = 3,000 RPM)

Notice how the spindle turns back on at the same set speed. This happens even if the spindle rotation direction is changed from clockwise to counterclockwise or vice versa.

S codes show up frequently in programs at the beginning of a new section of code. This can be switching tools or switching machining operations such as going from cutting the outside profile of the part to drilling holes.

Some other notes about the S code:

  • Must be a whole number (no decimals such as 3000.5)
  • Most machines have a limit to the range of spindle speeds that can be used. 1-9999 is common but 1-99999 is also used by some machines

Spindle speed modes

In CNC programming there are two codes that control the spindle speed mode, G96 and G97.

G97 is the most common and sets the spindle mode to RPM.

G96 sets the spindle mode to constant surface speed which adjusts the speed of the spindle based on the size of the part being machined.

G97 [speed in RPM]

When the G97 mode is active, the machine will maintain a constant spindle speed based on the RPM value set with the most recent S code.

If G97 is active, spindle speed will only change when the S code is changed.

G96 [constant surface speed]

When the G96 mode is active, the machine will maintain a constant surface speed.

Imagine a monster truck tire. Now picture rolling the monster truck tire one complete revolution in one minute. In that one minute, you might move 20 feet.

Now imagine you have a normal car tire. If you roll the car tire one revolution in one minute, you might only travel 4 feet.

You covered a lot less distance in that one minute, which means you traveled at a slower speed.

When things are spinning based on an RPM speed, the actual speed that the cutting edge of the tool is traveling can change.

Using constant surface speed with the G96 code tells the machine to change the spindle speed over time as the size of the part changes so that the speed where the cutting action is happening remains the same.

This is a simplified explanation of how G96 works. For more information about G96 see our full guide to the G96 command.

How to change the tool in your spindle

Most machining centers have automatic tool changers that can switch tools into and out of the CNC spindle.

an automatic tool changer on a dmg mori cnc machine
Automatic tool changer holding multiple tools in a DMG Mori CNC

The tool to be placed into the spindle is called up with the T code. This places the new tool in location so that it is ready to be switched.

The M06 command is then used to perform the tool change.

Here is an example section of code:

T01    (Tool 1 is readied for change)

M06    (Tool 1 is placed in the spindle)

T02    (Tool 2 is readied for change)

T03    (Tool 3 is readied for change)

M06    (Tool 3 is placed in the spindle)

Notice that even though tool 2 was readied for change, it never actually was put in the spindle. Instead, tool 3 was readied before the tool change occurred and it was placed in the spindle instead.

Want to learn more about CNC G Code?

Quick Guide to CNC Safety Lines [Common Codes]

a graphic of a cnc machine with text that says learn g code today safety lines

What are CNC program safety lines?

Safety lines, sometimes called a safety block, are a section of code within a CNC program which are used to protect the machine, the workpiece, and the operator.

Safety lines are used to make sure the machine is in the proper mode/state which means that the machine will understand all the commands we give it correctly.

If you need the machine to work in inches (or mm in some parts of the world), it is important to frequently set the machine to work in those units. 

This is especially true if you will be switching between units when machining.

While many won’t switch between imperial and metric units, it is common to switch between absolute and incremental positioning modes.

The safety lines used will vary by machine, however there are many which are common between the majority of machines.

Want to learn more about CNC G Code?

Types of codes found in a safety line

Safety lines can contain G codes for coordinate systems, measurement units, tool compensation, and cancel functions. 

Each one of these commands is necessary to move the tool safely. 

Modal commands and cancel commands are two of the most common codes used in CNC safety lines.

Below are the most common safety codes found in CNC programs:

Positioning mode – G90/G91

The first code normally found in a safety line will be the machine’s positioning mode.

There are two positioning modes available to use. Absolute and incremental positioning.

Absolute positioning uses the G90 command. 

Absolute positioning mode tells the machine to interpret all locations it is given as measured from a fixed zero location (origin).

graph paper example of absolute positioning with multiple points as examples

Incremental positioning uses the G91 command.

Incremental positioning modes tells the CNC that the zero location is wherever the machine currently is. 

Once the CNC makes a move in incremental mode, the new location becomes the zero location.

graph paper example of incremental positioning with multiple points as examples

Units mode – G20/G21

Selecting the system of units you will be working in is important. This is why the units mode is found in the safety lines of the program.

Imperial units are set with G20 (inches) and metric units are set with G21 (mm).

You don’t want to move 4 inches when you meant to 4 millimeters.

Setting the units mode is critical to running your CNC.

comparison of units of measurement for cnc programming

Plane selection – G17/G18/G19

Selecting the plane you will be working with is necessary. Not because you will often switch between planes, but because it’s possible.

Most people will never use anything other than the standard XY plane with G17, but setting it will make sure that it is set correctly.

The alternatives to G17 are G18 for the ZX plane and G19 for the YZ plane.

Canned cycle cancel – G80

G80 is the g code used to cancel any active canned cycle.

Canned cycles are used to perform repetitive machining. This includes drilling, reaming, boring, counterboring and other operations.

Canned cycles are modal which means they are on until they are switched or turned off. 

In the case of a drilling canned cycle, once it is turned on every new location the machine reads will be a spot where it drills a hole.

Obviously, you need to stop drilling holes eventually. Using G80 cancels the drilling canned cycle or another other canned cycles that might be active.

Cutter compensation cancel – G40

Cutter compensation is when the CNC machine control changes how it reads the program. With cutter compensation on, the machine will shift a set distance based on the size of the cutting tool when running the program.

illustration that shows how a CNC will act when using cutter compensation left with the G41 code

Cutter compensation is turned on with either G41 or G42. G41 shifts the tool left and G42 shifts it right.

illustration that shows how a CNC will act when using cutter compensation right with the G42 code

The G40 code turns cutter compensation off.

illustration that shows how a CNC will act when there is no cutter compensation mode active

Tool length compensation cancel – G49

Cutter compensation is accounts for the diameter of the cutting tool.

Tool length compensation accounts for the length of the cutter from the CNC spindle.

G49 is the code used to cancel tool length compensation.

Both compensation modes adjust for the size of your cutter. This allows you to run the same program with different tools.

Other safety codes

Codes will vary by machine. Check your instruction manual for the specific codes you need to use in the safety lines.

The codes listed here are certainly a good start.

an illustration of a cnc machine that shows how a g43 code offsets the program

Safety lines for starting up your CNC

Setting the initial modes for your machine is an important part of every CNC program. If the modes are not set then the machine will stay in it’s initialized state.

Modes such as the unit system (mm/inch) can be set in the machine parameters. If no code is specifically given in the program then the machine will remain in the initialized state.

This is not a good programming practice because there is plenty of opportunity for errors to occur. Use safety lines to make absolutely sure your CNC is in the correct mode.

Here is an example of a safety line to use at the beginning of a program:

O1000

(Start of safety code)

G20 G17 G40 (G20 inch, XY plane, cancel cutter compensation)

G49 G64 G80 (cancel tool length compensation, normal cutting mode, cancel canned cycles)

G90 G94 G98 (absolute mode, feed per minute, initial plane for canned cycles)

(end of safety code)

Frequently asked questions about CNC safety lines

Can you put all of your safety codes on the same line?

The number of codes that can fit in the same line depends on the CNC machine.

Many machines have limitations for how many M-codes you can put on one line. G codes are generally only limited to one code from each group.

For example, G00, G01, G02 and G03 are all in the same group (movement). Only one of the codes from this group should be used on any particular line.

Want to learn more about CNC G Code?

Ultimate Guide to CNC Codes

Here is our Ultimate Guide to CNC Codes. Below is a list of CNC codes with a description of what they are.

Click on the code if you want to find out more including multiple examples to help you understand how to use them in your programs.

A - Rotation Around the X Axis

Rotates around the 4th axis of the machine if equipped.

B - Rotation Around the Y Axis

Rotates around the 5th axis of the machine if equipped.

C - Rotation Around the Z Axis

Rotates around the 6th axis of the machine if equipped.

Specifies the tool diameter offset to be used for cutter compensation (G41 and G42).

Learn more about the D code

Sets the feed rate to be used for movement. The feed rate is used when moving using codes such as G01, G02 & G03.

The feed rate is not used when using rapid travel (G00).

Learn more about the F code

Sets various modes in the machine or prepares the machine to perform a function such as a canned cycle.

Learn more about G codes

Specifies the height offset to be used when turning tool length compensation on (G43) or off (G49)

Learn more about the H code

I CNC Code

I - Radius Center in X Axis

Identifies the location of the center of a radius for a circular move relative to the current X axis location. 

J CNC Code

J - Radius Center in Y Axis

Identifies the location of the center of a radius for a circular move relative to the current Y axis location. 

K CNC Code

K - Radius Center in Z Axis

Identifies the location of the center of a radius for a circular move relative to the current Z axis location. 

L CNC Code

L - Number of Subprogram Repetitions

Used with the M98 subprogram call command. L lists how many times the subprogram will be repeated.

M codes turn on and off various machine functions such as the spindle or coolant. 

They are also used for program start and stop functions.

Learn more about M codes

Identifies the sequence or line number of the program. They are not required but they can help make a CNC program easier to follow. 

Learn more about the N code

The program number is the first CNC word in the program.

Learn more about the O code

When used with an M98 code, P identifies the subprogram number.

When used with G04 or canned cycles, P specifies the amount of time to dwell.

Learn more about the P code

Used with G73 and G83 peck drilling cycles. Q identifies the depth of each drilling peck before the drill backs up to break chips.

Learn more about the Q code

When used with G02 and G03, R specifies the size of the circular curve to be machined.

When used with a canned cycle such as G73, R specifies the location of the rapid plane.

Learn more about the R code

Sets the speed of the spindle.

Units are in revolutions per minute (RPM)

Learn more about the S code

Selects a tool to prepare it for tool change. M06 will cause the CNC to swap the currently loaded tool with the one selected with the T code.

Some machines do not require the use of a M06 code and will swap tools by simply using the T code.

Learn more about the T code

Specifies the location to be moved to in the X axis. 

The distance will be affected by whether the machine is in absolute (G90) or incremental (G91) mode.

Learn more about the X code

Specifies the location to be moved to in the Y axis. 

The distance will be affected by whether the machine is in absolute (G90) or incremental (G91) mode.

Learn more about the Y code

Specifies the location to be moved to in the Z axis. 

The distance will be affected by whether the machine is in absolute (G90) or incremental (G91) mode.

Learn more about the Z code

; - End of Block

Signifies the end of a block of code. A single block will usually consist of one line of code.

Useful when testing code by stepping through the blocks in single block mode.

Slash Block Skip CNC Code

/ - Block Skip

Used together with a switch on the CNC control. 

When the switch is on the machine will read and execute lines that start with the / character. When the switch is off, these lines will be ignored.

Every G Code for Your CNC [The Complete List]

G code, sometimes called g-code, is a simple programming language for CNC machines. 

Listed below are the codes that use the G word. These codes are preparatory commands.

This means that they set modes or prepare the machine for various actions. 

We have put together a complete list of G codes for your reference.

Not all codes are used often.

Below is a list of G codes. They have been organized into group types based on how the machine reacts to the individual code.

If you are new to G code, you should review the code groups and compare the codes within a single group. 

You will quickly see they handle the same function, such as one code to turn something on and one code to turn something off. 

This makes learning the codes twice as easy.

Table of Contents

CNC Movement and Travel

Moves the CNC around at the maximum possible speed. Often called rapid traverse.

Learn more about the G00 code

Move the CNC in a straight line to a specific location. The speed of this movement is determined by the feed rate (F).

Learn more about the G01 code

Move the CNC to specific location along along a specified arc or radius traveling clockwise. The speed of this movement is determined by the feed rate (F).

Learn more about the G02 code

Move the CNC to a specific location along a specified arc or radius traveling counterclockwise. The speed of this movement is determined by the feed rate (F).

Learn more about the G03 code

Tells the CNC not to move for a certain amount of time.

Learn more about the G04 code

Plane Selection

G17 CNC G Code

G17 - XY Plane Selection

The vast majority of movement in CNC programs will be relative to the XY plane. Plane selection affects how G02, G03, cutter compensation and some canned cycles are handled.

G18 CNC G Code

G18 - XZ Plane Selection

Plane selection affects how G02, G03, cutter compensation and some canned cycles are handled. G18 tells the machine you are machining radii around the Y axis.

G19 CNC G Code

G19 - YZ Plane Selection

Plane selection affects how G02, G03, cutter compensation and some canned cycles are handled. G19 tells the machine you are machining radii around the Z axis.

Unit Modes

All size and location commands will be in inches until changed.

Learn more about the G20 code

All size and location commands will be in millimeters until changed.

Learn more about the G21 code

Compensation Codes

Turns off any cutter compensation modes (G41 or G42). 

Learn more about the G40 code

Shifts the machine tool path to the left based on the radius of the cutting tool.

Learn more about the G41 code

Shifts the machine tool path to the right based on the radius of the cutting tool.

Learn more about the G42 code

Adjusts a tool’s location based on a specified tool height (H) offset.

Learn more about the G43 code

Turns off the tool length compensation set by a G43 or G44 command. 

Learn more about the G49 code

Work Offsets

Sets a specific location in the CNC as the zero location for the program.

Learn more about the G54 code

Sets a specific location in the CNC as the zero location for the program.

Learn more about the G55 code

Sets a specific location in the CNC as the zero location for the program.

Learn more about the G56 code

Sets a specific location in the CNC as the zero location for the program.

Learn more about the G57 code

Sets a specific location in the CNC as the zero location for the program.

Learn more about the G58 code

Sets a specific location in the CNC as the zero location for the program.

Learn more about the G59 code

Canned Cycles

Peck drill a hole by repeatedly drilling, then retracting a small amount, then drilling deeper. Often used to break up chips when drilling.

Learn more about the G73 code

A tapping cycle for left-hand or reverse threads. The spindle must be running in reverse during this cycle. The machine will feed to the bottom of the hole and then reverse the spindle direction and back out of the hole.

Learn more about the G74 code

G76 CNC G Code

G76 - Fine Boring Canned Cycle

Bores a hole then stops the spindle, retracts the tool from the surface and rapid retracts the tool out of the hole.

Drills a hole then rapid retracts out of the hole.

Learn more about the G81 code

Drills a hole, dwells at the bottom of the hole for a set amount of time and then rapid retracts out of the hole.

Learn more about the G82 code

The machine will drill in pecks while rapid retracting out of the hole between each peck to help clear chips from the drill.

Learn more about the G83 code

The standard tapping cycle with the spindle running clockwise. The CNC will feed to the bottom of the hole and then reverse the spindle direction and back out of the hole.

Learn more about the G84 code

The machine will feed to the bottom of the hole and then rapid retract out. 

Learn more about the G85 code

The machine will feed to the bottom of the hole and then rapid retract out. The tool is not pulled away from the surface which can leave a tool mark on the hole.

Learn more about the G86 code

G87 CNC G Code

G87 - Back Boring Cycle

Bores a hole from bottom to top. This is the reverse direction of the G86 code.

G88 CNC G Code

G88 - Boring Cycle with Dwell

Bores a hole and then dwells at the bottom for a set amount of time.

G89 CNC G Code

G89 - Back Boring Cycle with Dwell

The machine will feed to the bottom of the hole, pause for a set amount of time and then rapid retract out. The tool is not pulled away from the surface which can leave a tool mark on the hole.

Cancel Codes

G50 CNC G Code

G50 - Cancel Scaling

Turns off scaling mode.

Cancels any active canned cycles for drilling, boring, tapping, etc.

Learn more about the G80 code

Positioning Modes

All movement locations are relative to a fixed zero such as the work offset (G54, G55, etc.) or machine home location.

Learn more about the G90 code

All movement locations are relative to the machine’s current position.

Learn more about the G91 code

Speeds and Feeds

G94 CNC G Code

G94 - Feed per Minute Mode

Sets the feed rate to units (inches/mm) per minute. The tool will move at a set rate.

G95 CNC G Code

G95 - Feed per Revolution Mode

Sets the feed rate to units (mm/inches) per revolution. The tool will move a set rate for every spindle rotation.

G96 CNC G Code

G96 - Constant Surface Speed

The spindle speed will vary to maintain the same surface speed of the material.

G97 CNC G Code

G97 - Constant Spindle Speed

The spindle will operate at a consistent RPM.

Plane Return

After a canned cycle the tool will retract to the start of the canned cycle.

Learn more about the G98 code

After a canned cycle the tool will retract to a specified location. Can be useful for avoiding workholding fixtures.

Learn more about the G99 code

Lesser Used G Codes

G09 CNC G Code

G09 - Exact Stop Check (Non-modal)

Causes the machine to come to a stop after each command. Useful for making sharp corners. It causes the machine to stop after executing the current line.

G10 CNC G Code

G10 - Programmed Offset Input

Adjusts offset values. Can change work offset, tool length offset and/or cutter compensation offsets.

G22 CNC G Code

G22 - Stored Stroke Limit

Turns on a set safety zone that will cause the machine to alarm out if it enters.

G23 CNC G Code

G23 - Stored Stroke Limit Cancel

Turns off the stored safety zone.

G27 CNC G Code

G27 - Zero Return Check

Rarely used. This command checks to see that the machine has moved to the zero return position.

The machine will move to a specified location and then to the zero return (home) position.

Learn more about the G28 code

G29 CNC G Code

G29 - Return From Reference Position

The machine will move to the position referenced in the last G28 command. It will then move to the location referenced with the G29 command.

G30 CNC G Code

G30 - Second Position Zero Return

Similar to G28 the machine will move to a specified location and then will move to a secondary reference point in the machine such as a tool changer location.

G31 CNC G Code

G31 - Skip Function

Often used with probing, it is used to move the probe until it hits an object.

G44 CNC G Code

G44 - Negative Tool Length Compensation

Rarely used. Adjusts a tool’s location based on a specified height (H) offset in the opposite of the normal direction.

G45 CNC G Code

G45 - Single Offset Increase

Rarely used.

G46 CNC G Code

G46 - Single Offset Decrease

Rarely used. 

G47 CNC G Code

G47 - Double Offset Increase

Rarely used.

G48 CNC G Code

G48 - Double Offset Decrease

Rarely used.

G51 CNC G Code

G51 - Scaling

Scales the machined part size by a scaling factor.

Scaling factors >1 make it bigger. Scaling factors <1 make it smaller.

G52 CNC G Code

G52 - Temporarily Shift Program Zero

Shifts the program zero location based on a location specified with the command.

G53 CNC G Code

G53 - Return to Machine Zero Position

Rapid moves the CNC to the machine reference position.

G60 CNC G Code

G60 - Single Direction Move

Forces the machine to approach each XY location from the same direction. Helps eliminate location errors caused by machine backlash.

G61 CNC G Code

G61 - Exact Stop Check (Modal)

The machine will come to a stop after each line of code. 

G64 CNC G Code

G64 - Normal Cutting Mode

Cancels both G60 and G61 modes.

G65 CNC G Code

G65 - Custom Macro Call

A macro is similar to a subprogram but it allows you to use variables in the program.

G66 CNC G Code

G66 - Custom Macro Modal Call

Makes the machine call a macro, similar to G65, with every new location given until turned off.

G67 CNC G Code

G67 - Cancel Custom Macro
Modal Call

Cancels any active custom macro modal calls.

G68 CNC G Code

G68 - Coordinate Rotation Mode

Rotates the machine coordinates at a given angle around a specified location.

G69 CNC G Code

G69 - Cancel Coordinate Rotation Mode

Turns off coordinate rotation mode.

G92 CNC G Code

G92 - Program a Work Offset

Sets a work offset based on a specific location in the machine.

Frequently asked questions

How many G codes are there?

We listed 70 G codes in our list alone but in reality there are many more. 

Some will have different meanings on lathes vs mills. Also, different CNC controller manufacturers will include their own special codes. For example, some will have codes such as G103 or they will switch the meaning of a code.

You should always know how your individual machine will react to a specific code. 

What other types of codes are used in CNC programming?

There are numerous codes other than G codes used in CNC programming. 

There are codes for locations, speeds, feeds and machine operations among others. For the most common codes, review our posts on CNC codes and M codes.

Who needs to know G code?

Anyone who works with a CNC machine would benefit from understanding G code. 

While it may not be a requirement for their job depending on where they work, these positions would benefit from understanding G codes:

Is learning G code hard?

Learning G code can be a daunting task when there are so many codes to understand. 

While it is true that there are a lot of codes that can be used, you should know that most shops will only use a small selection of codes which cuts down the number you need to understand before you are up to speed.

Don’t be overwhelmed. Figure out which codes are the most commonly used ones and start your learning there.

How to Learn CNC Programming [Best Resources]

What is CNC programming?

CNC programming is the process of creating and running a program consisting of G code in a CNC machine to move the machine and control its functions.  

There are a large range of CNC machine types available, from industrial mills and lathes to home machines such as 3d printers, laser engravers and CNC routers.

All of these CNC machines use the same G code language to control the machine.

How difficult is it to learn CNC programming?

Learning basic CNC programming is fairly easy. It involves learning how the CNC machine will react to a series of codes. Most of the codes are easy to remember with a little practice (F for feedrate, S for spindle speed) and for any of the harder to remember codes, cheat sheet type references are usually not too far away.

Learning advanced CNC programming will take more time. Practice and repetition help, as does attending local training programs or completing an online training course.

When learning CNC programming expect to apply math skills, learn to read manufacturing blueprints and work with specialized computer programs.

What are the steps involved in CNC programming?

infographic that shows three steps to making a cnc program

Plan the program

The first step in CNC programming is planning out your program. In this step you will choose the machine and tools that will use to make your part. The operations to create the part (shape part, drill hole, mill slot, etc.) as well as the order of those steps will be determined.

Write the program

Now that you know what you will use to make the part (machine and tools) and how you will make the part (the order of operations), the program can be written.

When writing the program, you will create code either by hand or with the help of software to create the instructions for the machine to run.

In this step, documentation is usually created that lists any special requirements for running the program such as the tooling to be used, offset information, and fixturing information.

Setup the CNC machine

The role of the CNC programmer will sometimes end once the program is written and documented. However, in many machine shops programmers are also responsible for setting up and/or operating the machines too.

Setting the CNC machine up will involve loading the correct tools, setting offsets, loading the program and running a first piece to verify everything is running as planned.

Types of CNC programming

Manual programming

Manual programming is when the programmer creates the G code by hand. This involves controlling all of the machine’s functions and movements through the use of code.

Manual programming of CNC programs is usually only done with very simple programs.

Conversational programming

Conversational programming involves giving the machine specific parameters or dimensions that are required and the CNC machine generates the code for you based on the input.

Conversational programming is a middle point between manual programming and programming with CAD/CAM systems. Conversational programming simplifies the programming of features that may be difficult to program manually.

Conversational programming can allow quicker programming times when compared to CAD/CAM programming options. It also generally requires far less training than what is required to work with CAD/CAM packages.

Programming with CAD/CAM

two computer monitors with CAD-CAM software running
Example CAD/CAM software

The majority of CNC programming today is done with the use of various computer aided drafting (CAD) and computer aided manufacturing (CAM) software packages. These software programs allow the creation of long, complex CNC programs with much less work when compared to manual or conversational programming.

CAD/CAM programs are capable of programming things that wouldn’t be possible with manual or conversational programming. There are many different CAD/CAM software programs available with some of the most common being AutoCAD, Fusion 360, SolidWorks, Mastercam & EDGECAM.

How to start learning CNC programming

Local college/training

One of the best ways to start learning CNC machining is to look for local education resources such as colleges, community colleges, training programs and your state’s manufacturing extension partnership (MEP).

These resources often provide unequaled instruction and hands on use of equipment.

In some areas, companies have created their own training programs which they operate to help educate their local workforce.

Self-guided training

If you don’t have local training options available, there are a large number of resources that allow you to learn CNC machining and programming on your own schedule.

YouTube has a wealth of informative instructional videos and there is an abundance of information available on other online resources such as MachinistGuides.com.

We recommend reviewing our list of the Best CNC and Machining Books to find the best reference material available.

Learning on your own can be daunting, especially when you don’t know where to start. For this reason, we have put together A Roadmap to Learn CNC Programming to help guide you and make sure you focus on the important stuff first.

Online training

For those looking for a more structured approach, there are online CNC training resources and courses available such as GCodeTutor.

The biggest benefit of online training is that it allows you to work at your own pace. The best online training programs will have help resources available as well as quizzes and projects to test your knowledge.

Types of CNC machines

CNC machines used to be extremely expensive machines that only large companies were capable of purchasing.

In recent years, the cost of CNC machines has come down quite a bit. Large scale industrial machines are still available, but they are accompanied by a new generation of machines aimed at hobbyists and makers.

Home/hobbyist machines

cnc wood router
CNC router
  • CNC routers
  • CNC plasma cutters
  • CNC laser engravers
  • 3d printers

Industrial level machines

a cnc mill with multiple fixtures and coolant lines
Industrial CNC
  • Mills
  • Lathes
  • Electrical discharge machines (EDM)

Frequently asked questions

Do you need a degree to get a job in CNC programming?

No degree is needed to become a CNC programmer, although previous training or certifications are looked at very favorably by employers.

Many employers are willing to provide on the job training to teach new employees the skills needed to perform the job.

How long does it take to learn CNC programming?

The basics of CNC programming can be learned in a short amount of time.  Learning the basics will only take a few short months.

However, CNC programming is a wide field, and it will take much longer to have a solid understanding of everything that goes into CNC programming.

To become a highly skilled CNC programmer will likely take years. Training programs vary in length from 1-4 years on average. In addition, hands on experience will be needed to truly become a master of the craft. Certainly, anyone who applies themselves and works hard to learn will shorten that timeframe considerably especially when working in a good training program.

Is CNC programming a good career?

CNC programming is a great potential career. There is a high level of demand for skilled CNC workers across the globe. Many experienced CNC programmers and machinists are expected to retire in the coming years and a lower rate of younger workers entering the field has created a high demand for skilled CNC workers.

The demand for skilled CNC workers is so large that many in the CNC industry refer to it as “the skills gap”.

This skills gap has created a good opportunity for anyone seeking a well-paying job in the industry.

What is the salary for a CNC programmer?

According to GlassDoor.com, the average CNC programmer makes about $85,000 per year.

That comes out to about $40 an hour.

CNC programming is similar to other skilled trade jobs and can pay quite well without the need for a college degree. Getting training or certifications will help improve your chances of landing that well-paying position.

What skills does a CNC programmer need?

Because most CNC programming positions require the use of specialized CAD/CAM software, the best programmers have solid computer skills.

CNC programming positions often require math skills as well. Trigonometry, geometry and algebra are all commonly used when programming. Often the computer software will perform the necessary calculations but there are many times where calculations must be verified by hand.

Luckily, most of the math skills only use a limited number of formulas. To get a better idea of the type of math skills involved, check out our Beginner’s Guide to Machine Shop Math.

What other jobs take similar skills to CNC programming?

CNC and machine operators are the closest related job to CNC programming. Often, operators are the ones who will be running the CNC programs.

It is quite common for operators to gain some experience in their machine shop and work their way up to a position in CNC programming.

CNC and machine operator positions are typically much less demanding when it comes to computer and math skills and are a great starting point for anyone interested in learning CNC machining.

Beginner’s Guide to Machine Shop Math

title image that shows a triangle drawn on a paper with pencil next to it

How important is math when working in a machine shop?

Math is something that anyone working in a machine shop will use on a daily basis.

The good news is that everything you need to know can be learned on the job and it isn’t too difficult.

Basic middle school level math skills can take you quite far with machining.

Find out which math skills are the most important and how to do them.

What type of math is used in machining?

a speech bubble that shows how machinists speak
Say what?

First, I want to point out that learning to speak like a machinist isn’t a math skill necessarily, but it is a skill that anyone working in a machine shop will need to have to do math in the shop.

Our guide to learning how to talk like a machinist teaches you the differences between machining terms such as “thou” or “tenth” and how they compare to normal math terms you may have already learned.

Now on to the real math!

Easy math skills

The math skills needed by a machinist are pretty simple, with a few exceptions. Luckily, a good calculator and a cheat sheet of common formulas (like the one provided below) will make almost all the math used in a machine shop easy enough for just about anyone to solve.

1+1=? written on chalkboard
The easy stuff really is this easy

A large portion of the math you will need to do when machining is working with decimals. If you can do the following operations while working with decimals, you will have a solid start to learning machine shop math:

  • Addition
  • Subtraction
  • Multiplication
  • Division

Addition and subtraction are regularly used to calculate the top and bottom of your part tolerance.

Multiplication and division are used to convert between units such as taking a metric value and converting it into inches.

This is easy stuff to do with a calculator, which you should have by the way.

Speaking of calculators, I recommend going with an actual calculator and not just using your phone. You will look much more professional using an actual calculator. It won’t matter if you are using your smartphone for calculating setups and offsets, people are going to assume you are watching cat videos.

There are some good, specialized calculators for machining, but a cheap Texas Instruments calculator will do everything you need it to.

Unless you know you want a calculator with special functions for machining, it’s best to start out with something like a TI-30 series calculator.

One last easy one that helps is knowing how to calculate the decimal equivalent of various fractions. Again, this is simple to do with a calculator. Quick reference cheat sheets work well also.

Harder math skills

On to the fun stuff! 

I say that jokingly because I know that many are scared to even say these words:

  • Trigonometry
  • Geometry
  • Algebra

But they really aren’t that bad, especially because there are so many resources available to make them easier.

Take for example trigonometry.

Trigonometry is math for working with triangles. Sure, some people will use it frequently working in a machine shop, but there are tons of online calculators that basically make it a no brainer. And to top it off, you will only really use a handful of formulas anyways.

Geometry is no different than trig. Knowing where to find the formula or an online calculator is half the battle.

Most shops will have a trusty reference book such as Machinery’s Handbook or another good machining textbook available with all the formulas you will need. If not, luckily Google will usually turn up anything you need pretty quick.

You'll use the same formulas over and over so just keep practicing

Algebra is probably the most difficult math you will work with if you aren’t very good at math. A little bit of rearranging equations goes a long way.

And honestly, even if you will never be good at algebra, you can go pretty far in the machine trade.

There are multiple online algebra calculators/solvers to help you solve those equations without breaking a sweat. What did we do before the internet?

Lastly, statistics gets used in manufacturing, but in most instances this is something left to higher level engineers and/or management. It’s not something that anyone just starting out in a machine shop should be worried about.

What can you use to make machine shop math easier?

I touched on it earlier, but skip the slide rule and get a good calculator!

After that, bookmark some handy references whether they are online or in an actual book.

Lastly, just practice. The more you use the types of math that get used in a machine shop, the better you will get. 

Bookmark the best resources and practice to master machine shop math.

If you want the easy button instead…

Focus on the most important stuff first.

You need to know how to do a limited number of calculations.

Hit the “easy button” for Machine Shop Math and find out what you really need to know.

Don't overthink it, take the easy route

Other resources

Common machining formulas

Speeds and feeds formulas – Make sure you don’t mix inches and mm! Always stay in the same units

  • Feed rate (inches per minute) = RPM x feed per tooth x number of teeth/flutes in cutter
  • Surface feet per minute = RPM x diameter of cutter / 3.82
  • RPM = surface feet per minute x 3.82 / diameter of cutter
  • Inches per Tooth = inches per minute / RPM / number of teeth/flutes in cutter


Conversion formulas

  • Inches = mm / 25.4
  • MM = inches x 25.4
  • Diameter = radius x 2
  • Radius = diameter / 2

Best online calculators for machine shop math

Where to Sell Your CNC Projects

person on phone in front of map with pins in it and text that reads best places to sell you cnc projects

Who doesn’t like to earn a little extra dough?

Whether you have a CNC router, laser engraver or plasma cutter, selling your projects locally or online can bring in a pretty penny.

But where is the best place to sell those cool creations?

We picked the best spots to set up shop and turn a tidy profit with tips to help you make the most of each marketplace.

Fire up the CNC, it’s time to make some money!

Best Places to Sell Your CNC Projects

You can sell your products both locally and on the internet. Billions of people buy and sell goods online thanks to the widespread internet access. Here are some of the places you should explore:

Facebook Marketplace

hand holding a phone that shows the facebook login page

Facebook Marketplace is one of the best and easiest ways to market your CNC projects to a local audience for free.

Through the marketplace, people can browse through your product portfolio and message or call you with offers. Getting started is super easy, especially if you’re already a Facebook user. You can use your personal account or create one for your business.

All you need are a couple nice pictures of your CNC projects, a thorough description of the products, their conditions (new), price, and where willing buyers can pick them from.

The pictures are very important because they are what will help get people to share and tag others on your listing. Spend a little time getting good pictures.

Locally, it is best to meet buyers face to face and cash is always best. You can sell and ship products through Facebook Marketplace, but Facebook charges a 5% fee.

Tip: Be careful accepting some forms of payment such as PayPal or Venmo. People have been known to dispute transactions leaving sellers without their payment or their product.

Craigslist

Craigslist has been around since 1995 and is still one of the most popular online marketplaces to sell all sorts of items. This makes it a great place to sell your CNC projects and best of all there is not cost for selling.

It has taken a hit in popularity since the introduction of Facebook Marketplace, but plenty of buyers and sellers still use the site.

Creating a Craigslist ad is so simple that you don’t even need a Craigslist account.

How to list your CNC projects on Craigslist

  • Go to the Craigslist website and set it to your current city or area
  • Click on the ‘Create a Posting’ link
  • Answer ‘what type of posting is this’. In your case select ‘ for sale by owner’
  • Select your item category. For you that would be ‘furniture by owner’ or ‘arts & craft’
  • Write a clear and precise product description. Add price. Provide your contact information. Add mode of payment. Always prefer cash transactions. Meeting your customers face to face is safer.
  • Upload photos of your project and publish your ad.
the new york craigslist home page

Once posted you will simply need to monitor your email for interested buyers.

Craigslist is a great zero fee option for selling CNC products online locally.

Craft Fairs

Craft fairs or craft shows are local craft events organized for artists to showcase and sell their products. Craft fairs are a superb way to show off your brand to the locals and hopefully make some sales while you’re at it.

CNC products can get a lot of attention at craft fairs because often there isn’t much competition. Many of the other vendors at the show will be focused on things such as jewelry, knitting and painting.

Get your products to stand out and put yourself out there and you can make sales even after the fair is over. Craft shows allow you to bring your CNC projects to the masses, network with peers, and acquire a new set of skills and techniques.

Most craft fairs and shows will charge a fee to display your wares. They can range from $10 to hundreds of dollars, it varies a lot by event. Bigger venues with more traffic are going to be more costly to attend but they also have the potential for much larger sales.

Some tips for selling at craft fairs:

  • Make sure that you’re adequately prepared before the show
  • Be friendly with your potential customers. Friendly conversation is a great way to generate sales.
  • Showcase your best work so more people come visit your booth or table.
  • Pricing your products correctly can be tricky, but don’t undercut yourself. Make sure you are turning a profit and account for your time as well.
  • Keep track of what sells. Keeping good records will help you plan for future events.
  • Hand out your business cards to increase your brand awareness.

Flea Markets

various things for sale at a flea market

Flea market are an outdoor street market where organizers rent spaces to vendors to sell their products. Some events will be indoors, but most flea markets are done outside in the warmer months.

Vendors commonly sell secondhand or used products at flea markets, but this doesn’t mean your unique brand-new CNC creations can’t be sold. You can make a pretty penny selling your CNC projects at flea markets the same way you would at craft shows.

Flea markets tend to have lower space rental fees which can increase your overall profits.

Many flea markets are temporary and open mainly in the summer late spring to early fall depending on your local climate. Some of the larger markets will be open year-round.

Renting a space in a flea markets will vary in cost much like craft fairs but can be anywhere between $10 to a couple hundred.

Tip: Check local newspapers and Facebook groups to find nearby markets to sell your wares and don’t be afraid to ask your friends and family if they have visited any that were particularly busy.

Craft Stores

Craft stores can be an interesting and extremely profitable proposition if done right.

The first step is finding a good craft store. A quick Google of “craft stores near me” may do the trick. Another good way to find the best craft stores to sell your projects is by talking to other sellers at events. This is only one of the reasons why networking with other makers is helpful.

Not all craft stores are created equal. They vary in the type and amount of fees they charge as well as their rules. Some may be strict on keeping your product stocked and others might not allow you to setup shop if someone else is already selling similar products there.

All this means you need to put some boots on the ground and get out there and check some local shops out. The best ones are close to you for easy stocking or not far from your normal commute.

Don’t be afraid to ask shop owners for suggestions to increase your sales. They see firsthand what people want and it will be best to stay on their good side after all.

Our best tip is to try out multiple craft stores over time and find out which ones work best for you and your product. Different locales will have varying tastes that may or may not cater to your specific product. Find your target market.

Yard Sales

yard sale sign on a mailbox with people browsing in the background

Think of it like a pop-up craft store and a good excuse to get rid of some stuff you don’t need at the same time. A good old fashion garage sale can be an excellent opportunity to kick start your side hustle.

Even better if you are near an area that gets a decent amount of traffic. If possible put up signs to advertise that are easy to read at a distance. Some towns or cities even hold town wide yard sales which brings even more traffic and potential customers in.

Make sure you price everything ahead of time and expect people to negotiate. Seriously, people can be brutal. I once saw an old lady offer a dime for a $10 item. And it sold! Don’t be afraid to stand firm on your prices as they won’t be normal yard sale fare but giving in a little is likely to improve your overall sales numbers.

Special events

people browsing tents at a special event

Local festivals, fairs, and events offer valuable opportunities to sell your CNC projects. Often people are in a happy mood and ready to buy more than they usually would.

What might seem like a small town event can be huge for the local community and bring out a large portion of the population. More eyes on your products means more potential customers.

Fees to set up shop at these types of events tends to be low so take advantage and make a killing even if the event is only once per year.

Some sample events to look for that usually have vendor spots available:

  • State, county and local fairs
  • Holiday events such as Halloween and 4th of July
  • Farmers markets
  • Chili cook offs
  • Food truck festivals
  • Music festivals

Etsy

Laptop computer displaying logo of Etsy

Etsy is a popular global marketplace for artisans with nearly 82 million monthly active users. The platform is dedicated to sellers and buyers of “handmade, vintage, custom, and unique” products.

This platform is crawling with buyers who are willing to splurge on unique items on sale. Don’t expect cookie cutter type products to do well here.

Your best bet to gain customers on Etsy is to highly customize your art to make sure nothing like it exists on the platform or any other place. When done correctly, sellers can often get top dollar for their products.

The best products on Etsy are unique. Etsy is a great market to sell products that cater to a specific audience. Custom board game tiles, 3d topographic maps of specific locales and personalized products of all kinds are just some examples of the types of things sold on Etsy.

Having the right product to list might not be simple but creating an Etsy account is super easy:

  • On the Etsy, landing page click the ‘Sell on Etsy’ link
  • Edit your shop’s settings including language, location, and your preferred currency among other customizations
  • Add a creative name that communicates your brand to potential buyers
  • List your products with titles, descriptions, photos, prices and how much inventory you have
  • Add shipping information for your products. Include the shipping fee, where the product is being shipped from, the time it will take to process the order and the weight of the product, and size.
  • Add a payment method. Most electronic payment methods including PayPal are accepted on Etsy. Select your preferred payment method.

Etsy charges a transaction fee of 6.5% for every product sold on its platform.

EBay

magnifying glass looking at ebay website

EBay is huge player in the ecommerce industry. Recent statistics show that EBay is used by nearly 35% of all active US mobile users. That’s a huge group of potential buyers.

EBay also has the potential to open your side hustle up to a global market giving you limitless possibilities.

You can list your item for sale as either a standard bidding auction or for a buy it now price. Buy it now prices tend to work best if you will be consistently offering the same products.

One of the best things about using EBay is how easy it is to set up a listing. Typical EBay listings requires a photo, product description, price, payment method, and shipping information.

EBay does a great job of integrating shipping and keeping the overall shipping cost low which helps drive more sales.

EBay takes a percentage of nearly every sale, ranging from 1.5% and 15%.

Amazon

Amazon logotype printed on cardboard box

Everyone knows Amazon. Over 197 million people around the world visit Amazon.com every month, making it by far, the most popular ecommerce site worldwide.

You can monetize most of your CNC project ideas on Amazon under their different categories and go about creating unique products for the worldwide market.

Furniture, arts & craft, ornaments, customized signs, and personalized nameplates, among others, can sell pretty quickly on Amazon.

Setting up an Amazon listing is simple but you should take care to accurately list your products to make sure that customers get what is expected.

To create a listing you will need to:

  • Adding your product title
  • Uploading high-quality images
  • List any variations of your products i.e. color, measurements, material, et al
  • Create a detailed description of the item including a bulleted summary of the most important features

You may sell your products on your Amazon customer account or create a seller’s account.

Amazon takes a cut of between 6% and 15% of every sale made on the platform. The percentage can go to as high as 45% for Amazon devices accessories.

While the platform is huge. You need to be ready for the potential demand. Because of this, it is best to make sure you have your business running smoothly before selling on Amazon.

Things to consider as a seller

Identifying where you can sell your CNC projects solves only a part of the puzzle. The other equally important part is getting the item ready for sale and shipping.  Even after finding the ideal outlet for your products, there are a couple of things you need to consider when selling. They include:

Project materials and supplies

CNC projects can be created on wood, plastic, light metals (aluminum, brass, and copper), and acrylics among others. You will want to create your projects on high quality materials, but make sure you don’t overpay because buyers like a good bargain as well.

Packaging

First impressions are important. Besides its main job of protecting your product from damage during shipment, the packaging is the first introduction the customer has to your brand.

Make it memorable. This can mean custom printed labels or laser engraved packaging but no matter which way you go try to stand out.

And toss a few business cards in the box. Happy customers are often willing to spread the word of your quality work. Make it easy for them.

Including a card or code that offers 5 or 10% off another purchase can also be a great way to keep the customers you already have coming back for more.

Shipping

Shipping can be costly and makes selling your products a little more complicated. This is why it is a great idea to start locally and work your way up to online only marketplaces.

Pay close attention to the sizes and weights of your products because they can make big changes in your shipping cost which can end up hurting your bottom line.

Warranties and returns

What happens when a product is faulty when it reaches the buyer? Can you refund their money or send them a replacement quickly?

It is bound to happen eventually when you start your own business. Make sure you are prepared for it to happen and act quickly. Quality customer service can make or break the customers opinion of your brand.

Make sure you clearly list your warranty and return policies because you will be expected to follow them and customers take them into account when making purchasing decisions. 

That’s plenty of ideas and tips about where to sell your projects, but what if you don’t know what to build?

Then check out our guide to the Best CNC Projects That Really Sell to kickstart your imagination.

Beginner’s Guide to CNC Router Bits

a selection of various cnc router bits in a tray

Besides your CNC machine itself, the next most important part of machining is the router bit.

Different bits make different cuts and have different jobs, and if you’re new to machining, navigating bits can be confusing. From the bare-bones essential bits for machining to the more specialized bits that you’ll use rarely, there’s a lot of information around bits that can confuse even the most seasoned machinists.

To clear things up, we’ve made what we hope is a handy guide to walk you through everything you need to know about bits while you’re getting started as a machinist.

While we don’t claim this article is comprehensive, we do think that when you’re done reading, you’ll be a lot more knowledgeable about bits than when you started.

Essential bits

These are the bits to get started with. They will get the most use. As a result, they should be the first ones that you upgrade to better bits.

End mill

closeup of cnc router end mill with features pointed out

End mills are side-cutting tools, meaning they’re meant to cut flat bottoms.

They can cut a square slot or profile with a square corner, and you can also use them for contouring and reaming.

You’ll be able to distinguish an end mill by the flat bottom on the end of the bit.

V-bit

closeup of whiteside v router bit
V-bit from Whiteside

V-bits are – you guessed it – shaped like a “V.” Producing a V-shaped cut, these bits are great for engraving, lettering, detailed designs, and signs.

You’ll typically use V-bits to add your special style or artistic design to projects.

V-bits come in all different sizes and angles. The smaller the angle, the more narrow the cut.

Ball nose end mill

closeup of ball nose end mill with features pointed out

A ball nose bit is basically the same thing as an end mill, except the end is a ball. This will give you a rounded contour around the edges of your cut.

You may also occasionally use a ball nose bit in lettering, but they are not as common as v-bits.

V-bits will allow you to create sharp-cornered letters, while ball nose bits will give you softer, rounded letters.

Surfacing bit

closeup of cnc surfacing bit

Surfacing bits are basically just big end mills.

You’ll use a surfacing bit to remove large amounts of material at once, like if you’re smoothing out your spoil board.

You can also use a surfacing bit to condition a bad piece of wood or otherwise smooth out the surface of the wood if it isn’t perfectly straight. This is very similar to planing a piece of wood.

Specialty bits

These specialty bits may not be necessary for CNC machining, but they’re nice to have handy.

Definitely don’t purchase any of these bits until you have the four essential ones above. But, once you have some experience under your belt, you can try a couple of these out to get more creative with your projects.

Carving bit

a cnc router with a carving bit installed

Carving bits are for any of you that want to make 2.5D or 3D projects. They allow you to make a lot of fine detail.

Some of the most amazing projects will use these bits. It will definitely be best to get some practice with not only your machine but also the software you are using as well before jumping into working with these bits.

You don’t want to be busting bits while you are still learning. Because of this, it is a good idea to start out with some cheaper practice bits while learning how to carve with your CNC.

T slot cutters

T Slot cutters are pretty simple: they’re made for cutting out slots on the back of a sign so you can hang it on a wall.

Signs of all sorts are common projects for anyone operating a CNC router. If you find yourself making plenty of signs, wall art or similar wall hangings then this bit will be an essential add to your tool box.

Bowl cutters

closeup of bowl cutter bit

Imagine if a ball nose bit and a surfacing bit had a baby – that’s what bowl cutters are for. They will cut the same rounded shape as a ball nose. However, the bottom is wider and flatter than a ball nose because this bit is meant to remove a lot of material, like a surfacing bit.

These cutters are excellent for removing larger amounts of material or “hogging” out the material.

Engraving bit

Engraving bits are most often used to etch designs into glass, wood, acrylic, or metal.

The interesting thing about an engraving bit is that it’s a “drag” bit. This means the spindle isn’t actually turned on while the bit is in use. Instead, the bit just drags across the surface to engrave.

Cutting flutes

The spiral-shaped cutting edges on the sides of an end mill are called flutes. Generally, there are 2 flutes on CNC router bits, though there can be more. The more flutes there are, the better the finish you’ll get.

One misconception is that the more flutes you have, the faster you can feed material. Yes, extra flutes mean that you remove more material per spin, but it’s common for people to increase the speed too much and overload the tool.

In reality, you should slow things down when you have more flutes to avoid any overloading. So, while you’ll cut more material per spin with 5 flutes, the lower spin rate may mean that using fewer flutes is more efficient since you can cut faster with 2 flutes than you can with 5.

If you’re relatively new to machining, 2 flutes should be enough.

Types of flutes

Some of the stuff in this section is going to get pretty technical. While we’ll try our best to explain how the different flutes cut material, we also recommend watching a tutorial video for any bit where you have confusion. 

Sometimes, it’s just easier to see a bit in action than it is to explain how the bit works.

Straight

closeup of straight flute router bit

Straight flutes give you an interrupted cut that sheers away material for the entire length of the bit. Straight bits really slap the wood and cause a great deal of vibration and chatter. These bits require a lot of force and should generally be avoided unless you need them for a specific purpose.

Bowl cutters and surfacing bits are examples of straight flutes.

Upcut (up-spiral, upbit)

closeup of upcut router bit with pros and cons listed

Upcut bits pull the chips up to remove them – the chips are “riding” up the flute. They pull the chips up towards the router or spindle.

Because the upcut is removing material out the top of the surface, the rough edge of the material you’re cutting is on top. Upcut bits have flat bottoms, which means they cut a smoother surface on the bottom.

These bits are great for drilling and plunging. They are not great for working with plywood because they will create a poor edge on the top of the wood.

Downcut (down-spiral, downbit)

closeup of whiteside downcut router bit
Downcut bit from Whiteside

Downcut bits are the reverse of the upcut bit. The material you’re removing is “pushed” downward away from the router or spindle. The rough edge, then, will be at the bottom of your material. The top edge of your material will be very clean when using a downcut bit.

Downcut bits are good for finish passes. However, you shouldn’t use downcuts for deep slots, drills or plunges. That’s because the downcut has no way of ejecting chips and debris, so it will stay stuck in the slot, or at least be very difficult to clean out.

While the downcut has a V-shaped bottom to leave room for the chips, the chips are not removed as well as a upcut bit and this can lead to heat buildup which can dull or ruin your bit.

Compression bit

closeup of yonico compression cnc router bit
Compression bit from Yonico

Compression bits are a combination of Upcut and Downcut bits. A compression bit will have an upcut for the bottom quarter or third of the bit, while the rest of the bit will be downcut. When run at full depth, the compression bit will leave clean edges on both sides of your workpiece.         

They can’t run as fast as upcut bits, but they are a nice compromise between finish edge quality and speed. They are a solid choice for working with veneered wood or plywood.

Router bit materials

When we’re talking about router bit materials, we’re really only talking about the cutting edge, as that is the most important aspect of a bit. 

carbide faced cutters vs high speed steel cutters

Carbide steel is a metal that is made with tungsten and a whole lot of carbon. The unique combination of materials, combined with how the metal is made gives this material a high tensile strength and high heat tolerance. Carbide steel also has high abrasion resistance.

In other words, carbide steel is good stuff. Naturally, it’s more expensive, but it’ll last 20-50x longer than a normal steel bit.

Compared to carbide steel, High Speed Steel bits are lower on the scale of tensile strength, heat tolerance, abrasion resistance, and price.

High speed steel is a little springy and generally has a worse finish than carbide steel. It also breaks down faster. Of course, then, high speed steel bits are cheaper.

There is nothing wrong with high speed steel bits but keep in mind that they will likely need to be changed or sharpened more often.

Router bit coatings

Coatings are chemical or metal finishes that have been bonded to the bit. Not all bits come with coatings, though it’s not at all uncommon to see coated bits.

One thing we should note is that coatings do not add strength to your bit. This is a common misconception. Coatings are intended to be heat barriers and are only a few atoms thick. To be honest, coatings are not always necessary, especially for hobbyists.

Because coatings often add expense to the bits and they aren’t needed for most users, we do not recommend them. However, if you think they are right for your application then by all means experiment and see what happens. For beginners though, we say skip them.

Black oxide bits are common and will protect against corrosion and friction. They are very similar to normal high speed steel (HSS) bits and work well for most materials.

Cobalt bits are made for greater heat resistance which works well when dealing with harder materials such as steel. These are overkill for working with soft materials such as wood and aluminum.

Tungsten carbide bits, which are generally just referred to as carbide bits, are extremely hard and heat resistant. Their hardness also makes them brittle, so you will want to use extra care when working with these bits, so they don’t chip. They can also be quite expensive.

Titanium bits are actually just high-speed steel bits that are coated with titanium nitride. This coating helps them to wear slower. This works well for heavy-duty, high-volume work. Once big downfall of titanium bits is that because they are coated and not solid titanium, they can’t be sharpened once they go dull.

All in all, we don’t really think it’s worth the additional cost for coatings. The benefits are rather minimal, especially if you’re just doing CNC as a hobby.

Router bit costs

To be honest, if you’re new to CNC, we recommend getting cheaper bits. Yes, they’ll dull faster, make lower-quality cuts, and don’t last long, but they make for good practice.

While you’re still getting a feel for machining, it’s not a bad idea to start off with cheaper bits. When you run them into your steel clamp and bust them into a million pieces, you won’t be nearly as disappointed.

Unless you forgot to wear your safety glasses. Always wear your safety glasses!

As you get better at machining, there will come a time where you should treat yourself to more expensive bits. They cut so much cleaner, and their high price is offset by the fact that they last a long time.

When you move on to the pricier bits, build up your arsenal by first starting with the essential bits we talked about earlier.

The first premium bits to get are:

  • End mills
  • V-bits
  • Ball nose end mill
  • Surfacing bit

Which router bits do you need to start with?

The essential CNC router bits

Flat Bottom End Mills:

  • ¼”
  • 1/8”
  • 1/16”

The ¼” inch bit gets used the most, followed by the 1/8” and then the 1/16”

V Groove Cutters:

  • 90 Degree
  • 60 Degree
  • 30 Degree

You’ll find other V groove bits besides these 3, but they aren’t necessary. Perhaps you’ll eventually want a 120 degree bit for larger lettering, but that’ll come down the road.

Remember the larger your V-bit angle is, the wider your lettering will be.

comparison chart that list router bit cutting angles

Ball Nose Bits

These bits are used for contouring and finer details such as when you are carving with your CNC.

Surfacing Bit

This bit is for flattening or “surfacing” your material. They work similar to a planer but they make the part flat in multiple passes.

They are also used for surfacing your spoilboard.

CNC router bits to buy later

These next few bits are nice to have but are nonessential. Hold off on purchasing these bits until you have a full set of the bits above.

Carving Bit

You have to be pretty advanced to get into carving. Carving projects have long run times, and you’ll likely need to learn a specialty program. Definitely hold off on carving until you’re ready.

Drag Bit

cnc router diamond drag bit

Unless you’re engraving metal or glass, you can hold off on buying a drag bit. They can be used to make some cool CNC projects but they only have a single use.

T Slot Cutter

These are handy if you’re making signs that you want to hang but are not a necessity.

Bowl Cutter

You won’t need this bit unless you’re contouring and removing a lot of material at once.

Practice bits and good bits

Surely you picked up on the concept, but we want to hammer home the importance of having practice bits, and sound, solid, expensive bits.

If you’re new or if you’re experimenting around, you should stick to cheap steel bits. This gives you margin for error and won’t leave you with much out of pocket when they break.

Once you’ve upgraded your skills and have a good handle on your machine, go ahead and upgrade your bits. But even if you’re confident in yourself, it never hurts to have some spare practice bits laying around.

Frequently asked questions

I'm new to routing, what bits are the most important?

If you skipped down to the bottom of this article and wound up here, go back up to the top and take a look at the first section. There, we went over the most essential bits in machining and explained what each essential bit is for. The most important bits to own are:

  • End Mills
  • V-bits
  • Ball Nose bits
  • Surfacing bit

Do I need coating bits for CNC routing?

Honestly, we don’t think coated bits are necessary. The coating layer is usually super thin, so you don’t get much out of the coating in the first place. And, coatings can make the bit’s cut less smooth.

To top things off, you can pay a heck of a lot of money for a coated bit, yet you likely won’t notice a difference in the cut.