G85 is a canned cycle that feeds a reamer or boring tool into a hole — and feeds it back out at the same rate. That feed-in, feed-out motion is what makes it different from most other boring cycles.
Key Takeaways
- G85 feeds the tool into the hole and back out at the programmed feedrate
- Use it for reaming or finish boring — not for drilling from scratch
- The hole must be pre-drilled before running G85
- Retract at feedrate (not rapid) reduces tool marks and can improve surface finish
- Cancel with G80 when you’re done or the machine will bore at every new XY position
| G85 – At A Glance | |
|---|---|
| Function | Ream / Bore Canned Cycle |
| Format | G85 X_ Y_ Z_ R_ F_ |
| Type | Modal (Canned cycle) |
| Cancelled by | G80 |
| Used with | G98 or G99, G43 (tool length comp) |
What G85 Does
When the machine executes G85, it follows this sequence every time it hits a new hole position:
- Rapid down to the R plane (your clearance height above the part)
- Feed from the R plane down to the Z depth at your programmed feedrate
- Feed back out to the R plane at that same feedrate — no rapid retract
- If G98 is active, rapid back up to the initial point. If G99, stay at R plane.
That feed-out on step 3 is the key. Other cycles like G81 rapid back out. G85 feeds back out — which gives the tool a second light pass on the way up. For a reamer, that can clean up the finish. For boring, it helps avoid gouging the wall on retract.
G85 Code Format
G85 X2.0 Y3.0 R0.1 Z-1.0 F12.0In practice, most programs split the XY position from the cycle call:
X2.0 Y3.0
G98 G85 R0.1 Z-1.0 F12.0
Here’s what each address does in the G85 context:
- K — Number of times to repeat the cycle at the same location (rarely used for reaming)ll clear any and all obstacles including clamps, fixtures and the part itself.
- X / Y — Position of the hole center
- Z — Bottom of the bore/ream stroke (not the surface of the part — the depth you want to reach)
- R — The R plane: where the tool stops rapid and starts feeding. Set this above the part surface with enough clearance to clear clamps and fixtures.
- F — Feedrate for both the plunge and the retract
COMMON MISTAKE – Setting Z to the part surface instead of the bottom of the hole.
Why it matters: Z is the depth of the bore stroke, not where the hole starts. If your part surface is at Z0.0 and you want to ream 1.5 inches deep, Z should be Z-1.5 — not Z0.0. Getting this backwards means either not reaming deep enough or crashing through the part.
COMMON MISTAKE – Using the same feedrate for reaming that you used for drilling.
Why it matters: Reamers run at lower feedrates than drills. Running a reamer too fast removes too much material per flute and leaves a rough finish — or breaks the tool. Check your tooling manufacturer’s speeds and feeds for the material you’re cutting.
When to Use G85
Use G85 when you need one of these results:
Finishing a hole to a tight tolerance
If a drawing calls for a reamed hole — like an H7 or similar fit — G85 with a chucking reamer is how you get there. The hole needs to be pre-drilled close to final size first (typically 0.010″–0.015″ undersize for reaming, though check your tool manufacturer’s recommendation).
Smooth bore retract to protect surface finish
Some boring bar operations benefit from feeding back out rather than rapid retracting. A rapid retract can leave a small mark or scratch where the tool lifts off the bore wall. G85 avoids that by keeping the tool moving on the way out.
COMMON MISTAKE – Running G85 on a hole that hasn’t been drilled yet
Why it matters: Reamers and boring bars aren’t designed to create holes from solid material. Using G85 on solid stock will damage the tool, the part, and potentially the machine. Always drill first.
Hole Size and Setup Considerations
Pre-drill close to final size
Leave as little stock as possible for the reamer to remove — usually around 0.010″–0.015″ for smaller holes, slightly more for larger diameters. Too much stock and the reamer deflects and leaves a bad finish. Too little and it skips over the surface.
Speeds and feeds matter
Reaming is slower than drilling — typically half the RPM and a higher feed per revolution. Your tooling supplier’s spec sheet for the material you’re cutting is the right starting point. Don’t guess.
Set your R plane with room to spare
The R value is your clearance height between holes. It needs to be above any clamps, fixture plates, or part features the tool could hit while moving from hole to hole. When in doubt, go higher and use G98 to return to the initial point between holes.
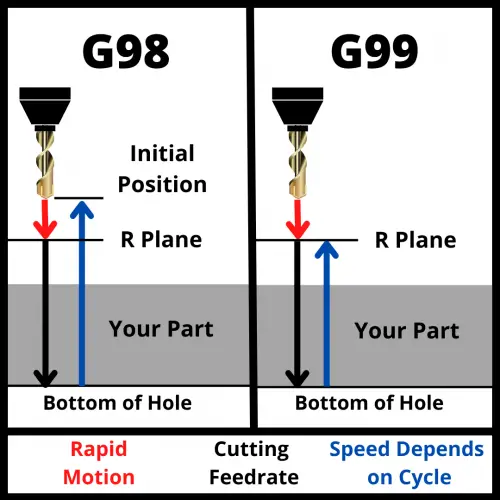
G98 vs. G99 with G85
G98 and G99 control where the tool goes after it retracts from the hole.
- G98 — After the G85 retract, the tool rapids back to the initial point (wherever Z was before the cycle started). Use this if you have clamps, tall fixtures, or part features between holes.
- G99 — After the retract, the tool stays at the R plane and moves directly to the next hole. Faster cycle time, but only safe if your R plane clears everything.
For most reaming operations, G98 is the safer default.
Canceling G85
Use G80 to cancel the G85 cycle:
G80Once G85 is active, the machine will attempt to ream at every new XY position it encounters — even ones you didn’t intend. G80 turns that off. Put it on its own line when you’re done reaming.
G85 vs. Similar Canned Cycles
G85 vs. G81
G81 is the basic drilling cycle. It rapids the tool back out after reaching depth. G85 feeds back out. If you ran G81 with a reamer, the rapid retract could scratch the bore wall. G85’s feed-out retract is the reason it exists.
G85 vs. G86
G86 also bores, but it stops the spindle before retracting. That spindle stop protects the bore wall from the cutting edge dragging across it on the way out. The tradeoff: you get a small mark where the spindle stopped, and cycle times are longer. G86 is used more for roughing. G85 is used where you need a clean finish without stopping the spindle.
All three cycles — G81, G85, and G86 — are canceled with G80.
Example Program
Here’s a simple G85 program reaming two holes:
G90 G54 G00 X1.5 Y2.0          (Rapid to first hole)
G43 H01 Z1.0                   (Tool length comp, initial point at Z1.0)
G98 G85 X1.5 Y2.0 R0.1 Z-1.25 F8.0   (Ream first hole, return to Z1.0)
X4.0 Y2.0                      (Move to second hole, ream it)
G80                             (Cancel canned cycle)
G00 Z5.0                       (Retract to safe height)
M05                             (Spindle off)
The R0.1 puts the R plane just above the part surface. The Z-1.25 is the bottom of the ream stroke. G98 sends the tool back to Z1.0 between holes, which is safe if there are fixtures in the area.
FAQs
What’s the difference between G85 and G81?
Both are canned cycles used for hole operations, but G81 rapids the tool back out after reaching depth. G85 feeds the tool back out at the programmed feedrate. For reaming, that feed-out retract is important — it keeps the reamer from scratching the bore wall on the way up.
Does G85 work for drilling?
No. G85 is designed for reaming and finish boring on holes that have already been drilled. Using it to drill from solid material will damage the reamer and likely the workpiece. Use G81 or G83 for drilling.
What feedrate should I use with G85?
That depends on the tool and material. Reamers generally run at roughly half the RPM you’d use for drilling the same size hole, with a higher feed per revolution. Check your tooling manufacturer’s chart for the specific reamer diameter and material combination.
How do I cancel G85?
Use G80 on its own line after your last hole. G85 is modal, which means it stays active and will try to ream at every new XY position until you cancel it.