With the right engraving tool in your hands, you can finish creative tasks with ease.
And it’s a terrific way to personalize something generic with a fun crafty hobby.
Engraving tools come in a wide variety of styles, sizes, and capabilities. It’s important to find the ideal one at is ideal for your project.
The Customizer by Culiau is an engraving pen that is more than capable of meeting most people’s needs. That’s why it’s a popular choice among home crafters and those who like to try out new tools for art.
The Customizer’s durability, power, compactness, and exceptional value for money make it an excellent professional etching tool suitable for all materials, including glass, wood, and metals.
Don’t get me wrong, it will still take practice to get a nice, finished product, but the Customizer is easier to use than some of the other bulkier engraving pens on the market.
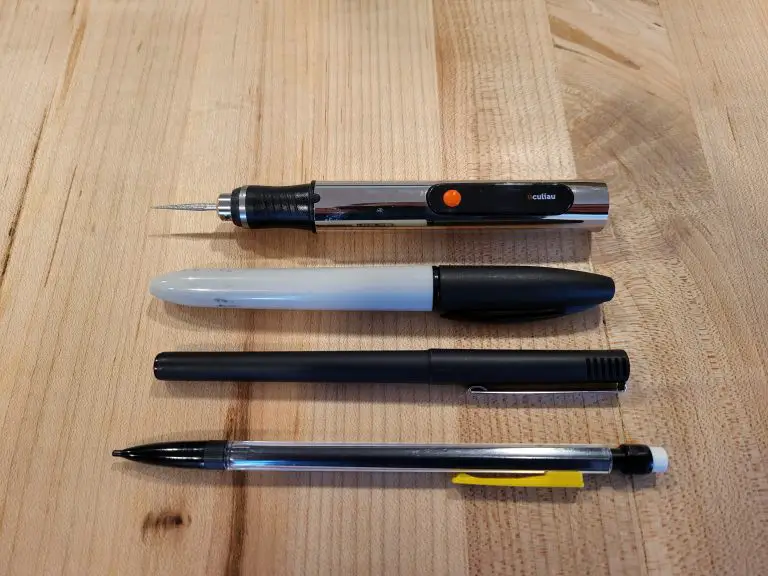
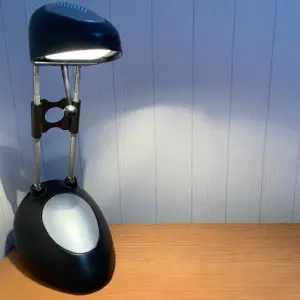
Size comparison of the Customizer
The Customizer is roughly the size of a regular marker. The textured grip and light weight make controlling the engraver while in use a snap.
You can sketch with it just like a normal pen or pencil.
The flexibility of this tool makes the job as simple as drawing on paper. It works well on wood, including hardwoods, glass, and metals such as steel, silver, and others.
The Customizer comes with a rechargeable battery and a USB charging wire. The run time is about 2 hours. And trust me 2 hours is more than enough time. Unless you are super experienced, your hand it going to get tired well before the 2 hours runs out.
Charging port and cable
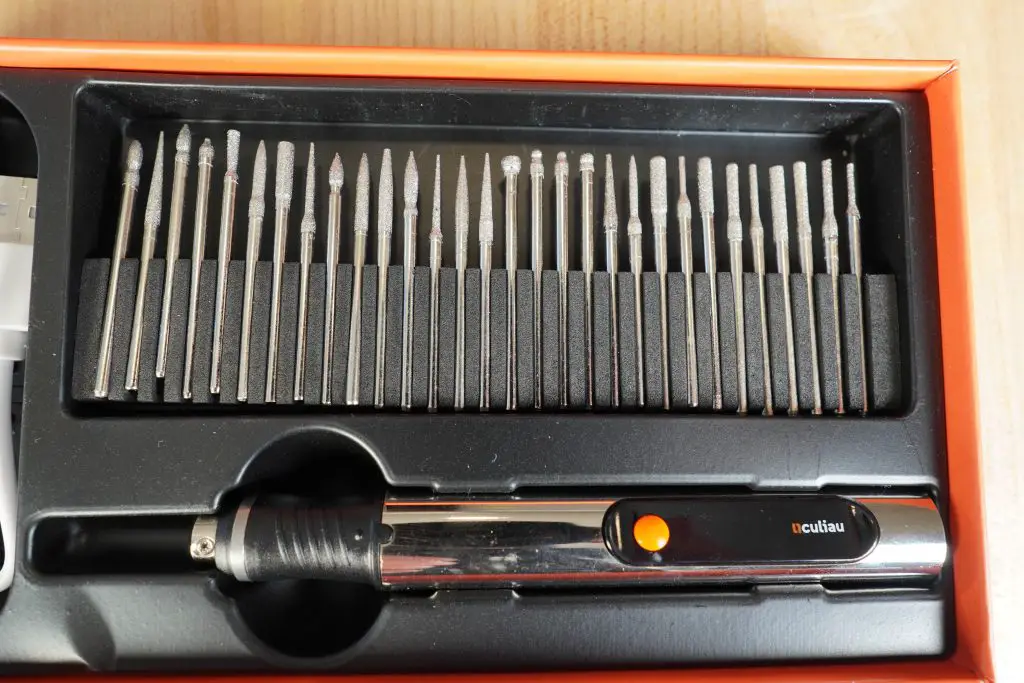
Also included is a large selection of engraving bits. They come in a variety of shapes and sizes which means you won’t need to pick up any extras for the Customizer right away.
Unless you plan to use it almost daily, there is a good chance you won’t need to get any more bits ever because the assortment that comes with the Customizer is well rounded.
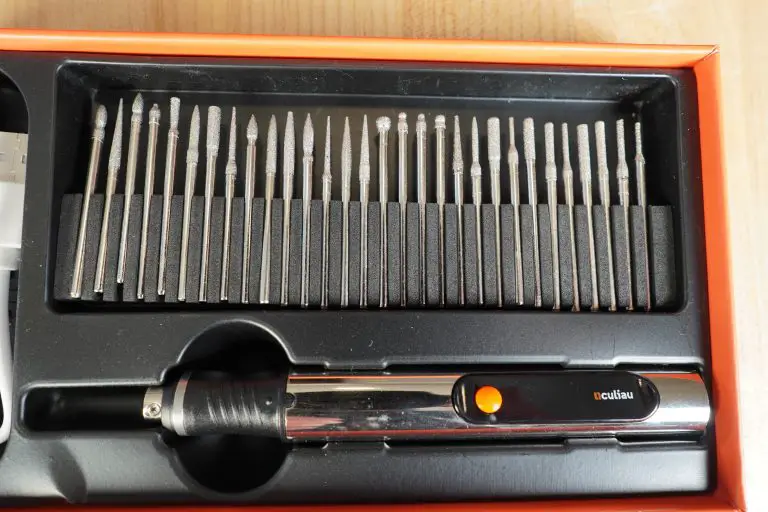
The engraving bits that come with the Customizer
The engraving pen includes an LED display indicator, which shows you the battery level and speed of the tool.
One of the biggest indicators of the quality of the Customizer is the feel of the tool. This is a well built tool that feels good in the hand.
It is ergonomic, lightweight, and small. Because of this it is exceptionally comfortable to use and handle. The Customizer truly is a pocket-sized engraving machine.
The quality comes with a price though and the Customizer does cost more than some of the other engraving pens on the market. However, many of those cheaper engraving pens aren’t built as well. Often they just don’t feel good in your hand.
If you plan to use it a lot, I recommend going the Customizer from Culiau and avoiding all the generic copycats.
Above all, make sure you think safety first with any power tool. Proper eye protection. Consider gloves and a dust mask as well depending on the materials you plan to work with.
2. Use proper lighting
Nobody’s idea of a good time is engraving in the dark – and it’s not safe or productive.
Make sure your workplace has adequate light and that it is placed above or in front of you so that your head and shoulders don’t create a shadow on the work.
Proper lighting will make it much easier to see the fine details that you are creating on your workpiece.
3. Work on a clean surface
Before you begin, be certain that the surface you will be working on has been well cleaned.
Some materials can be cleaned with soap and water, others require special cleaning chemicals. Start with soap and water, it will work for most materials.
4. Use a template
Consider making a paper template to guide you. This helps in the beginning when you may lack the courage to do it all freehand.
Print out your design to trace or outline
It’s a good reference.
5. Practice
Just try.
If you want to learn it, then use it!
Practice different words and symbols on a piece of scrap material if you have it. Your first few designs will probably be rough. .
Another key point is to make sure you practice with the type of material you plan to work with. In other words, if you want to engrave on sea shells then find some to practice on.
Frequently asked questions
What kind of material can the Customizer work with?
An engraved piece of glass
The Culiau Customizer is capable of working with a wide range of materials including:
Wood
Plastic
Metal
Glass
Leather
Stone
Shells
Clay
Does the Customizer use standard Dremel style bits?
Unfortunately, the Customizer does not take Dremel bits straight out of the box. For an added cost, you can purchase an adaptor that will allow you to use them however.
How is customer support?
In my opinion good customer support says more about the product than just about any other feature.
Culiau has excellent customer support through email. [email protected] is their address and in my experience they are quick to answer any questions you might have, even if you just need tips for using your new tool.
Micrometers are amazingly accurate measuring tools.
But for anyone just starting out it can be hard to know which ones are good and which ones are bad.
This has only gotten trickier in recent years as some of the once great manufacturers have moved their production to China and various other countries known for lesser quality. On top of that some of the Chinese manufacturers have really upped their game and are producing quality tools.
We’ll break it down for you and let you know which micrometers are best with some tips on what to avoid.
One last tip if you are very new to micrometers.
Think about what you plan to measure. What are the sizes involved? Most of the time people don’t need huge sets of micrometers.
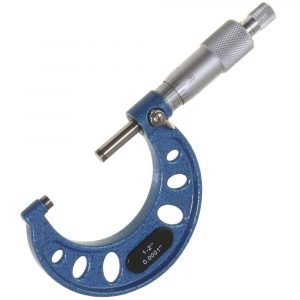
My advice for someone new would be to get the best set of 0-1” micrometers that they can afford. This is the tool that will get the most use.
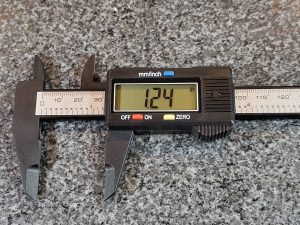
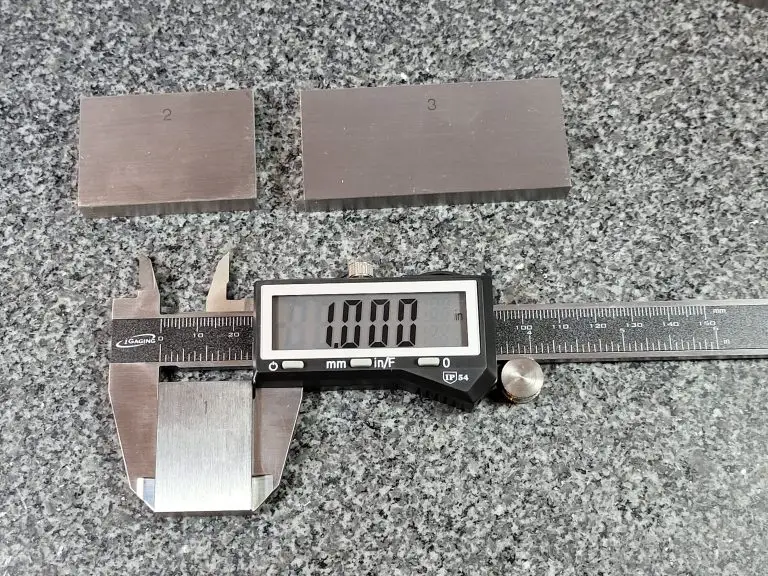
A common mistake the newbies make is thinking they need a micrometer when a caliper will do the job just fine.
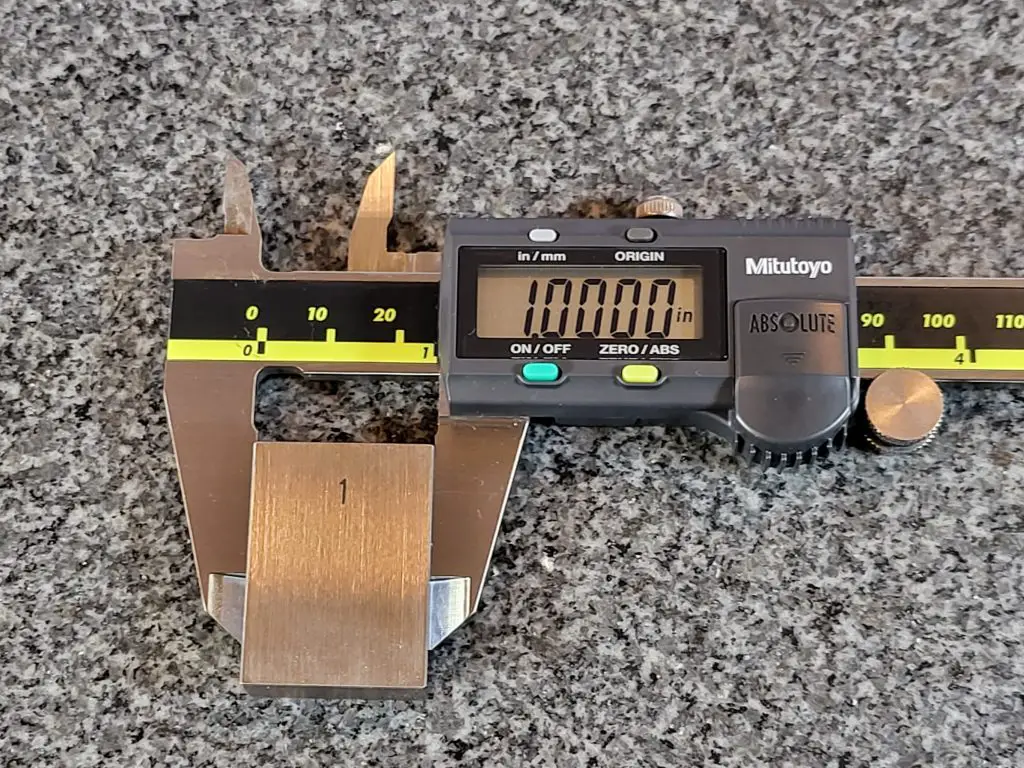
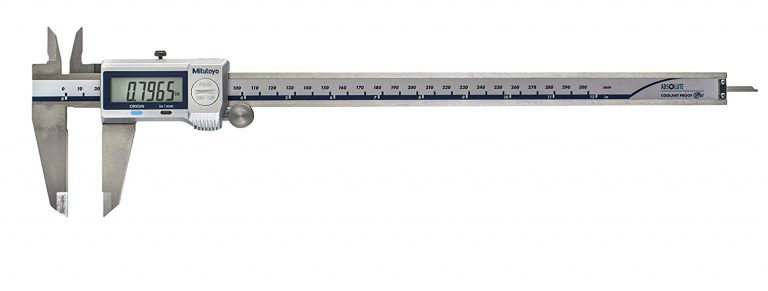
0-6″ Mitutoyo digital caliper
If your tolerances are +/- .001” or more then you can likely get by with a dial or digital caliper. These can be had for prices well below the cost of a good micrometer.
Another benefit is that calipers are much more versatile and have larger measuring ranges.
Digital micrometers are a good choice because they are quick to read. This is especially helpful for anyone just starting out.
It’s not that hard to read an analog micrometer but some people struggle a little learning to read a micrometer. For a little help learning to read a standard analog micrometer, see our post that walks you through the process – How to Read a Micrometer
Digital mics simplifies the process of reading your mic, but it is still a good idea to learn how to read a standard analog micrometer.
Digital micrometers also have the added benefit that they can be easier to see the readings. If your vision isn’t great up close or you need a new set of readers, you might want to stick with a digital micrometer.
Analog micrometers have the benefit of always being ready to use. Digital mics require a battery and some are better than others when it comes to battery life.
An analog mic will always be ready to pick up and use. If you only use your digital micrometer occasionally then it might be a good idea to take the battery out when not in use. This way it isn’t dead when you need to use it.
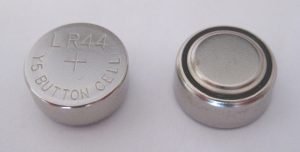
Typical button cell battery used in digital micrometers
Measurement units
Unless you are purchasing a digital micrometer, you will only get a reading in one set of units. Take note of the units you will be working with and buy accordingly.
This seems pretty self explanatory. I include it only as a reminder to double check your units before purchasing and to contemplate getting a digital micrometer if you are going to be working in both units constantly.
Measuring range
Micrometers typically are capable of taking measurements over a one inch measuring range. You will find them available individually, such as a micrometer that can take measurements from 4″-5″ and you can also find them sold as sets.
0-6″ micrometer set
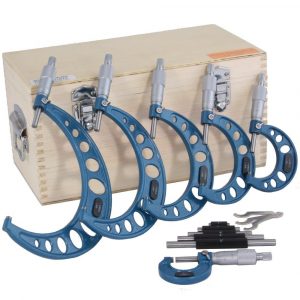
Set sizes are generally sold in 0-3″, 0-6″ and 0-12″ varieties. They are available in many different configurations but these sets are the most common. Sets will usually start at 0″ and go up. Some of the bigger sets differ and only include larger size micrometers such as with a 12″-18″ set.
As the set gets bigger and the micrometers get larger, the cost gets significantly higher.
Because this is the case, don’t go out and buy a set that contains tools you won’t be using. In many instances a 0-3″ micrometer set will be sufficient for taking the majority of your measurements.
Think about the sizes you will need to measure and don’t overspend on a set larger than you really need.
Calibration certificates
Does your micrometer need to be calibrated?
Yes, but also no.
What you will want to do is check the calibration yourself. Use a known standard such as a set of gage blocks to verify the accuracy of the tool over its measuring range. At a minimum, verify the micrometer with the standard provided by the manufacturer.
What you should not do is pay extra to get a calibration certificate from the micrometer seller. Many sellers will offer a NIST traceable calibration certificate at a substantial upcharge. In reality, all the calibration certificate tells you is that the tool was found to be accurate at the time of calibration.
Damaged shipping box
In between the time you receive it and the time the calibration was performed, the tool passed through many hands, most notably the hands of a shipping company. I shouldn’t need to tell you that those shipping companies are not always gentle in the transportation of your precision measuring instrument.
It will probably be packaged well and everything will be fine. Remember many micrometers have withstood harsh machine shop environments for decades and continued to measure as accurately as a brand new tool.
Should you buy a used micrometer?
Used tools are an excellent way to save money when it comes to micrometers. This is even more true when talking about depth micrometers, if you can find the right deal.
Generally, I have found prices for used tools fall into two categories; cheap and priced like new. Avoid the like new prices. It just isn’t worth it. Some people just want way to much for their tools.
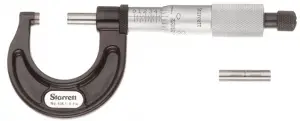
Personally, I wouldn’t be too excited about a standard used outside micrometer unless it was pristine and from a brand like Starrett or Mitutoyo.
There are plenty of other brands out there that put out quality tools for years. The tricky thing is that over the years some of these manufacturers have taken a step down in quality. Case in point, Fowler and Browne & Sharpe. The older stuff is much better.
If you’re looking to pick up some good tools on a budget, then keep an eye on Facebook marketplace and Craigslist along with hitting up some local yard sales. I’m sure it depends on your area, but yard sales have always been where I find the best deals.
Micrometer with a case
A good tip when looking for used tools is to look for ones that still have the original case or box. It is usually a sign that they were well cared for.
For more info about used micrometers, see our post about the best micrometer brands to find out which ones stand the test of time and the brands you should avoid.
Carbide vs non-carbide tipped micrometers
Stainless steel tips
Carbide tips
Carbide tips have the benefit of increased resistance to wear. The downfall is that they are more prone to chipping of the anvil face.
If you are careful with either type, it is unlikely that wear or chipped anvils will be an issue.
Micrometer cases
A good case will go a long ways towards keeping your tool protected and safe. Whether you’re working in a machine shop or using it in your garage, there are hazards everywhere. Coolant isn’t something you want on most precision tools. The same can be said of dirt and brake dust.
Give them a good wipe down after use and keep them safely in a case or toolbox to make sure they will be in working order for years to come.
Micrometer ratchets
Friction thimble stop
Click ratchet stop
A good ratchet makes a big difference when it comes to micrometers. If the ratcheting mechanism is bad, then the tool could give bad readings.
Micrometer ratchet mechanisms come in many forms. The most common types are the click style ratchet and the friction thimble.
Personally, I prefer to use the click style or no ratchet over the friction thimble. Just a matter of personal preference.
Some companies claim that the friction thimble, which simply spins freely once it is at the correct size, is more accurate but I have never known this to be the case.
If possible, try out both the click style ratchet and the friction thimble and determine what you prefer. If this isn’t possible, I recommend starting with a click style ratchet for your micrometer.
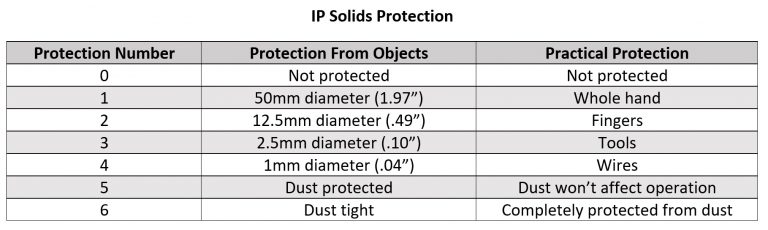
IP ratings
If you go with a digital micrometer, pay attention to the IP rating of the tool. The tables below show how well protected the device is from the elements.
The first number is for protection from solids such as chips and dust. The second number is for protection from liquids such as oil and coolant.
Both of the Mitutoyo digital micrometers recommended above are rated IP65. This is a very high level of protection. The next level down that is commonly seen is a IP54 rating which would be sufficient for most environments as well.
Data transfer
Many micrometers are capable of transferring measurement data to a computer. I don’t believe this is something that will prove useful for most users unless they are working in a high volume industrial setting so I will be brief on the topic.
Please note that there are multiple ways of transferring measurements to a computer including:
USB
SPC
RS232
Wireless, including Bluetooth
Other proprietary wired and wireless formats
If data transfer is a feature you are interested in then please pay attention to the manner in which the tools communicates and the price of any required accessories. The cost of a simple cable can often be half the cost of the micrometer itself or more.
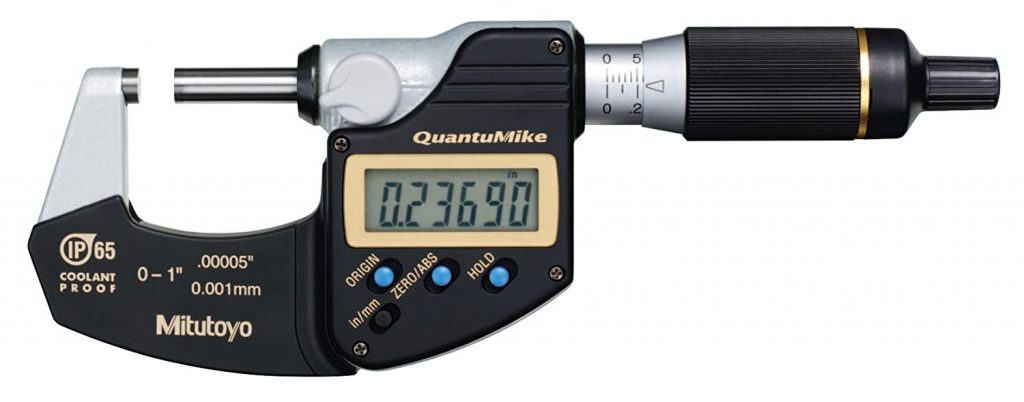
Mitutoyo has long been one of the very best micrometer manufacturers. They make top of the line tools across the board. Standard micrometers, digital mics, depth mics. You name it and they are leading the pack.
Every micrometer on our best of list is incredibly accurate but the digital micrometers from Mitutoyo, including this one, are on another level. With accuracy of .00005” or .001mm, Mitutoyo’s digital micrometers measure tolerances 2x tighter than most standard micrometers.
For reference, the human hair is about .003”. Take a strand of your hair and split it into 60 pieces and that is how accurate these micrometers are.
Besides the accuracy, the other standout feature of the QuantuMike is the speed. Anyone who has used a micrometer knows they aren’t quick to open or close.
The QuantuMike is unlike any other micrometer on the market and opens and closes four times faster. Each turn of the thimble moves the tool .100” instead of the normal .025”. No arm rolling needed.
Combining speed and accuracy is not a feat easily accomplished but Mitutoyo’s QuantuMike has done just that and more.
For a more in depth look at what makes the QuantuMike so special, see our full review.
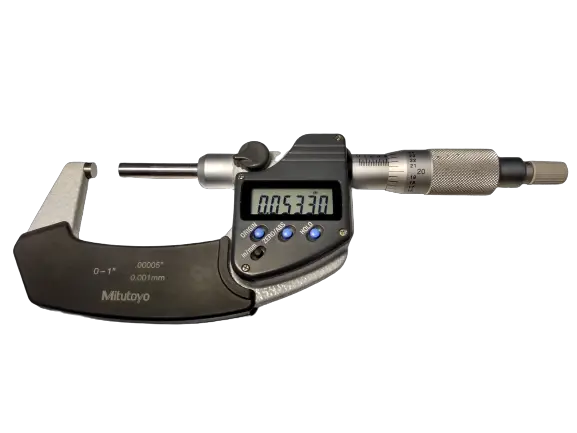
I am a huge fan of Mitutoyo’s digital micrometer line. Across the board they are quality all around.
Rather than gush over the quality of these things for paragraphs on end. I am just going to include a bulleted list of what makes them so good:
Extremely accurate
Quick to use and take measurements
Battery life is long
IP65 rating means they are protected from dust and splashing water
Great build
Excellent durability
If the price is too high, I would recommend going with a standard analog micrometer instead. If you must get digital, then go with one from one of the bigger budget brands such as iGaging.
Unlike standard analog micrometers, the cheap ones are not as close in quality to the budget tools. A budget digital micrometer is going to be a significant step down. That doesn’t mean it’s bad. It just means that the gap is bigger.
If you are still on the fence, re-read the bulleted list and contemplate whether its better to “buy once, cry once” or not.
There was a time where Chinese made knockoff micrometers were bad. I mean real bad. This isn’t the norm anymore though.
Many manufacturers such as Anytime Tools have made a name for themselves by providing quality measuring instruments at a fraction of the price of higher end tools.
And quality wise there just isn’t a big difference between the cheaper tools and the more expensive ones anymore. At least when it comes to the best of the budget tools. If the pricier tools from companies like Starrett or Mitutoyo are 5% better, honestly most won’t notice the difference.
One note about budget priced micrometers, don’t go buy some random mic made in China and expect it to have the same quality. The good brands that are cheaper are usually American companies that are purchasing the tools from Chinese manufacturers. They have performed the quality control to ensure you get a good product.
If you want a quality tool that is accurate and built to last but your budget doesn’t allow for the best from Starrett or Mitutoyo check out Anytime Tools.
For standard analog micrometers, Starrett has put out a line of excellent measuring tools for a very long time. Founded in 1880, they were one of the creators of the modern micrometer and it shows.
Having never used a micrometer from the 1800s, I can not attest to their quality from 100 years ago. What I do know is that anything made on this side of the 1950s has been excellent. In machine shops all over the world, Starrett micrometers bought decades ago are still in use.
They are built to last. Often the only tell-tale sign of their age is a slight polishing of the frame or thimble from heavy use.
The quality does come at a price though. If you won’t be using this tool all day every day or for an extremely critical measurement, it might be best to think about our best budget micrometer below. If you are going to put this tool to use constantly, you would be hard pressed to find a better tool.
Depth micrometers are another monster. Certainly more difficult to manufacture, as a result they are quite a bit higher in price.
Because they are so expensive, I am going list a few different options.
As a side note, when it comes to depth mics think about looking for used options. Many people take excellent care of their tools and you can save a pretty penny by picking up a second hand set. My only recommendation would be to find a way to verify them before buying. Bringing a set of gage blocks along could save you quite a bit of headache in the future.
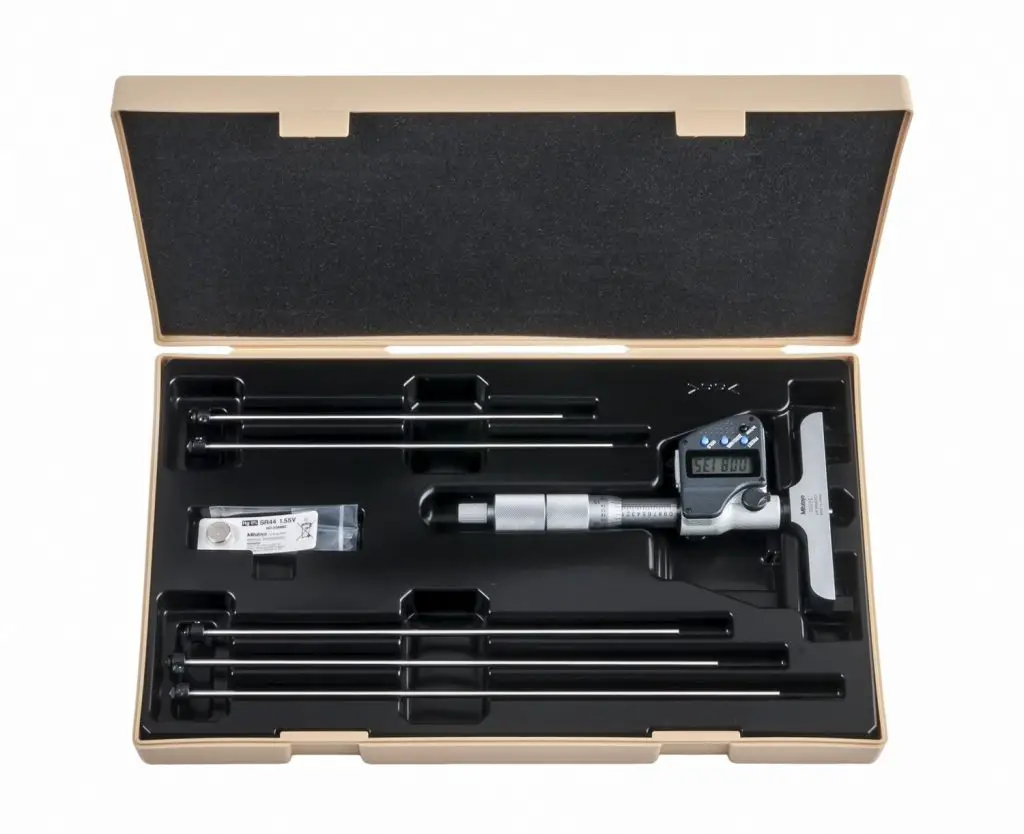
Just like their outside micrometers, the digital depth mics from Mitutoyo are excellent.
They are easy to use and easy to read. Most importantly, they are extremely accurate. Unlike normal micrometers, depth mics are one tool that the Chinese knock offs have really struggled to replicate. Many times cheaper depth mics are not accurate. The quality simply isn’t there.
This is not the case with Mitutoyo depth mics.
Mitutoyo depth mics, like their other digital micrometers, are in a league of their own. Unfortunately, their cost reflects this.
These depth mics are the best of the best but I only recommend them if you plan to put them to heavy use. If not, look into one of the non-digital options below to save more than a few bucks.
Both Starrett and Mitutoyo make great depth micrometers of the non-digital variety. Both companies make depth mics that are strikingly similar to their standard outside micrometers.
Really the differences are minor. Both are highly accurate. The ratchet on the Starrett is a little better. Additionally, the base is slightly smaller which I prefer.
The Mitutoyo depth micrometers have two types of bases. One that is larger such as what is seen on the digital version above. The other type is smaller. This makes it slightly more tipsy. The base of the Starrett depth mic feels like it is just right, smack in the middle.
It really is only small differences that give the Starrett depth micrometer the edge. You can’t go wrong with either, especially if you can find a good deal on it somewhere or pick one up used for a good price.
I’m sure you have noticed that the prices are pretty high on all of the listed depth mics so far.
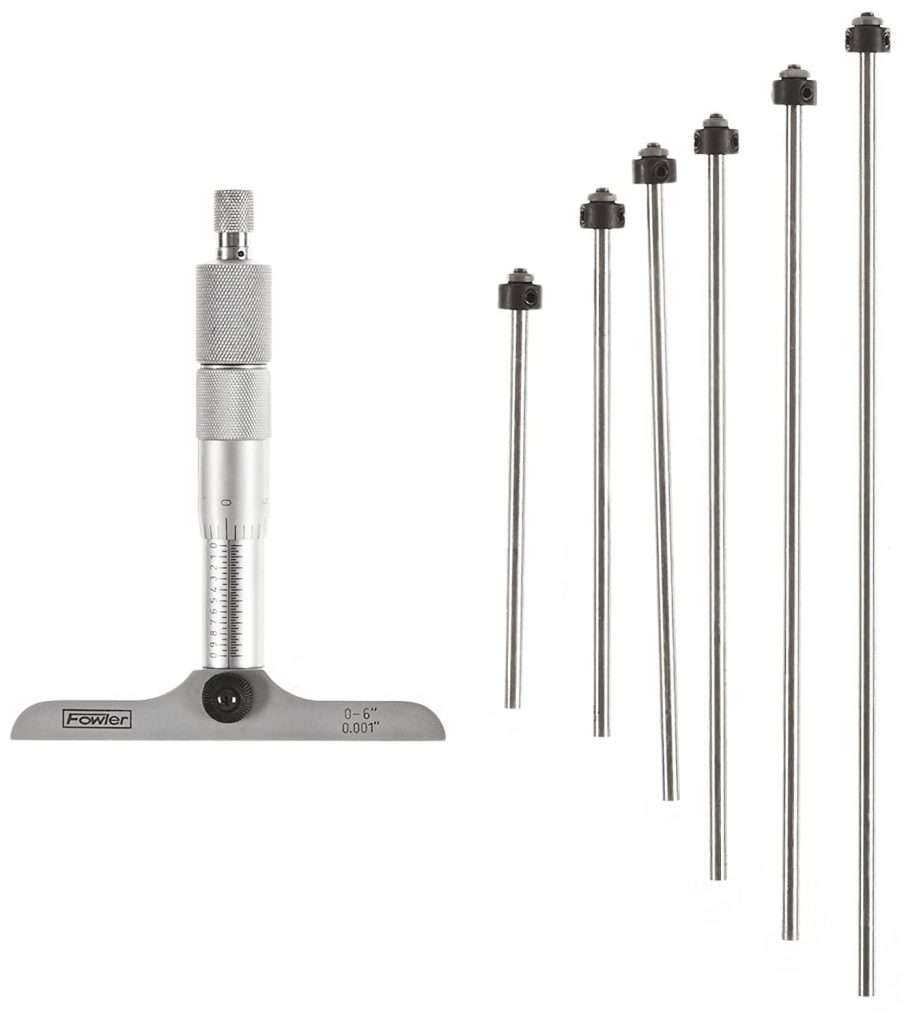
This is because the quality and accuracy don’t come cheap with depth micrometers. This depth mic from Fowler is the about the closest thing you will find to cheap and accurate.
I don’t know about all of their tools but many of Fowler’s gauges seem to be made in China. Nothing wrong with that in particular as seen with some of our other mic recommendations. Unfortunately, Chinese made depth mics are not something that they have perfected.
I have used Fowler depth mics that are every bit as accurate as Starrett or Mitutoyo, I just wouldn’t count on every single one coming off the line that good.
The nice thing about many online retailers is that they have good return policies. So if you absolutely need a depth mic and need it as cheap as possible then order away. Just make sure you check it for accuracy when you get it and send it packing if it isn’t up to snuff.
A good set of digital calipers is an invaluable tool for any machinist or hobbyist. Calipers can take a wide range of measurements. And do it with a ton of accuracy.
For many people, finding the best digital caliper is important because they get used so much. When you can measure inside, outside and depth measurements the tool gets a good amount of use.
I used digital calipers almost every day for 15 years and there isn’t much competition.
There is solid competition in the value department, but Mitutoyo has the most well-made caliper on the market.
If you don’t plan on using it day in and day out then consider this caliper from iGaging.
It has good build quality and is closer in price to a budget pick than the Mitutoyos. If you have a special use case or an extremely limited budget then keep reading to find the right digital caliper for you.
Name
Awards
IP Rating
Where to Buy
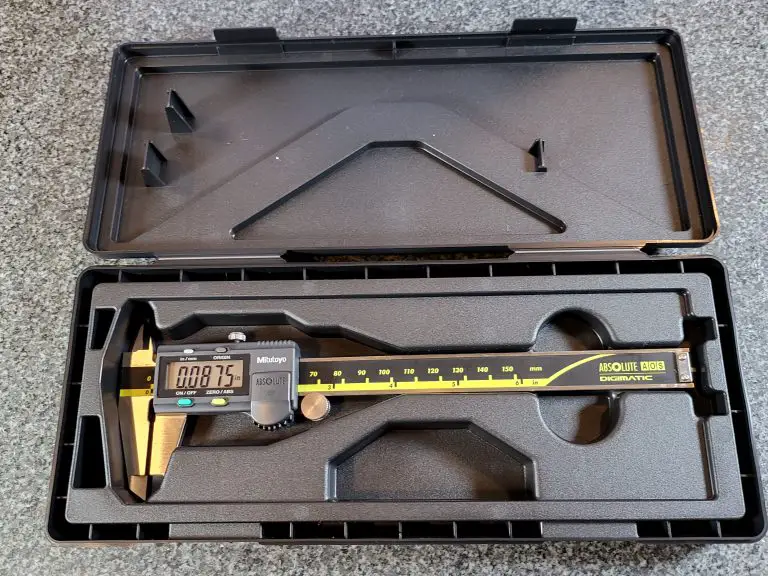
Mitutoyo 500-196-30 0-6" Digital Caliper
Best Overall Digital Caliper, Most Accurate, Easiest to Use
Accuracy is the single most important feature of your digital caliper.
They are measuring tools and they need to measure correctly.
Mitutoyo digital caliper
The accuracy is the ability of the caliper to give the true value of a given measurement.
The accuracy of the best calipers is usually +/- .001.
Cheaper alternatives will have an accuracy between +/- .002″ to +/- .010″. For some this may be fine, but it will depend on what level of accuracy you need for your project.
I also recommend that you do not blindly trust the claimed accuracies touted by the budget manufacturers. If Starrett or Mitutoyo specify an accuracy level, you can trust it but this is not the case
Keep in mind the type of tolerances you will be working with to help you decide how accurate your caliper needs to be.
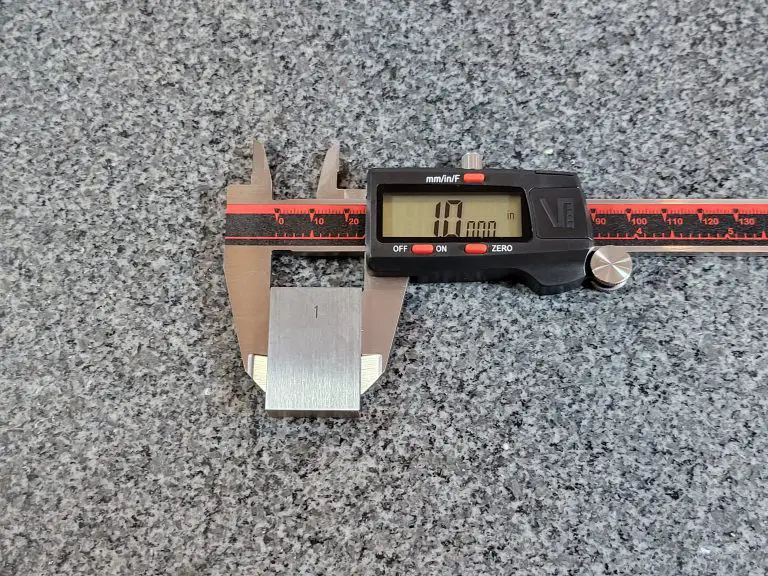
A 0-6″ caliper maintains a nice balance of measuring range and ease of measurement.
As the measuring range of a caliper gets larger, it becomes more difficult to use.
Using a 0-24″ caliper to measure a 1″ hole diameter would be quite difficult.
Even if you require the ability to measure larger sizes, you will want a 0-6″ caliper for many measurements because of its ease of use.
Display size
Look For A Large Display
The display on your caliper plays an important role in how easy it is to use. Being able to quickly read your measurements will save you time in the long run.
Let’s be real, some of us don’t have the best eyes. Larger displays make getting your reading simpler. This is one area that digital calipers have a nice advantage over dial calipers. The dial and indicator needle can be hard for some to read on your average dial caliper.
The best displays have large uniform digits as shown on the Mitutoyo caliper above.
Measuring units
Most digital displays are capable of showing measurements in inches as well as millimeters. Some calipers will also read measurements in fractional units.
Fractional units are generally not the best way to take measurements because the displays don’t round and instead will display a measurement of something similar to 53/128″. That isn’t a very helpful way to display the data. If the display rounds to something useful such as 1/16 or 1/32 it would be more useful but most don’t.
Battery life
Typical digital caliper battery
Battery life should be a prime consideration when examining the quality of a digital caliper.
An auto on and auto shut off feature can greatly extend the longevity of a calipers battery life.
The best digital calipers will have battery life that is measured in months or years. Most of the budget options available have much shorter battery lives. If you go the budget route with your caliper, make sure to keep some extra batteries on hand and maybe think about taking the battery out when the tool is not in use.
Good battery life means the caliper will be ready to use when you need it.
Dial vs digital calipers
Dial caliper face
Dial calipers make a good option for a measuring device as well. The main benefit they possess is that they don’t require batteries so they are always ready to use.
Dial calipers can’t switch measuring units at the press of a button though. There are some dial calipers that measure in mm as well as inches at the same time but they haven’t been proven to be particularly reliable.
Ingress protection rating or IP rating for short is the amount of resistance a device has to things such as dirt and water.
Many digital calipers have no protection rating at all.
For the ones that do, IP54 is the most common rating. This equates to limited protection from dust and protection from splashing water which will be more than most users require.
The less frequent IP67 rating is excellent and means they are almost impervious to everyday dirt and water.
Keep in mind though that IP ratings don’t protect the tool from physical damage such as being dropped.
The chart below outlines how protected a tool is. The first digit in any IP rating is for the solids protection and the second digit covers the protection from liquids.
Materials
Carbon fiber digital caliper from Adoric
For most applications you will want to get a caliper made of stainless steel. Other materials available include carbon fiber composites and plastic.
While tools made of carbon fiber and plastic are generally not as nice in quality as those made of stainless steel, they do have some benefits. Carbon fiber and plastic calipers are less likely to scratch or damage softer materials such as wood or plastic.
Stainless steel calipers tend to have sharp jaws that can scratch some materials but if you are careful in their use, there shouldn’t be any issues. Carbon fiber composites and plastic also have the benefit of being non-magnetic.
Calibration certificates
Some calipers are sold with a calibration certificate for a decent upcharge. Skip it. The tool should be accurate when purchased, regardless of whether it comes with a certificate or not.
The best practice is to verify the accuracy of the caliper when you receive it. Check the tool against a known standard such as a set of gauge blocks. At a bare minimum, verify the zero position before using your gauge.
Cases
A Case Provides Much Needed Protection
A case is an important accessory for a digital caliper. These are precision measuring instruments after all and all too often they get knocked off a workbench or dropped by a careless coworker.
Keeping them in a case will add a layer of protection to help keep them safe. Cases come standard with calipers from the the best toolmakers such as Starrett, Mitutoyo, Fowler and Brown and Sharpe.
They do not come standard for cheaper tools so keep that in mind when looking at those budget friendly options.
Data transfer
An RS232 port can be a handy addition to your caliper, but is certainly not a necessity. A RS232 port allows the transfer of data/measurements from your caliper to your computer.
For most users this is an unneeded feature, but for some applications it can be handy to record the data directly to your computer.
Our top picks
Now that you know what we consider when reviewing the best calipers, let’s find out who is making the best in class calipers.
Accuracy: +/- 0.001”/.0254 mm Measuring units: Inches, mm Warranty length: One year Battery used: 1 SR44 (included)
Amazing accuracy, excellent battery life and protection from dirt, water and oil. Mitutoyo makes a digital caliper that is everything you would want in a precision measuring tool.
These calipers from Mitutoyo are a reliable and consistently accurate measuring instrument. Perfect for reloading, engine work or every day use in a machine shop.
Basically, Mitutoyo has set the standard for what a digital caliper should be and maintained that standard for a long time. In fact, if you can find a used set do be afraid to pick them up.
These calipers are heirloom quality.
That isn’t something you would normally say about something electronic, but these digital calipers from Mitutoyo break the mold and are built to last.
Everything about these calipers is well-made.
Quality stainless steel frame
Solid plastic body
Buttons that just feel nice and are easy to use
Large, easy to read LCD display
Better battery life than any other caliper I have seen (Mitutoyo claims 3.5 years – it might be longer)
Combine these things with the dependable accuracy and you got a tool that is truly best in class.
Accuracy: +/- 0.001”/.0254 mm Measuring units: Inches, mm, fractions Warranty length: One year Battery used: LR44 (included)
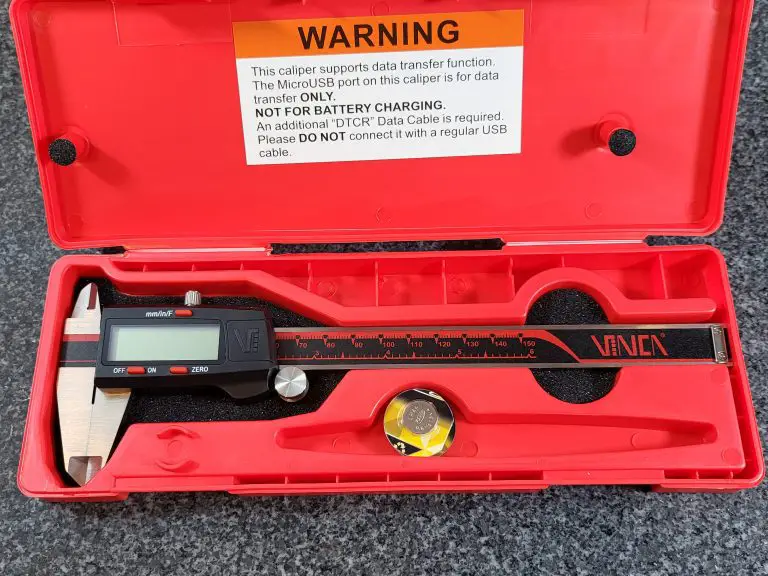
If you’re just getting into machining and you’re a bit nervous about dropping a lot of money on a high-end caliper like the one above, then this budget-friendly VINCA just might be the tool for you.
First and foremost, it’s a very accurate caliper for the price, with an accuracy of +/- 0.001″/.0254 mm. These are measuring devices after all. They need to be accurate.
While it is made of stainless steel, you’ll also be happy that this caliper comes with a heavy-duty case to keep it protected at all times when it’s not in use.
The LCD display face is fairly large, however you should note that the way the values are displayed is a little awkward, especially when measuring in inches. It appears VINCA did this to allow fractional measurements.
This isn’t something that is a deal breaker but worth noting because some of the numbers you will be reading are only half the size of the screen.
Battery life is good on these VINCA calipers. Take note that they automatically turn on when the caliper moves which can cause them to drain the battery faster even when not in use. Using the lock to gently keep them in place will go a long way towards extending your battery life and keeping them ready to use when you need them.
An excellent bonus feature of this caliper is the RS232 port which allows you to plug the caliper right into your computer. This is something that is rarely seen with budget priced calipers.
Digitally transferring readings can be super helpful, because it’s so easy to fat-finger a measurement if when entering them manually.
Overall, these VINCA digital calipers are a great value for the price. They aren’t quite on the same level as some of the higher end measuring tools but they make an excellent starter set that doesn’t break the bank.
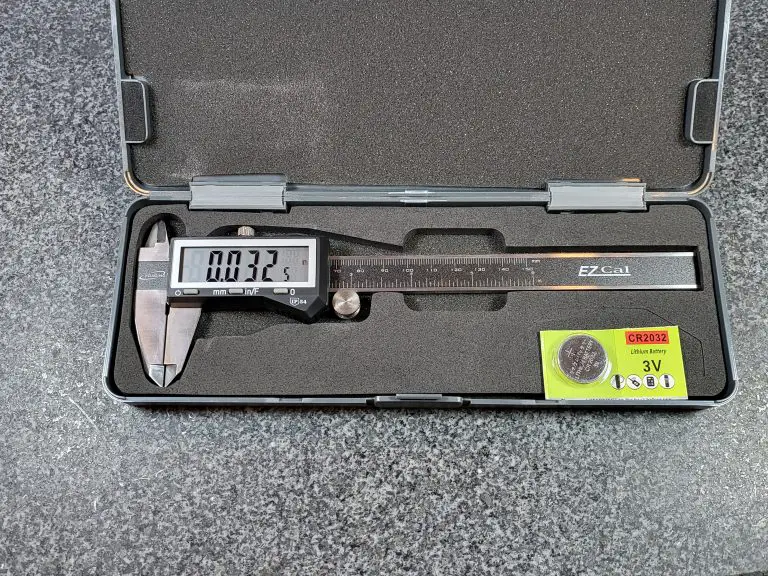
Accuracy: +/- 0.001”/.0254 mm Measuring units: Inches, mm Warranty length: One year Battery used: CR 2032 3V (included)
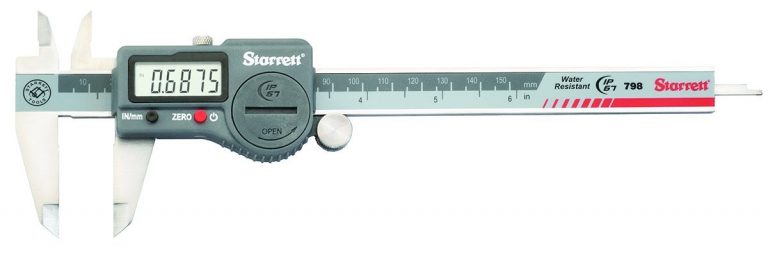
It’s tough to do a review about calipers and not include anything made by Starrett. Starrett is an industry leader, and for decades has carried a solid reputation for making incredible products.
This heavy-duty digital caliper from them has an accuracy of 0.001″, or 0.254 mm and a resolution 0.0005″ or 0.010 mm. Exactly the type of precision you would expect in a quality measuring tool.
When it comes to build quality, the stainless steel bar of this caliper is designed to last just like many other Starrett tools and the case it comes with only helps to extend the life of your caliper by keeping it safe when you’re not using it.
This display is easy to read and quite large. The buttons work as designed and overall the 798A-6 functions exactly as intended and just feels very well built.
However, the real reason you’ll want to buy this caliper is because of how rugged this thing is.
The 798A-6 is rated IP67. IP stands for ingress protection. This is a measure of the amount of resistance a device has to dirt, water, and other contaminants. For a full breakdown of IP ratings, see our rundown in the Things to Consider section.
Just know that most digital calipers, especially lower priced models, often offer no IP rating at all. The better models that do offer some form of IP rating are usually rated IP54. The IP67 rating of this Starrett is a significant jump up in protection.
One thing to keep in mind is that the IP rating doesn’t protect against damage from drops or other physical damage. You’re going to still need to treat it carefully. But let’s face it, we aren’t always working in the most pristine environments.
While the added protection that the Starrett caliper offers is welcome, it does come at a cost. Mechanics and machinists have known for a long time the value of a tool that can withstand a little abuse. Whether that is necessary for you situation is something you will need to decide.
I can’t say that I know of anyone who has regretted spending the extra to step up and get a tool from Starrett.
Accuracy: +/- .001”/0.02mm Measuring units: Inches, mm, fractions Warranty length: Two years Battery used: CR 2032 3V (included with spare)
While they are a budget tool manufacturer, iGaging has been around awhile and made quite a name for themselves providing decent tools for a much lower price.
Made of stainless steel, this iGaging caliper has an accuracy of +/- .001” or .02mm, and a resolution of .0005” or .01mm which is directly in line with the capabilities of higher priced tools. Fractional measurements are taken in increments of 1/128″
We tested the accuracy and it performed wonderfully reading spot on in all inside, outside and depth measurements taken across the measuring range. It even comes with a calibration certificate. Most budget priced tools skip this.
This is a solid set of calipers, especially for the price. The LCD display is large and skips the weirdness that other calipers such as the VINCA DCLA-0605 has because of the fractional units.
But the real standout feature of this caliper is just how tough it is given its price. The iGaging caliper has an IP54 rating, which, as we mentioned earlier, is the average rating for calipers with an IP score.
However, given the price point, this is a very uncommon feature for calipers in this price range. Most will have no IP rating at all.
Being a budget caliper, but still offering protection from dust, oil, water, and other contaminants is what sets this caliper apart from others in its class.
Another nice thing about this caliper is the 2-year warranty. You’ll notice that a lot of the calipers on this list are given a 1-year warranty which is still higher than the average warranty. 2 years provides quite a bit of assurance that the caliper will function for a good long time.
One small drawback of this caliper is that the on/off power function is manual. What this means is that you need to remember to hit the power button every time you are done using it or else you’ll drain the battery. Many digital calipers will feature an auto off feature to extend the battery life.
Overall, the IP rating this tool has offsets any issues with battery life. iGaging has done a great job of making a budget priced tool that stacks up well in most areas against some of the most well known measuring tool manufacturers.
Accuracy: +/- .0015”/0.0385mm. Measuring units: Inches, mm Warranty length: One year Battery used: 1 SR44 (included)
We’ve included another Mitutoyo caliper on this list because this caliper is a bit different than the other one. For one, it’s got a much larger measuring range, going from 0-12″.
While measuring above 6″ is less likely, especially for beginners, this caliper gives you the option for larger measurements when needed.
Keep in mind that you wouldn’t want this as a replacement for a 6″ caliper, instead larger calipers such as a 12 or 24″ model will get used in addition to a 6″ caliper.
There are situations where you might need to measure something larger and the 6″ caliper just won’t do. But anytime you are measuring a smaller size, a large format caliper such as this will be difficult and awkward to use. Not to mention it won’t fit into tight spaces well.
You should also take not that the accuracy is slightly reduced because it needs to maintain that accuracy over a larger measuring range. This caliper has an accuracy of +/- .0015″/0.0385mm which is pretty good.
You will find that some of the budget tool makers will spec their 12″ digital calipers with an accuracy of +/- .001″, which on paper looks like they are better than this Mitutoyo. In reality, they are often far worse than that. This is especially true if you move up to a 24″ caliper.
The Mitutoyo 500-754-20 comes with a whopping IP67 rating, meaning it’s super water and dust resistant. Having that level of protection on a tool that costs this much is important because you wouldn’t a splash of coolant or oil to destroy your prized measuring tool.
While it’s an expensive tool, if you have bigger projects that you plan on working with, then it’s well worth the money. And, as we touched on earlier, Mitutoyo is a premium brand in the industry, so if you do pull the trigger and decide to buy this caliper you won’t be disappointed in the quality of the product.
If you must go the budget route with a large range digital caliper, then be extremely aware of the accuracy you need and what the tool can actually provide. They might not line up.
I know everyone doesn’t have unlimited budgets so if you need to keep costs down, think about looking for a used Mitutoyo or Starrett digital caliper (good luck) or maybe going with a good quality dial caliper instead. Remember, that your large calipers are going to see much less use than a standard 6″ version.
Welcome to our comprehensive guide to using the G41 CNC code. Whether you’re a beginner learning CNC programming or an experienced machinist, understanding the G41 CNC code is extremely important.
In this guide, we’ll break down everything you need to know about this cutter compensation command, including how, when, and why to use it.
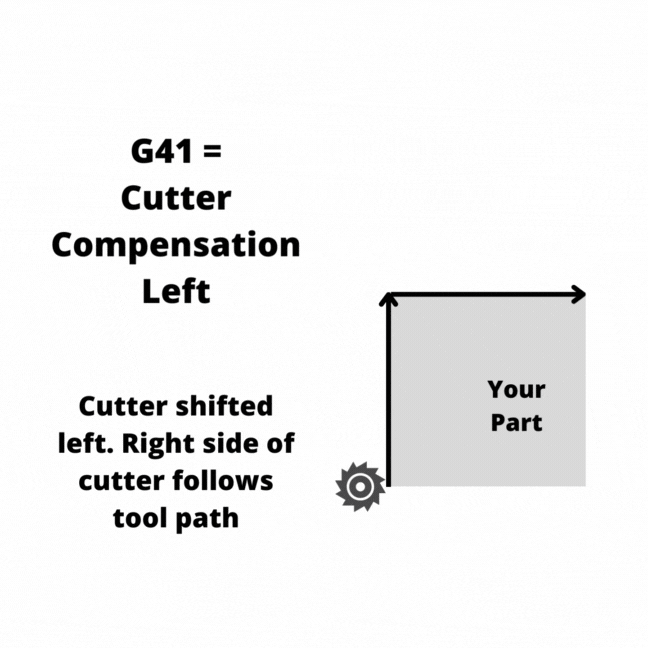
What does a G41 code do?
G41 is a modal command called cutter compensation left.
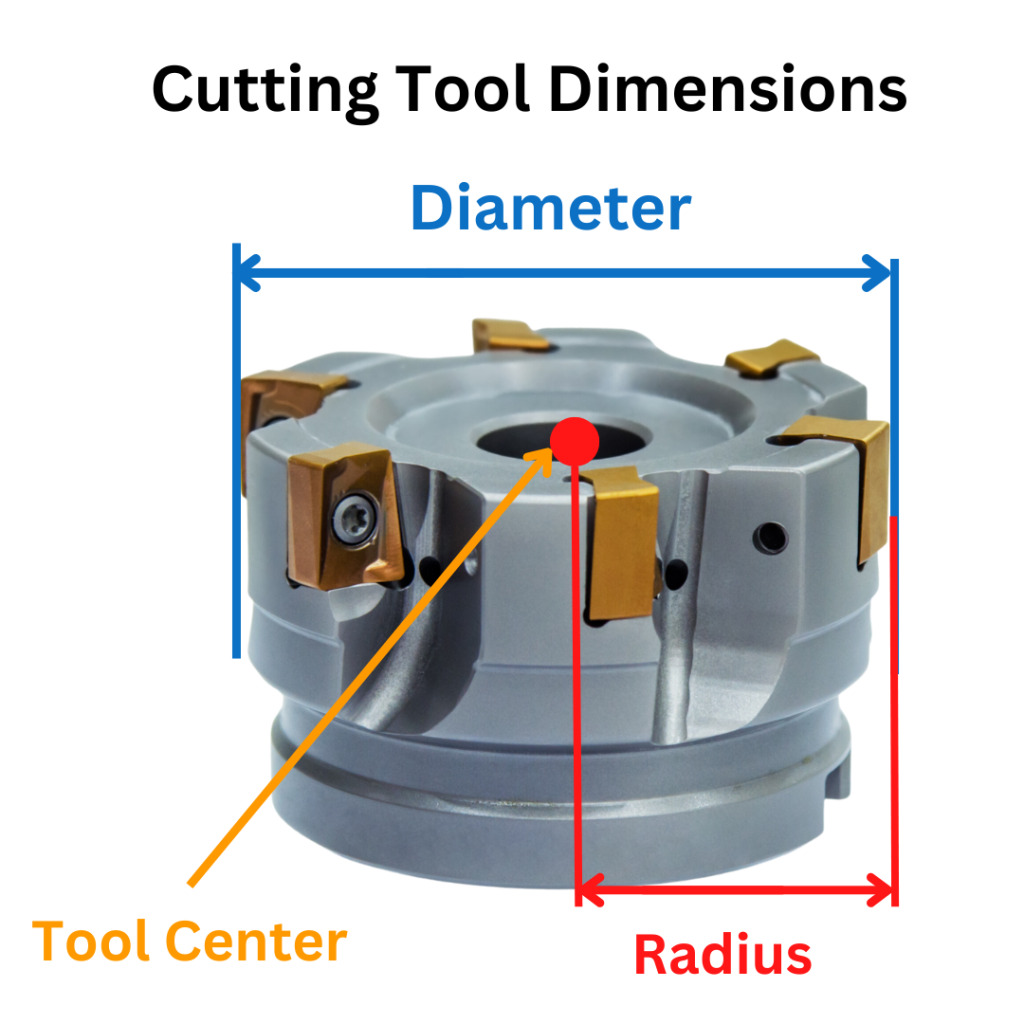
This code adjusts the path of the cutting tool based on the diameter of the cutter.
If you are looking towards the direction that the cutter is moving, the tool path is shifted to the left.
In the animation below, the tool path in the program is represented by the line with arrows.
Cutter compensation is a CNC mode that allows the CNC controller to adjust for the size of the cutting tool.
Setting the size of the cutting tool allows you to use the same program with multiple different cutting tools.
Turning cutter compensation on tells the machine to shift the cutting tool either left with G41 or right with G42. The shift is half of the diameter of cutting tool, otherwise known as the radius.
Learn CNC Programming – It’s Easier Than You Think!
Learning G Code doesn’t have to be difficult…
If you know what to focus on.
Join our simple, easy-to-follow course, “G Code Made Easy: CNC Programming for Beginners“. We walk you through all the important codes – with simple explanations and real-world examples.
Want to become a super-skilled CNC programmer? Join now to take the shortcut to becoming a G Code Master today!
Visualizing which way the machine will shift can be a little tricky. The shift happens as if you are looking towards the direction that the cutter is moving.
The two animations below show how the CNC will move when the other cutter compensation modes are active.
When cutter compensation is off (G40), the cutter will follow the tool path given in the program.
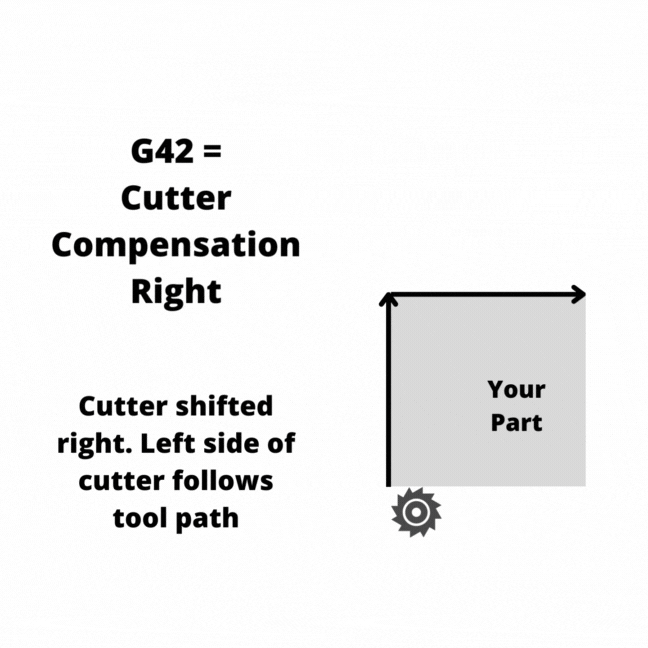
With cutter compensation right on (G42), the cutter will be shifted right and the left edge of the cutting tool will follow the tool path.
When to use a G41 code
The G41 command is useful in many milling operations such as contouring, pocketing, facing, and engraving.
Every operation that involves facing the cutter’s tip against the workpiece needs to account for the diameter of the cutting tool to avoid overcutting.
The G41 command is commonly found at the beginning of a program or subprogram and should remain activated until the machining operation ends. This doesn’t mean the entire program, but instead the individual sections of the program.
When using G41 or G42, the toolpath runs the cutter’s edge along the tool path instead of the centerline of the cutter.
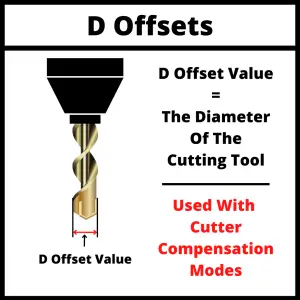
Cutter sizes and D offsets
Even if you were to buy two of the same cutters, it is likely that there is a small difference in size between them. This difference in size is accounted for using offsets.
Because we are talking about cutter compensation with G41, we are going to focus on D offsets.
D offsets are stored in your machine’s controller, and they store the diameter of your cutting tool.
Now usually when the machine reads the coordinates given in the program, it moves the center of the cutting tool to that position. This can make it difficult to get the correct size especially when using different or multiple cutters.
Telling the machine the size of the cutters with your D offsets allows it to account for them and run the same program with different tools and get the same size part.
If you didn’t have cutter compensation, then you would need to create a new version of the program every time you wanted to use a new tool.
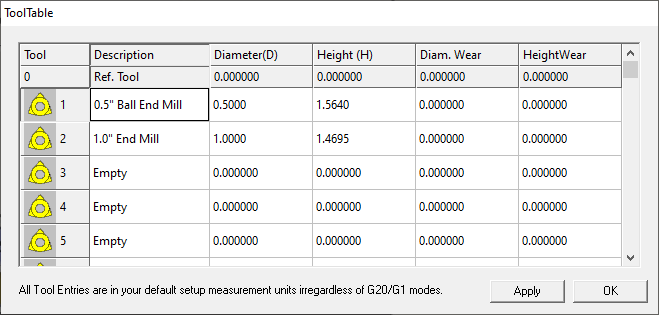
Using the tool offset table for cutter compensation
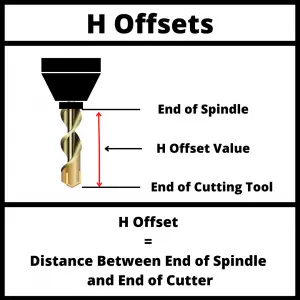
The Tool Offset Table, sometimes called Tool Table or Offset Library, is simply a table that the operator uses to store the offset values. This can include both diameter (D) and tool length (H) offsets.
Tool offset tables vary and some machines will only store one type of offset.
This means you may need to store both your diameter and tool length offsets in a D offset.
Some other machines may allow you to store the diameter and length of a cutting tool in the same offset number. The setup varies by machine so check yours out to make sure you know how it works.
The purpose of the Tool Table is to tell the CNC machine what the dimensions of the cutting tool are. This includes radius and length.
G41 programming format
There are multiple ways of formatting a G41 command:
G41 D1. When the G41 code is used with a D offset it is meant to be used on a machine with a built-in tool table in the controller. G41 turns on cutter compensation left and D1 tells the machine to adjust the tool path based on the size stored in the first D offset.
G41 P2. The P value is the radius of the tool used in the operation. This format is used more often on hobby level machines.
G41 X2. This format is the same as using the P value.
Focus on learning the first format unless you plan to only ever use simple home level machines.
G41 vs G42
There are two different cutter compensation modes that can be used:
G41 for cutter compensation left
G42 for cutter compensation right
The direction of the shift is relative to the cutting tools direction of movement.
G41 is used when climb milling, which is the most common type of milling used.
G42 is used when conventional milling. Conventional milling sounds like it would be the standard, but in reality it is rarely used.
When climb milling, the cutter moves in the same direction as the stock feeds, which means that the workpiece produces less resistance to the cutting as the chips fall behind the cutter.
This type of milling helps prolong the life of the cutters and create a better surface finish. This is the most commonly used milling method CNC machines.
On the other hand, with conventional milling the cutter runs in the opposite direction of the stock feed, which means that the cutter will have more resistance against the workpiece and cause more tool wear resulting in a shorter tool life.
The two main things to pay attention to when using G40 to cancel cutter compensation are:
Cancel cutter comp when you are off the part more than half the diameter of the cutter
Make a move when canceling cutter compensation
Canceling off the part enough keeps the machine from running back into the part.
Making a move forces the machine to move in a consistent way. Some machines can react unexpectedly if no move is made when canceling cutter compensation. The machine basically thinks it has teleported locations.
Don’t teleport your CNC. Make a move when canceling cutter compensation.
Other types of compensation
The other main form of compensation is tool length compensation.
Welcome to our comprehensive guide to using the G40 CNC code. Whether you’re a beginner learning CNC programming or an experienced machinist, understanding the G40 CNC code is extremely important.
In this guide, we’ll break down everything you need to know about this cutter compensation command, including how, when, and why to use it.
What does a G40 code do?
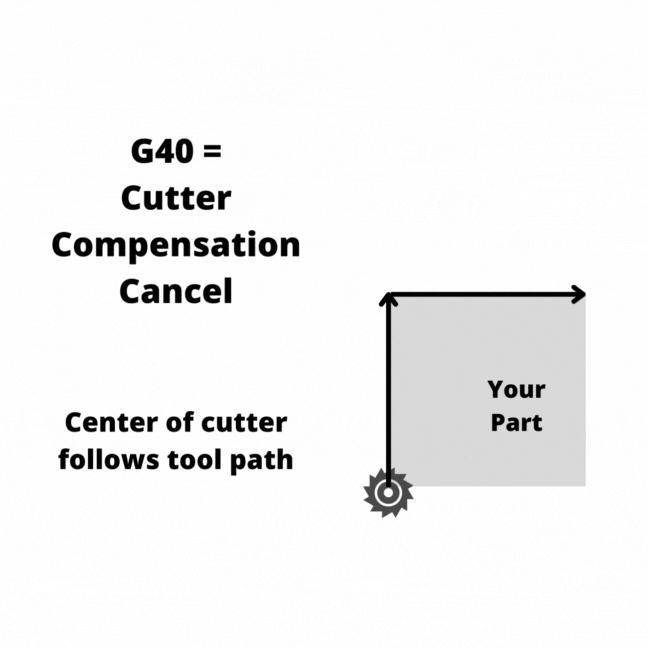
G40 is the CNC G code to turn off cutter compensation.
When cutter compensation is turned off, the center of the cutter will follow the tool path given in the program.
In the animation below, the tool path in the program is shown by the lines with the arrow.
What is cutter compensation?
Cutter compensation is a CNC mode that allows the CNC controller to adjust for the size of the cutting tool.
Setting the size of the cutting tool allows you to use the same program with multiple different cutting tools.
Turning cutter compensation on tells the machine to shift the cutting tool either left with G41 or right with G42 based on the size of the D offset chosen using the D code.
The shift is half of the diameter of the cutting tool, otherwise known as the radius.
Learn CNC Programming – It’s Easier Than You Think!
Learning G Code doesn’t have to be difficult…
If you know what to focus on.
Join our simple, easy-to-follow course, “G Code Made Easy: CNC Programming for Beginners“. We walk you through all the important codes – with simple explanations and real-world examples.
Want to become a super-skilled CNC programmer? Join now to take the shortcut to becoming a G Code Master today!
Visualizing which way the machine will shift can be a little tricky. The shift happens as if you are looking towards the direction that the cutter is moving.
The two animations below show how the CNC will move when the other cutter compensation modes are active.
With cutter compensation left on (G41), the cutter will be shifted left and the right edge of the cutting tool will follow the tool path.
With cutter compensation right on (G42), the cutter will be shifted right and the left edge of the cutting tool will follow the tool path.
Things to know when using the G40 code
The two main things to pay attention to when using G40 to cancel cutter compensation are:
Cancel cutter comp when you are off the part more than half the diameter of the cutter
Make a move when canceling cutter compensation
Canceling cutter compensation when off the part enough keeps the machine from running back into the part.
A good practice is to move the machine up above the part in the Z axis so that it is away from the part before canceling cutter compensation.
Making a move forces the machine to move in a consistent way. Some machines can react unexpectedly if no move is made when canceling cutter compensation. The machine basically thinks it has teleported location.
Don’t teleport your CNC. Make a move when canceling cutter compensation.
Where does G40 show up in a program?
The G40 command can be found at any point within the program, but the most common place to find one is in safety lines of the program.
Safety lines are a set of codes used to put the CNC machine into the correct mode(s) prior to running the program. Sometimes this means turning modes on, sometimes it means turning them off.
G40 is one of the off (cancel) commands.
Safety lines are often used at the start of a new section of code to make sure the CNC is set to the correct modes before running the section of code.
Other cancel commands
There are multiple G code cancel commands. The table below shows the most common codes for turning modes off:
Code
Description
G40
Cancel cutter compensation
G49
Cancel tool length compensation
G50
Cancel scaling
G67
Cancel custom macro call
G69
Cancel rotation
G80
Cancel canned cycles
Ready to master CNC programming?
Join our simple, easy-to-follow course, ‘G Code Made Easy: CNC Programming for Beginners’ and take the shortcut to becoming a G Code Master today!
Welcome to our comprehensive guide to using the G21 CNC code. Whether you’re a beginner learning CNC programming or an experienced machinist, understanding the G21 CNC code is extremely important.
In this guide, we’ll break down everything you need to know about this unit mode command, including how, when, and why to use it.
What does a G21 code do?
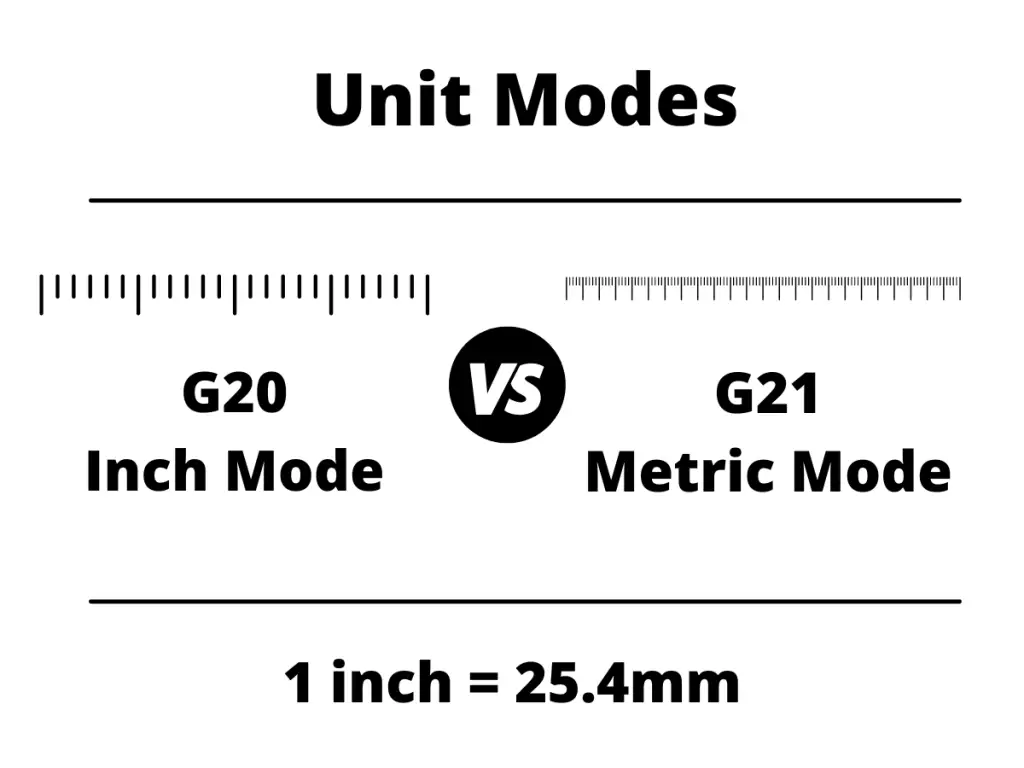
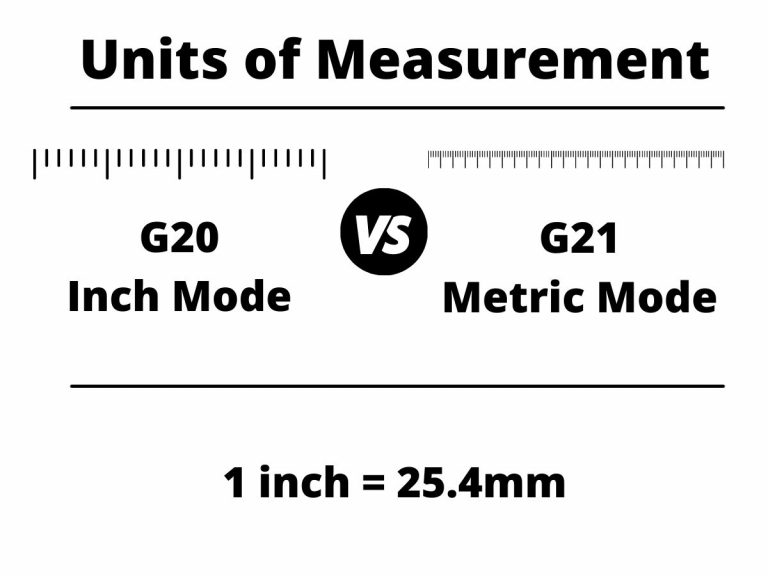
A G21 code will switch the CNC into metric mode.
Once the G21 code is used, all sizes and locations in the program will be treated as millimeter values until the mode is changed.
Modal commands remain in effect until they are canceled or changed to another code in the same group.
This holds true even if you restart your program.
Many, but not all modal codes have a cancel command to turn the mode off.
Note: There is no cancel command for unit modes. One of the unit mode codes must be active.
For this reason, most CNC programs will be created with start-up or safety commands. The safety commands make sure that the machine is always in the correct modes.
Learn CNC Programming – It’s Easier Than You Think!
Learning G Code doesn’t have to be difficult…
If you know what to focus on.
Join our simple, easy-to-follow course, “G Code Made Easy: CNC Programming for Beginners“. We walk you through all the important codes – with simple explanations and real-world examples.
Want to become a super-skilled CNC programmer? Join now to take the shortcut to becoming a G Code Master today!
It should be pretty obvious from the names but the other unit mode to consider is G20 – Inch mode.
When G20 is the active units code, the machine will read all locations and values as in inches.
Neither code can be canceled. The only way to turn on off is to switch to the other.
It is not advised to switch units in your program.
When to use a G21 code?
A G21 code can be found at any point within the program but the most likely location is at the start of the program or at the start of a new section of code.
For instance, you might switch the CNC into metric mode by using the G21 command immediately before starting to cut a slot in the part.
The machine may already be in metric mode or it could be in inch mode, but placing the G21 command immediately before the new block of code for the slot operation will make sure you are working in the correct units.
All kinds of things can happen when machining and it isn’t uncommon for the machine to crash or some part of a program to need to be re-run.
Placing the safety commands (G21 in this case) at the start of the new block of code makes sure your machine does exactly what was intended.
What to think about when using a G21 code?
When you use a G21 code you simply need to be aware of what type of units you are working in.
Most machine shops will work in either inches or mm.
There are definitely some shops out there that will use mixed units, but in most cases CNC programs will be written in one or the other for every program they make.
Know whether your parts are in inches or millimeters.
CNC codes that are similar to G21
All of the codes listed in the table below are modal commands that affect the way the CNC machine interprets size and location values that are entered.
Welcome to our comprehensive guide to using the G20 CNC code. Whether you’re a beginner learning CNC programming or an experienced machinist, understanding the G20 CNC code is extremely important.
In this guide, we’ll break down everything you need to know about this unit mode command, including how, when, and why to use it.
What does the G20 code do?
A G20 code switches the CNC into inch mode.
Once the G20 code is used, all sizes and locations in the program will be treated as inch values until the mode is changed. This includes canned cycles and subprograms.
Modal commands remain in effect until they are canceled or changed to another code in the same group.
This holds true even if you restart your program.
Many, but not all modal codes have a cancel command to turn the mode off.
Note: There is no cancel command for unit modes. One of the unit mode codes must be active.
For this reason, most CNC programs will be created with start-up or safety commands. The safety commands make sure that the machine is always in the correct modes.
Learn CNC Programming – It’s Easier Than You Think!
Learning G Code doesn’t have to be difficult…
If you know what to focus on.
Join our simple, easy-to-follow course, “G Code Made Easy: CNC Programming for Beginners“. We walk you through all the important codes – with simple explanations and real-world examples.
Want to become a super-skilled CNC programmer? Join now to take the shortcut to becoming a G Code Master today!
It should be pretty obvious from the names but the other unit mode to consider is G21 – Metric mode.
When G21 is the active units code, the machine will read all locations and values as in metric (mm).
Neither code can be canceled. The only way to turn on off is to switch to the other.
It is not advised to switch between units in your program.
When to use a G20 code?
A G20 code can be found at any point within the program, but the most likely location is at the start of the program or at the start of a new section of code.
For instance, you might use the G20 command immediately before starting a drilling cycle.
The machine may already be in inch mode, but placing the G20 command immediately before the drill cycle will ensure the program is in inch mode.
All kinds of things can happen when machining and it isn’t uncommon for the machine to crash or some part of a program to need to be re-run.
Placing the safety commands (G20 in this case) at the start of the new block of code makes sure your machine is in the correct unit mode when running that block of code.
With this example, the customer won’t be happy if you give them holes that are 1mm instead of 1 inch. If it goes the other way and you make a hole that is 1 inch instead of 1mm, just tell them that the extra work is on the house.
What to think about when using a G20 code?
When you use a G20 code you simply need to be aware of what type of units you are working in.
Most machine shops will work in only one unit mode, either inches or mm.
There are definitely some shops out there that will use mixed units, but in most cases CNC programs will be written in one or the other for every program they make.
Know whether your parts are in inches or mms.
Codes that are similar to G20
All of the codes listed in the table below are modal commands that affect the way the CNC machine interprets size and location values that are entered.
Welcome to our comprehensive guide to using the G04 CNC code. Whether you’re a beginner learning CNC programming or an experienced machinist, understanding the G04 CNC code is extremely important.
In this guide, we’ll break down everything you need to know about this dwell command, including how, when, and why to use it.
What does a G04 code do?
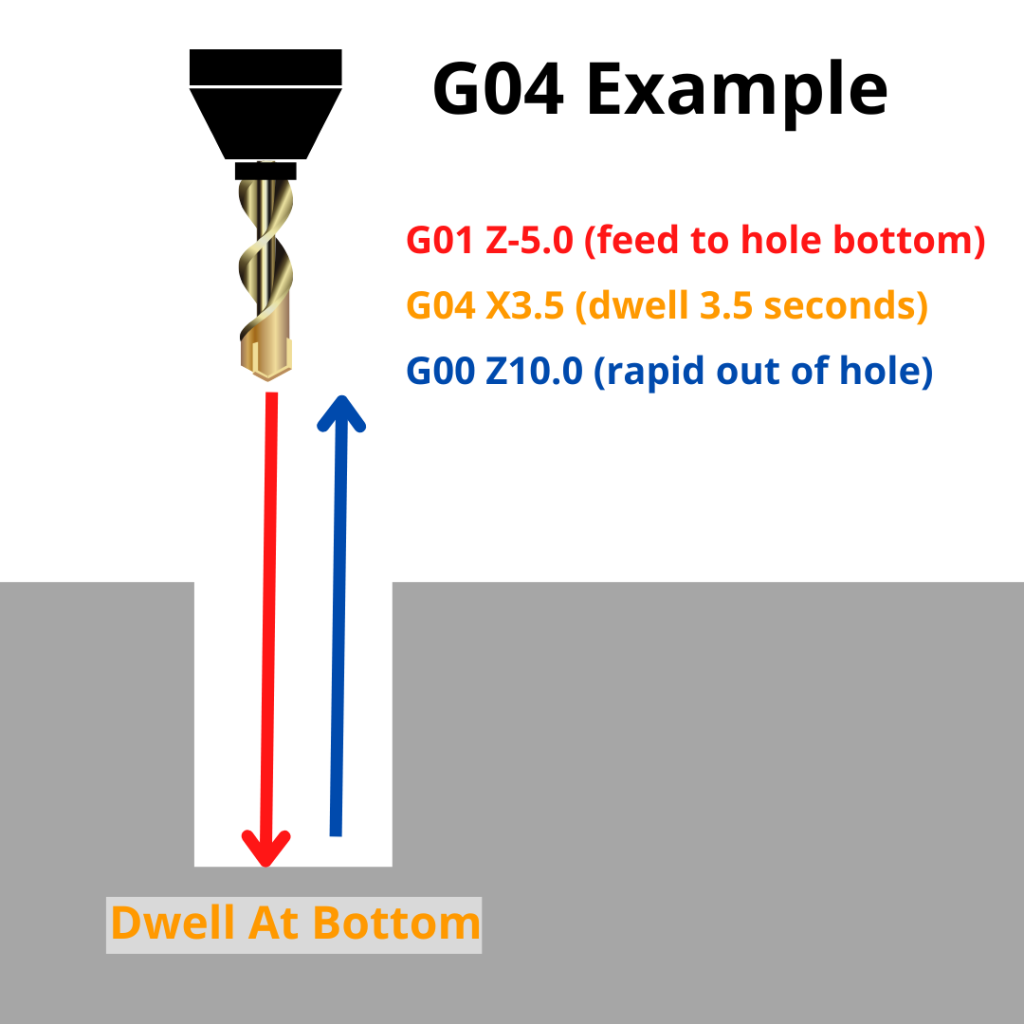
The G04 code tells the CNC machine to dwell (stay) in placefor specified amount of time.
It’s a code that tells the machine to pause for a bit.
After the specified amount of time is done, the machine will proceed to read the next line of code.
Learn CNC Programming – It’s Easier Than You Think!
Learning G Code doesn’t have to be difficult…
If you know what to focus on.
Join our simple, easy-to-follow course, “G Code Made Easy: CNC Programming for Beginners“. We walk you through all the important codes – with simple explanations and real-world examples.
Want to become a super-skilled CNC programmer? Join now to take the shortcut to becoming a G Code Master today!
They are used on lathes specifically, to break the chips. This way you don’t end up with one super long, razor-sharp chip.
Those chips are sharp!
They are also used to improve surface finishes on both lathes and mills. Dwelling at the bottom of a hole for instance may create a better finish on the bottom of the hole.
Another main reason that the G04 dwell code is used is to allow the machine time to perform an action. CNC machines tend to be very fast but sometimes all of their function can’t keep up.
Sometimes you may need to tell your machine to pause so the coolant can get flowing enough or allow the machine enough time to finish a pallet change.
Format for using a G04 code
There is some variation to how G04 codes are called out. The difference is how the dwell times are listed.
Depending on what brand/controller your machine is, the following can change:
Letter used in callout to list time. Common letters are F, P, U, and X.
Seconds vs milliseconds. 1 second = 1000 milliseconds. Some machines work in seconds, others work in milliseconds.
Decimal or no decimal. Some controllers require a decimal. Some don’t allow a decimal. Some allow either way, but treat the number different based on whether you use the decimal or not.
Real standardized stuff ain’t it?
For example, these three lines below could all do the same thing:
G04 P3
G04 U3.0
G04 U3000
Still, these differences should help you troubleshoot any program issues you have related to a G04 dwell code.
Consult your machine manual or machine manufacturer to make sure you know how your individual machine handles dwell commands.
G04 vs G4
Some people get confused about whether the 0 is required to be included in a G04 code.
To clear this up, there is no need to include the extra zero in the code. The CNC machine will read the code the same. It really is just a matter of preference.
Often you will see the full G04 code used in textbooks or other reference materials. In practice though, many prefer the shortened G4 code in their programs.
If you are working on your own, then go with whichever format you prefer. If you work in a bigger shop, make sure to stick to the format that the business has been using.
CNC codes that are similar to G04
If G04 pauses the CNC machine, what other codes are somewhat similar?
Welcome to our comprehensive guide to using the G03 CNC code. Whether you’re a beginner learning CNC programming or an experienced machinist, understanding the G03 CNC code is extremely important.
In this guide, we’ll break down everything you need to know about this circular interpolation command, including how, when, and why to use it.
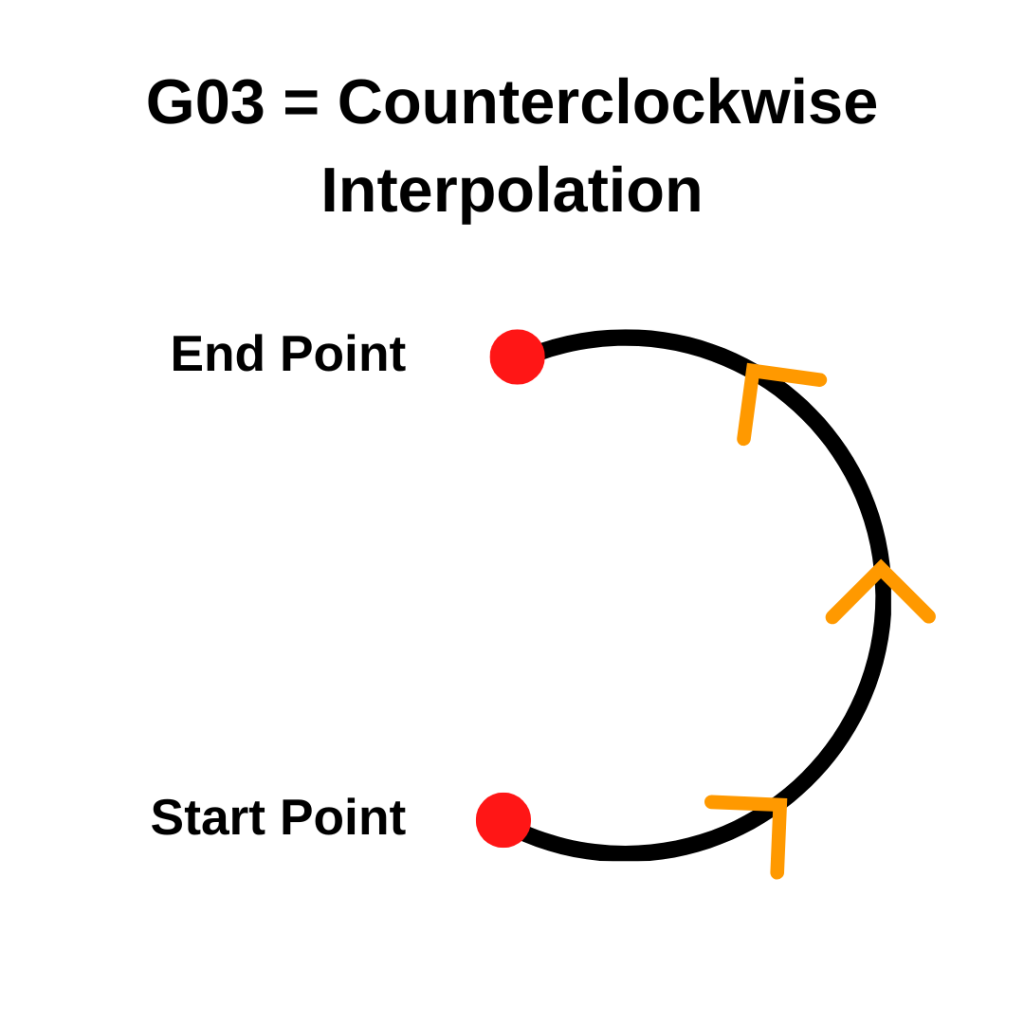
What does a G03 code do?
G03 sets the CNC movement mode to counterclockwise circular movement, otherwise known as circular interpolation.
Learn CNC Programming – It’s Easier Than You Think!
Learning G Code doesn’t have to be difficult…
If you know what to focus on.
Join our simple, easy-to-follow course, “G Code Made Easy: CNC Programming for Beginners“. We walk you through all the important codes – with simple explanations and real-world examples.
Want to become a super-skilled CNC programmer? Join now to take the shortcut to becoming a G Code Master today!
You know how when you zoom in real far on a photo, it starts to look all pixelated?
Circular interpolation is kind of like that. When we zoom in real close and look at how the machine is moving, we see it isn’t so smooth.
While it may look like your CNC machine is moving in a perfect circle, it is actually moving in a series of small steps that look like a circle. This is called interpolation.
Basically, your CNC is doing the best it can to mimic a perfect circle.
You don’t need to do anything differently, it’s just good to know what we mean by interpolation.
G03 [counterclockwise circular interpolation] vs G02 [clockwise circular interpolation]
Everything that applies to the G03 code applies to the G02 code as well.
The only difference between the two is the direction of movement.
Some people get confused about whether the 0 is required to be included in a G03 code.
To clear this up, there is no need to include the extra zero in the code. The CNC machine will read the code the same. It really is just a matter of preference.
Often you will see the full G03 code used in textbooks or other reference materials. In practice though, many prefer the shortened G3 code in their programs.
If you are working on your own, then go with whichever format you prefer. If you work in a bigger shop, make sure to stick to the format that the business has been using.
When to use a G03 code?
G03 codes will usually be in the lines of the program that are used to cut the part.
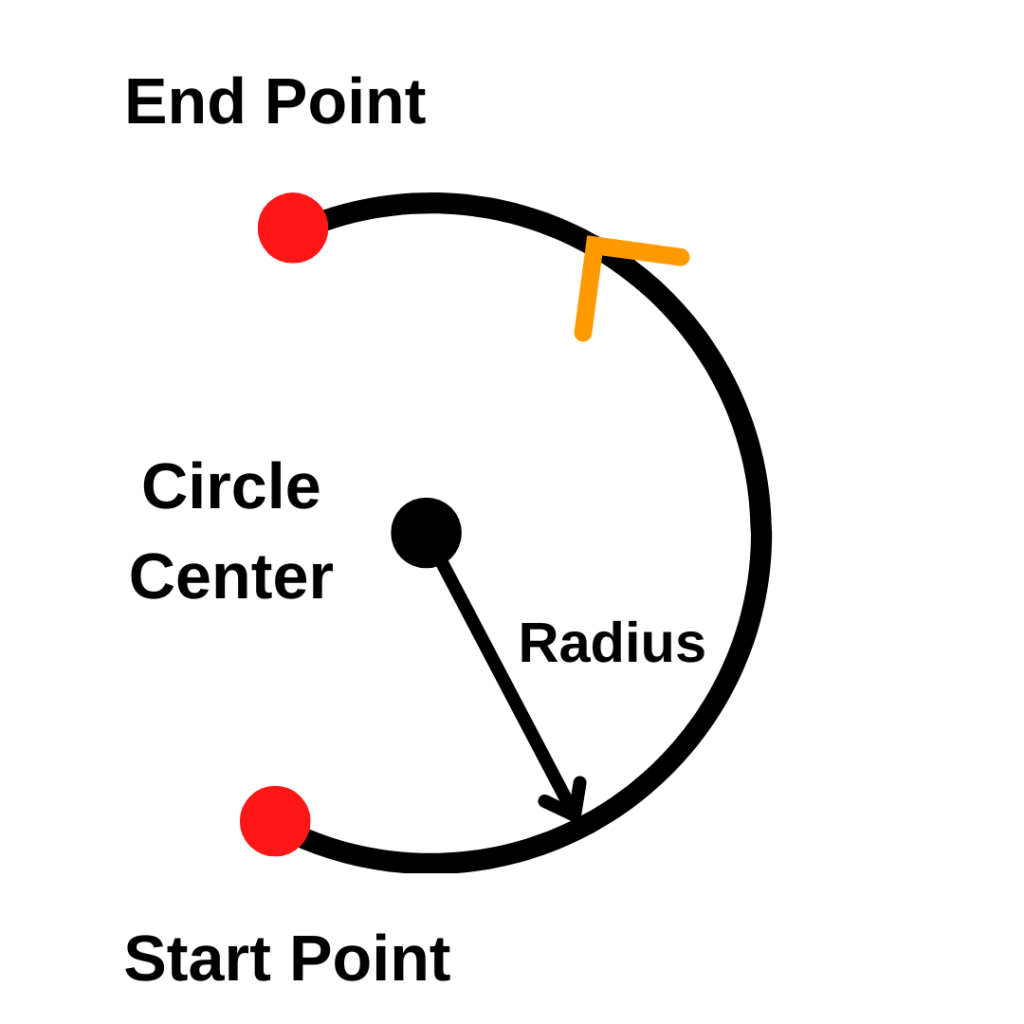
The G03 code allows the programmer to cut a full circle or portion of a circle.
An R code is used as well to tell the machine what size radius to move along. Some CNC programs will use IJK codes instead of an R code to describe the circular move.
Other codes used with G03
The codes below are used with the G03 code or commonly found very close to a G03 command in a CNC program:
Once the G03 code is used the machine will move to any XYZ locations given in a circular movement going counterclockwise along the given radius size and the set feed rate.
Because G03 is a modal code, you don’t need to specify it on every line of code.
If the next line of code after the one above was:
X7.0 Y1.0 R0.5
then the machine would still move to the location in a circle at the set feed rate. Because it’s modal, it stays on until switched to another mode.
The feed rate will also remain the same until it is changed and isn’t required to be on every line. This means that the feed rate can be set before the G03 code is used as well.
How to turn off a G03 code
There isn’t a specific cancel command for G03 like there is for canned cycles. Instead to turn G03 off you will need to switch it to another code in the same group of movement codes.
Using any of these codes will turn G03 counterclockwise circular interpolation off and switch to the new movement mode.
What to think about when using a G03 code?
Units
First, make sure you know what units you are working in. Moving 10 inches instead of 10 millimeters is a big difference.
A G20 (inches) or G21 (mm) code should identify the units you are working in before your G03 code.
Absolute vs incremental mode
The second thing to know is how the machine will understand position locations.
This is determined by whether you are working in absolute (G90) or incremental (G91) coordinates. The most recent G90 or G91 code in the program will determine which mode you are in.
Absolute positioning will move from a set zero location such as your machines home location or a specified location on your part.
Incremental positioning will move relative to your current position.
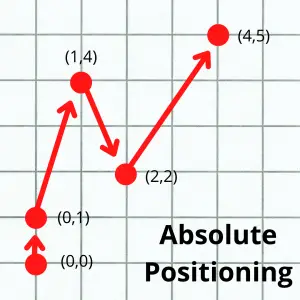
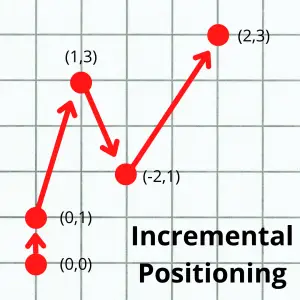
The images below show the difference between the absolute and incremental positioning modes. The numbers in parentheses are the locations given to the the machine to make the move.
Notice how in absolute mode, all locations are relative to a single location, usually either the workpiece zero or machine home location.
In incremental mode, all locations are relative to the machine’s current location.
Start and stop locations
Lastly, make sure you understand the path that the tool will take from it’s start location to the new location.
Check where you are currently position wise (X, Y & Z location), where you will be moving to and if there is anything in between the two locations.
The G03 code will move the machine in a circular arc to your new location. You don’t want anything in the way or to miscalculate your stop point. Clamps or vises can be easy to forget about and run into.
Crashing your machine is never a good time.
CNC codes that are similar to G03
Note that all the movement codes listed below are modal. This means they will stay in the movement mode identified by the code until switched to a different mode.
Welcome to our comprehensive guide to using the G02 CNC code. Whether you’re a beginner learning CNC programming or an experienced machinist, understanding the G02 CNC code is extremely important.
In this guide, we’ll break down everything you need to know about this circular interpolation command, including how, when, and why to use it.
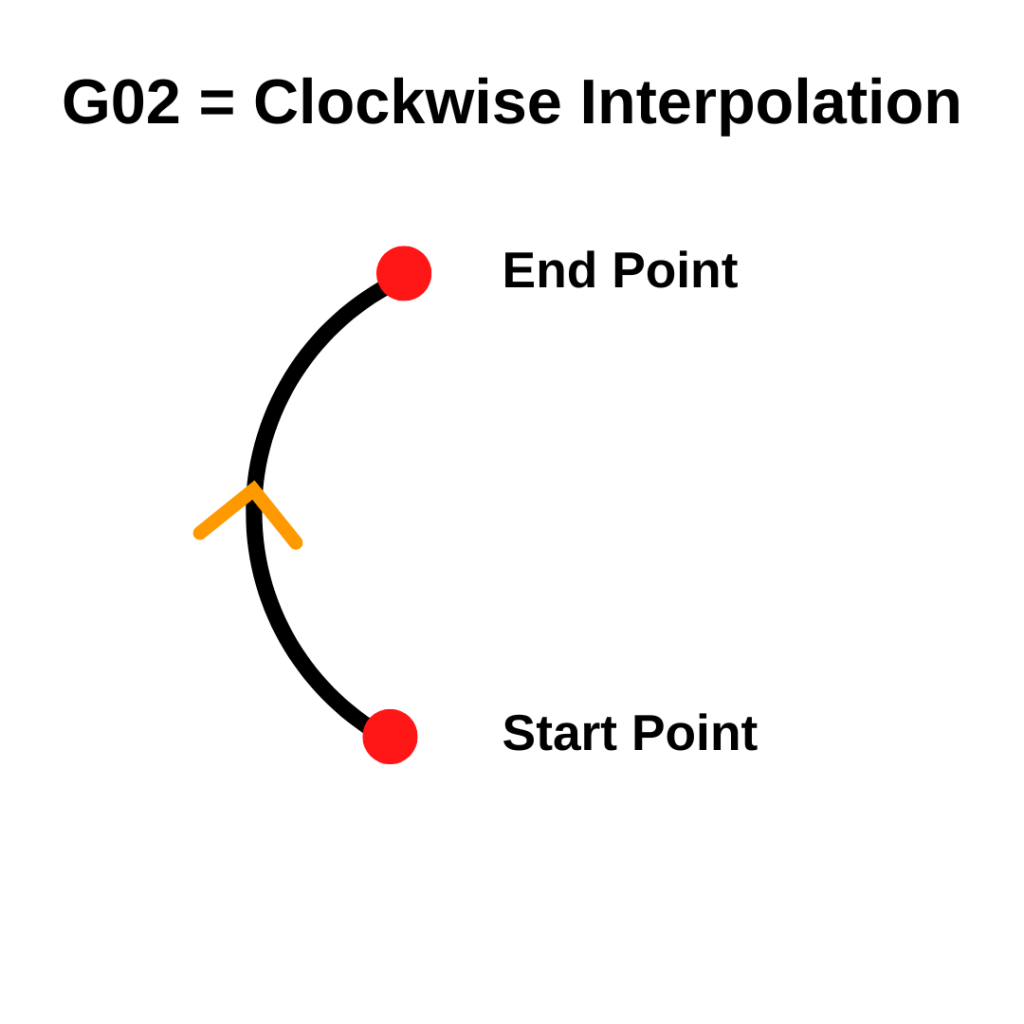
What does a G02 code do?
G02 sets the CNC movement mode to clockwise circular movement, otherwise known as circular interpolation.
Learn CNC Programming – It’s Easier Than You Think!
Learning G Code doesn’t have to be difficult…
If you know what to focus on.
Join our simple, easy-to-follow course, “G Code Made Easy: CNC Programming for Beginners“. We walk you through all the important codes – with simple explanations and real-world examples.
Want to become a super-skilled CNC programmer? Join now to take the shortcut to becoming a G Code Master today!
You know how when you zoom in real far on a photo, it starts to look all pixelated?
Circular interpolation is kind of like that. When we zoom in real close and look at how the machine is moving, we see it isn’t so smooth.
While it may look like your CNC machine is moving in a perfect circle, it is actually moving in a series of small steps that look like a circle. This is called interpolation.
Basically, your CNC is doing the best it can to mimic a perfect circle.
You don’t need to do anything differently, it’s just good to know what we mean by interpolation.
G02 [clockwise circular interpolation] vs G03 [counterclockwise circular interpolation]
Everything that applies to the G02 code applies to the G03 code as well.
The only difference between the two is the direction of movement.
Some people get confused about whether the 0 is required to be included in a G02 code.
To clear this up, there is no need to include the extra zero in the code. The CNC machine will read the code the same. It really is just a matter of preference.
Often you will see the full G02 code used in textbooks or other reference materials. In practice though, many prefer the shortened G2 code in their programs.
If you are working on your own, then go with whichever format you prefer. If you work in a bigger shop, make sure to stick to the format that the business has been using.
When to use a G02 code?
G02 codes will usually be in the lines of the program that are used to cut the part.
The G02 code allows the programmer to cut a full circle or portion of a circle.
An R code is used as well to tell the machine what size radius to move along. Some CNC programs will use IJK codes instead of an R code to describe the circular move.
Other codes used with G02
The codes below are used with the G02 code or commonly found very close to a G02 command in a CNC program:
Once the G02 code is used the machine will move to any XYZ locations given in a circular movement going clockwise along the given radius size and at the set feed rate.
Because G02 is a modal code, you don’t need to specify it on every line of code.
If the next line of code after the one above was:
X7.0 Y1.0 R0.5
then the machine would still move to the location in a circle at the set feed rate. Because it’s modal it stays on until switched to another mode.
The feed rate will also remain the same until it is changed and isn’t required to be on every line. This means that the feed rate can be set before the G02 code is used as well.
How to turn off the G02 code
There isn’t a specific cancel command for G02 like there is for canned cycles. Instead to turn G02 off you will need to switch it to another code in the same group of movement codes.
Using any of these codes will turn G02 clockwise circular interpolation off and switch to the new movement mode.
What to think about when using a G02 code?
Units
First, make sure you know what units you are working in.
Moving 10 inches instead of 10 millimeters is a big difference. A G20 (inches) or G21 (mm) code should identify the units you are working in before your G02 code.
Absolute vs incremental mode
The second thing to know is how the machine will understand position locations.
This is determined by whether you are working in absolute (G90) or incremental (G91) coordinates. The most recent G90 or G91 code in the program will determine which mode you are in.
Absolute positioning will move from a set zero location such as your machines home location or a specified location on your part.
Incremental positioning will move relative to your current position.
The images below show the difference between the absolute and incremental positioning modes. The numbers in parentheses are the locations given to the the machine to make the move.
Notice how in absolute mode, all locations are relative to a single location, usually either the workpiece zero or machine home location.
In incremental mode, all locations are relative to the machine’s current location.
Start and stop locations
Lastly, make sure you understand the path that the tool will take from it’s start location to the new location.
Check where you are currently position wise (X, Y & Z location), where you will be moving to and if there is anything in between the two locations.
The G02 code will move the machine in a circular arc to your new location. You don’t want anything in the way or to miscalculate your stop point. Clamps or vises can be easy to forget about and run into.
Crashing your machine is never a good time.
CNC codes that are similar to G02
Note that all the movement codes listed below are modal.
This means they will stay in the movement mode identified by the code until switched to a different mode.
To provide the best experiences, we use technologies like cookies to store and/or access device information. Consenting to these technologies will allow us to process data such as browsing behavior or unique IDs on this site. Not consenting or withdrawing consent, may adversely affect certain features and functions.
Functional
Always active
The technical storage or access is strictly necessary for the legitimate purpose of enabling the use of a specific service explicitly requested by the subscriber or user, or for the sole purpose of carrying out the transmission of a communication over an electronic communications network.
Preferences
The technical storage or access is necessary for the legitimate purpose of storing preferences that are not requested by the subscriber or user.
Statistics
The technical storage or access that is used exclusively for statistical purposes.The technical storage or access that is used exclusively for anonymous statistical purposes. Without a subpoena, voluntary compliance on the part of your Internet Service Provider, or additional records from a third party, information stored or retrieved for this purpose alone cannot usually be used to identify you.
Marketing
The technical storage or access is required to create user profiles to send advertising, or to track the user on a website or across several websites for similar marketing purposes.