Are you new to using a micrometer and not sure where to start?
Don’t worry, you’re in the right place! This article will give you a step-by-step guide on how to use a micrometer correctly and with confidence.
You’ll learn about the different parts of the micrometer, how to read the measurements, and even some tips and tricks to help you out.
Check out the secrets to mastering micrometer measurement.
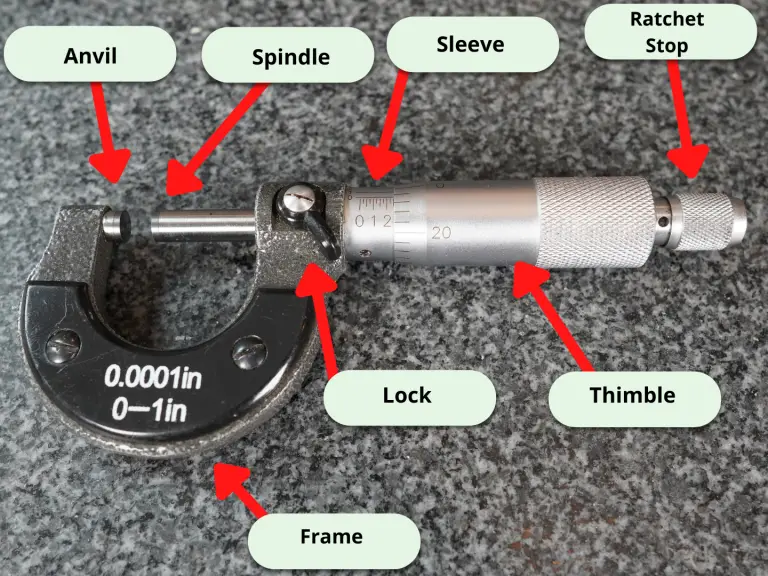
Parts of a micrometer
Before we talk about taking measurements with our micrometer, let’s have a quick refresher on the various parts of the micrometer.
Taking a measurement with your micrometer
Alright, let’s get down to business.
I’m assuming you’re ready to take your measurement now.
If you need tips for getting ready to take your measurement then skip to the bottom where we have some advice laid out.
For everyone else, grab your micrometer and your part to measure.
To take the measurement we are going to take four separate readings from the micrometer and add them up for our final reading.
Put your part between the anvil and spindle
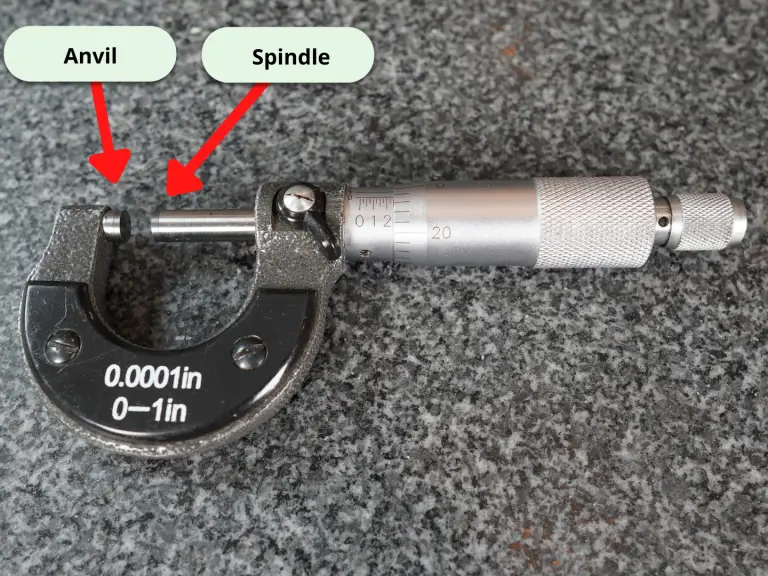
Put the part in between the anvil and spindle of the micrometer.
This might require you to spin the thimble to open the micrometer enough to get the part in there.
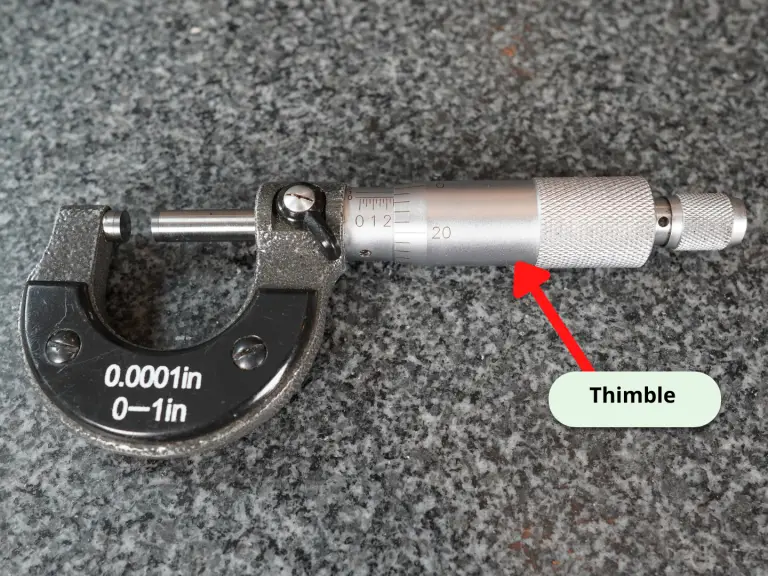
Close the micrometer on the part
Now spin the thimble until it closes on the part.
Remember you aren’t trying to clamp down on the part.
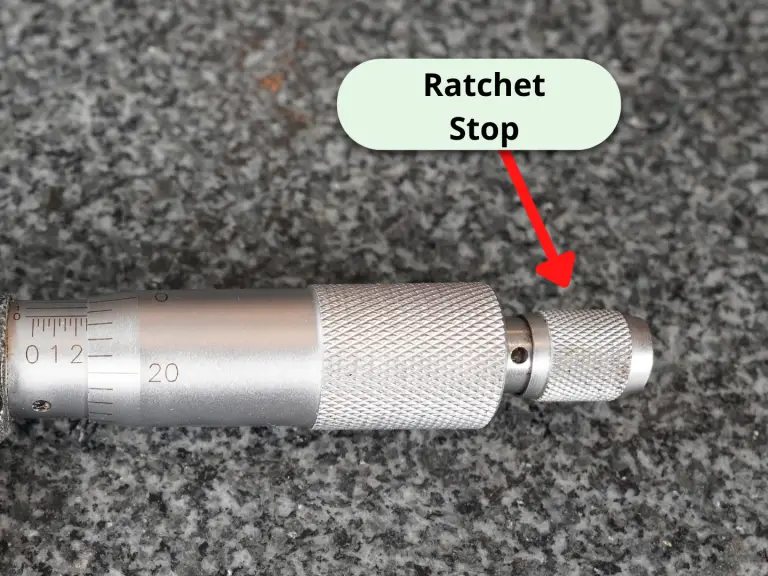
Use a gentle, consistent amount of force when spinning the thimble. Using the ratchet on your micrometer can make this easier. Try spinning the thimble until you get three clicks on your ratchet.
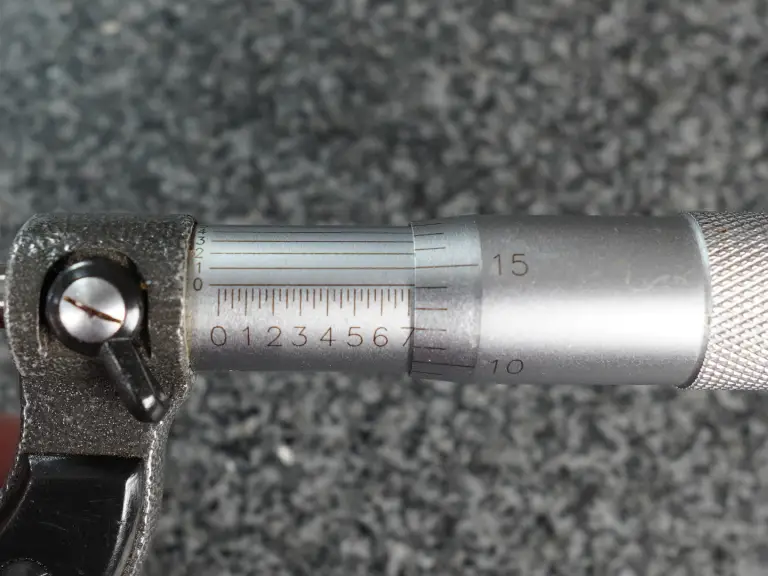
We’ve done that now and we have the reading below on our micrometer.
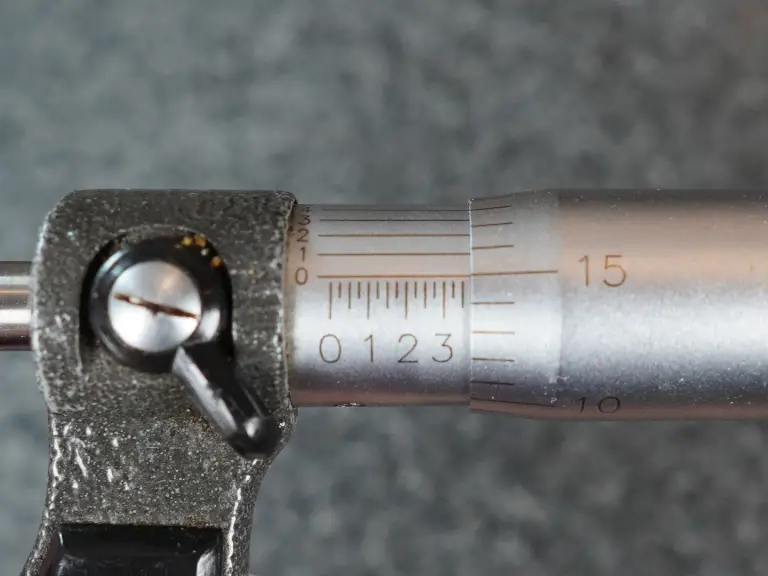
So let’s break down the four parts of this reading.
The 0.100″ reading
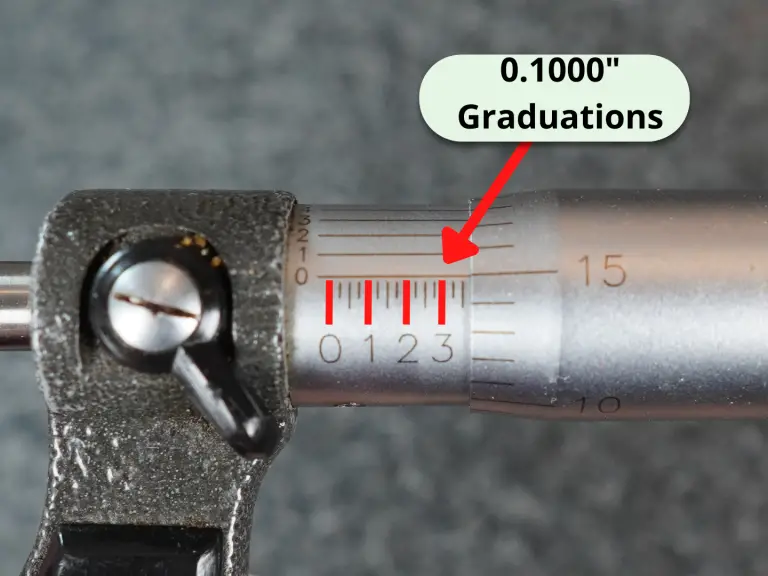
The first part of the reading is the 0.1000″ reading. This is our hundred thousandths or “hundred thou” reading.
In the example above we can see that the larger lines on the sleeve of the micrometer are numbered.
Each of these larger lines equals another 0.1000″.
We are taking our readings at the intersection of the lines on the thimble and the sleeve. Because the 3 is the last hundred thousandths graduation shown, the first part of our reading is 0.3000″.
The 0.025″ reading
Next is the 0.0250″ or 25 thousandths reading.
This reading is also taken from the sleeve of the micrometer.
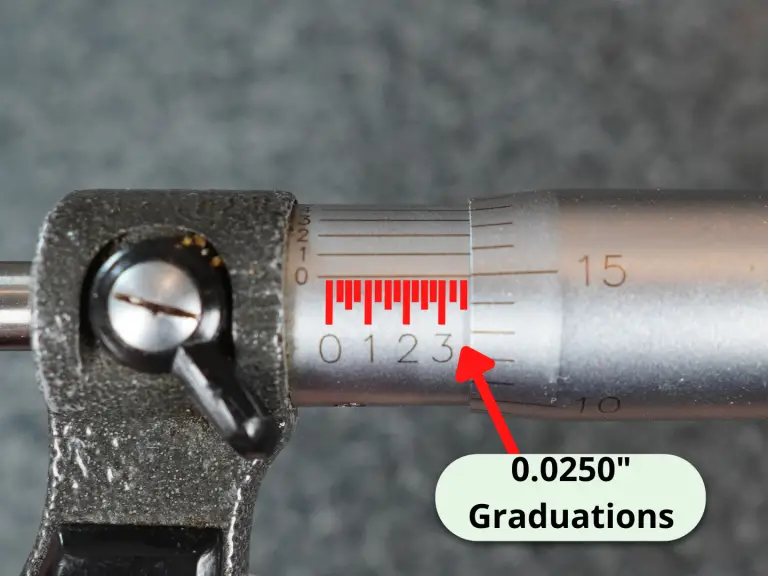
Each of the lines on the sleeve equals another 0.0250″. In our example, we can see two lines after the 3 which equals 2x 0.0250″ = 0.0500″.
This means so far our reading is 0.3000″ + 0.0500″ = 0.3500″.
The 0.001″ reading
There are 25 lines around the thimble of an inch micrometer.
Each of these lines equals 0.0010″ or 1 thousandth.
In our example we can see that we are on the 15 so our reading is 0.0150″.
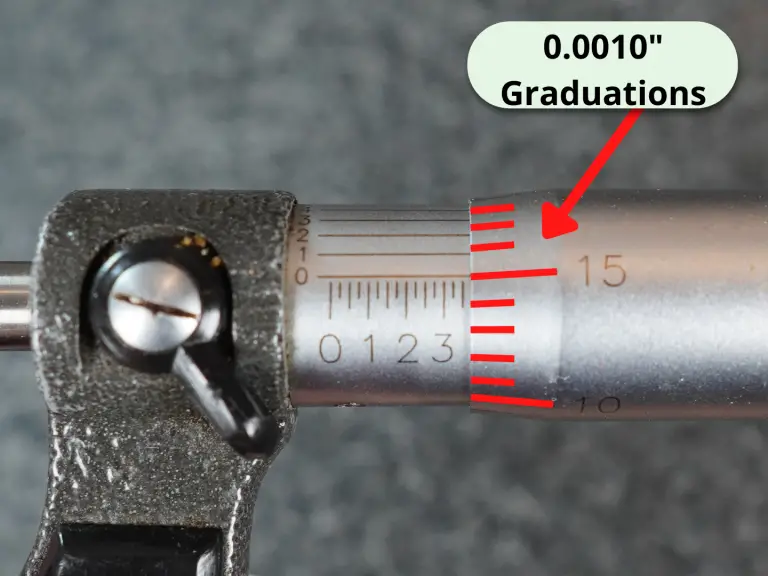
Let’s check in on our measurement so far.
We have 0.3000″ + 0.0500″ + 0.0150″ = 0.3650″.
The 0.0001″ reading
The last part of our reading is the tenths (0.0001″) reading.
Note: some micrometer don’t have a 0.0001″ reading. This is more common on older or very cheap micrometers.
To take the tenths measurement we look at the numbers that go around the sleeve of the micrometer.
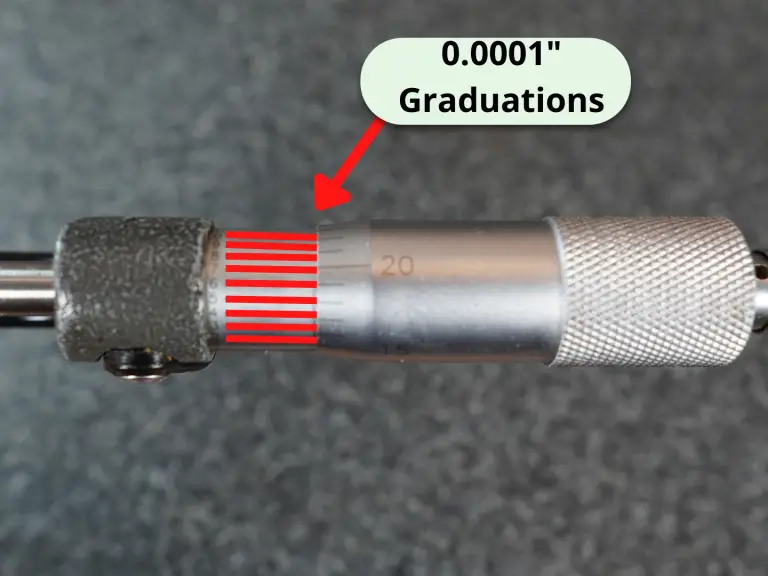
We take the reading where the number on the sleeve lines up best with a line on the thimble.
In the pic above you can see that it looks like the 6 on the sleeve lines up best with a number on the thimble. This would make the final part of our reading 0.0006″.
We now have all four parts of our reading. The 1, 25 and 100 thousandths readings as well as the tenths reading.
If we add them all up we get 0.3000″ + 0.0500″ + 0.0150″ + 0.0006″ = 0.3656″
Note: our measurement was taken using a 0-1″ micrometer. If we used a 1-2″ micrometer then we would add 1″ to our measurement. If we used a 4-5″ micrometer then we would add 4″ and so on.
Taking multiple measurements
One last thing to keep in mind when taking micrometer measurements is that you should take multiple readings.
These are very accurate measurements and it is easy for something to go wrong.
Clamping too hard, being a little off angle or a piece of dust or lint can really throw off your measurement.
Taking multiple measurements helps build confidence that your measurements are correct.
Micrometer reading examples
To give you a little more practice let’s look at a few more readings.
All of these examples assume you are using a 0-1″ micrometer.
Example #1

Here we have 0.1000″ + 0.0250″ + 0.0120″ = 0.1370″.
The tenths reading lines up with the zero so we don’t add any tenths.
Example #2

Here we have 0.5000″ + 0.0500″ = 0.5500″.
The 1 thousandths (0.0010″) and tenths (0.0001″) readings lines up with the zeroes so we don’t add them to our measurement.
Example #3
Here we have 0.7000″ + 0.0140″ + 0.0001″ = 0.7141″.
The 25 thousandths (0.0250″) reading doesn’t have any lines shown beyond the 0.1000″ reading so we don’t add anything to our measurement for the .
If our tenths reading lined up at the 9 as shown below. Our reading would instead be 0.7000″ + 0.0140″ + 0.0009″ = 0.7149″.

Tips for preparing to take your measurement
Reading your measurement correctly is important but so isn’t preparing to take your reading.
Pay attention to these factors before taking your measurement to help make sure your readings are accurate.
Make sure everything is clean
Dust and lint might seem small but they can make a huge difference in your measurement.
A human hair measures about 0.003″. Micrometers take measurements to an accuracy of 0.0001″ which is 30 times smaller. This is why everything has to be extremely clean.
Make sure the micrometer spins freely
You want to make sure your micrometer is in good working order.
Get a feel for it, literally!
If it feels like your micrometer is dragging or rubbing at any point when spinning the thimble, there is a good chance it could affect your measurement.
Pay attention to the angles
You want to take your measurements perpendicular (90 degrees) to the surface you are measuring.
Measuring at an off angle will skew your measurements and tend to give you a larger reading than the actual size.

Verify your micrometer – checking the zero
Your micrometer should be calibrated but it also a good idea to check it right before using it.
The simplest way is to check the zero. Close the micrometer and check the reading to make sure it isn’t a tenth or two off.
If you have a larger micrometer then use a gauge block to check your zero.
Frequently asked questions about taking readings with micrometers
How to take readings with different types of micrometers
Our examples are shown using a typical outside micrometer. However, there are many different types of micrometers available.
They all get read the same way.
Depth micrometers are probably the second most common type of micrometer. For most depth micrometer you will find that they don’t have a tenths (0.0001″) reading. Follow all of the same steps to read them but skip adding any tenths to your measurement.
What’s the difference between a micrometer and a caliper?
Generally, calipers are less accurate and more versatile. Check out the comparison below to see how they match up.
Micrometers | Calipers | |
Accuracy | 0.0001" | 0.001" |
Measuring Range | 1" increments | 0-6" |
Types of Measurements | Outside Measurements | Inside, Outside & Depth Measurements |