What is a micrometer?
A micrometer is a precision measuring tool.
They are used in manufacturing, machine shops, automotive work and the construction industry.
“Mic” is shorthand for micrometer.
Mics are very accurate measuring devices.
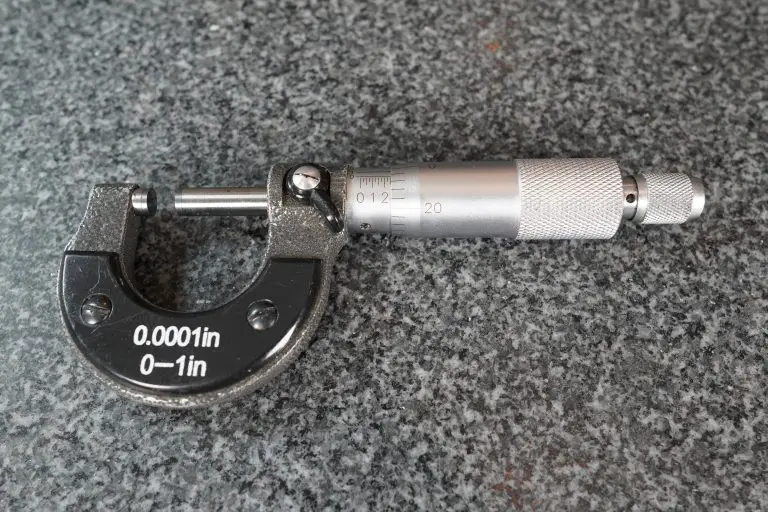
Micrometers are used to take measurements with an accuracy of ~.0001″ or better in inches.
Measurements in millimeters can be made down to .01mm or .001mm.
How accurate are micrometers?
Most micrometers have an accuracy of +/- 0.0001″, commonly referred to as a tenth of an inch in machining.
The standard metric versions would come as +/- 0.001mm or +/- 0.002mm.
They can be found with worse or better accuracy but what is usually seen .
When to use a micrometer
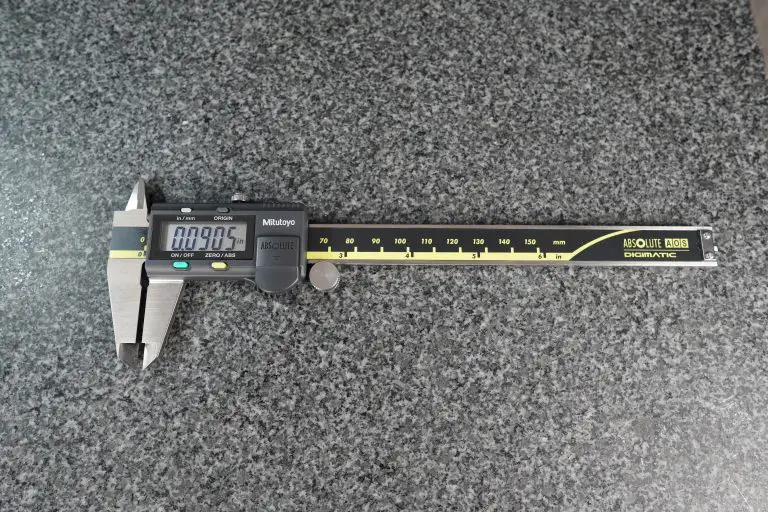
Three of the most common precision measuring devices used by a hobbyist or a machine shop are calipers, micrometers and dial test indicators.
Calipers have the least accuracy of the three and the largest measuring range.
The dial test indicator has the most accuracy and least measuring range.
Micrometers are in the middle for both accuracy and measuring range.
While still very accurate, one downfall of the micrometer is that they usually come with a 1″ measuring range (3-4″, 4-5″, etc.).
Because of this they are often sold in sets to cover a larger measuring range.
A 0-6″ micrometer set will cover the needs of most applications while a 0-12″ set is more than most people, especially hobbyists will need. 0-3″ sets are also common.
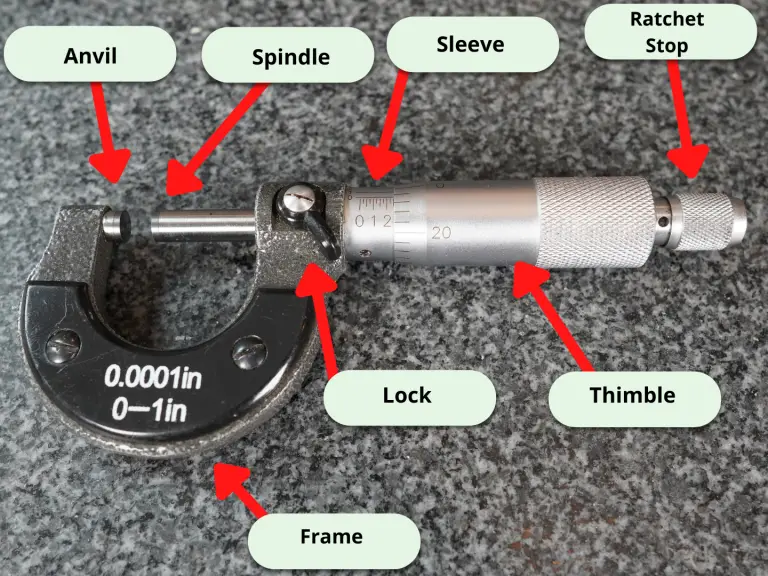
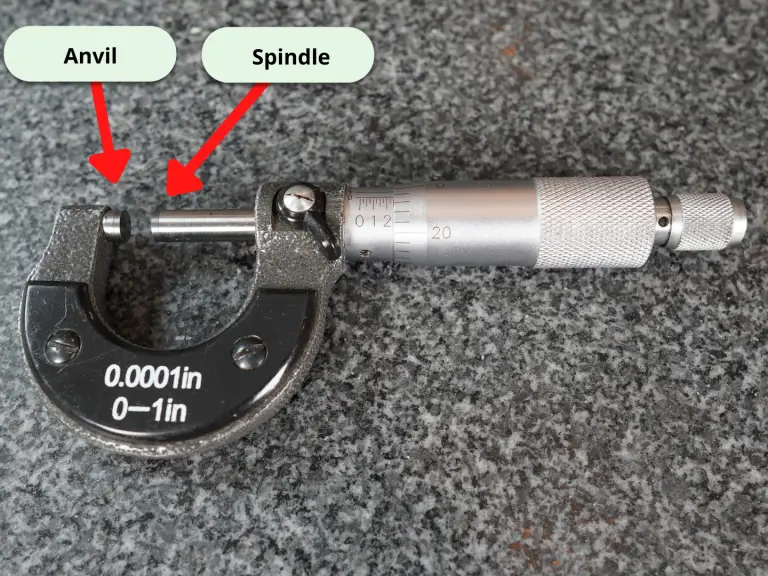
Parts of a micrometer
How to use a micrometer
Before using your micrometer, ensure that the measuring tool and surface to be measured are free of dirt, debris, chips, etc.
Everything should be clean.
The micrometer thimble should spin freely. No hangs up or anything similar.
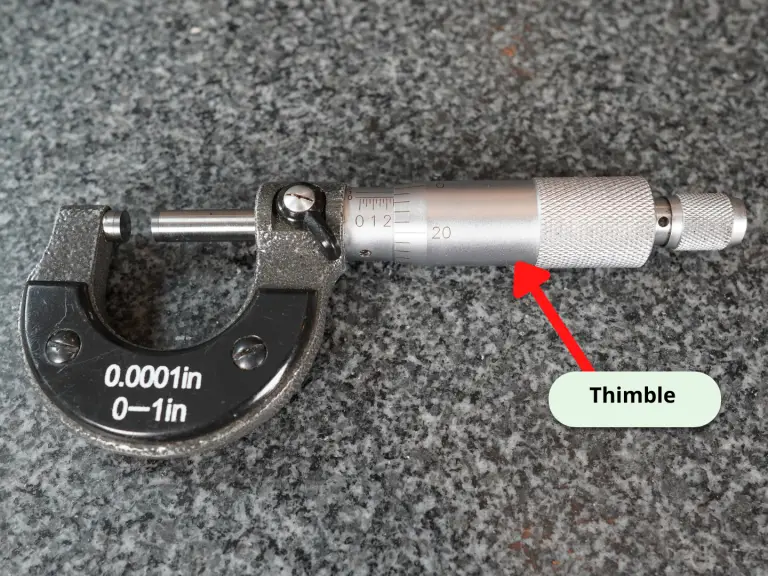
Open the thimble to place the part you want to measure between the anvil and spindle.
Spin the thimble until it closes on the part.
You aren’t trying to clamp down on the part.
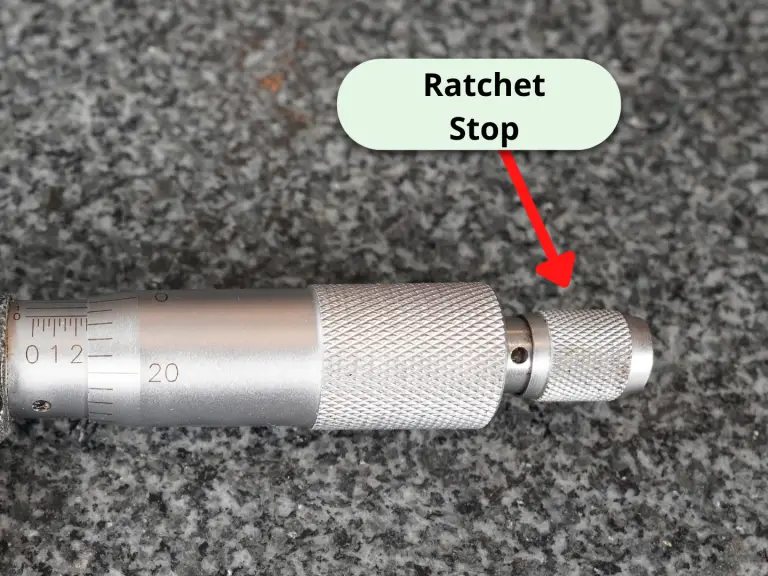
Use a gentle, consistent amount of force when spinning the thimble. Using the ratchet on your micrometer can make this easier. Try spinning the thimble until you get three clicks on your ratchet.
This will help you get repeatable measurements. You want to be consistent in your measuring so you know your readings are good.
This is why taking multiple measurements is so important.
When possible, measure the part multiple times to be confident your readings are accurate.
A little practice on a cheap gauge block can help here. Measure that same gauge block a bunch of times and you will become more repeatable in your measurements. You’ll also see how easy it is to change your reading.
As the spindle closes on the part being measured, it can be beneficial to slightly rock the micrometer in an effort to seat the micrometer on the part.
Be careful: this technique isn’t right for surfaces that could be scratched or damaged easily.
Once you have closed the part in the micrometer, it is time to take your measurement reading.
How to read a micrometer
The most common variety of micrometers measures to one ten-thousandth of an inch (.0001″).
Measurements are taken by identifying where the lines on the micrometer line up.
You will need to take 4 readings and add them together to get your measurement.
These readings are the 0.1000″, 0.0250″, 0.0010″ and 0.0001″ readings.
Machinists refer to these as the hundred thousandths, 25 thousandths, 1 thousandths and lastly the tenths readings.
Let’s get started.
Along the sleeve of the micrometer will be graduations similar to a ruler. The graduations at every fourth interval are most often numbered 0, 1, 2 and so on.
These numbers represent .100″ or one hundred thousandths of an inch.
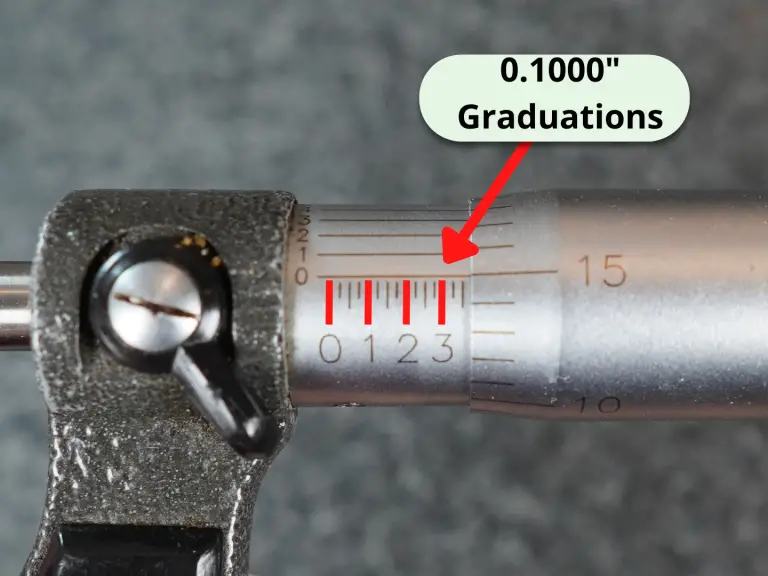
Whichever hundred thousandths reading you are past is your reading. In the pic above, the hundred thousandths reading would be 3 which equals 0.3000″.
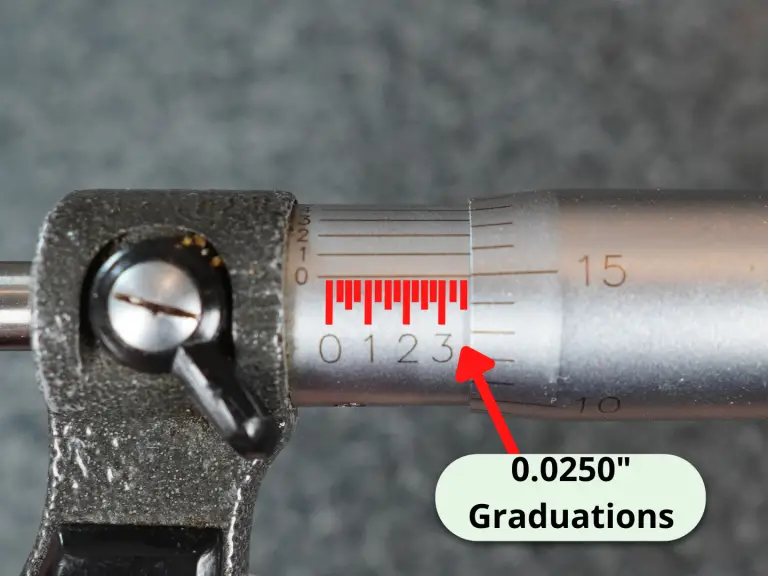
Once you have taken your hundred thousandths reading then you will need to take the 25 thousandths reading.
Each mark along the sleeve is 0.025″ or 25 thousandths.
Next is the reading from the thimble. This is the 0.0010″ reading or one thousandth of an inch reading.
In the pic above two lines are shown past the three so the 0.0250″ graduation value would be 0.0500″.
In the end we are going to add all of our individual measurements up for our final reading.
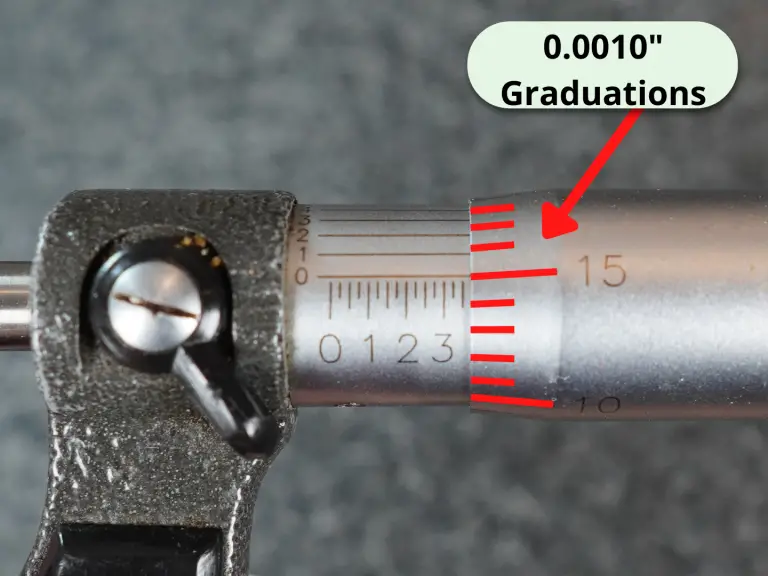
Note the 0.0010″ reading on the thimble and lastly take the tenths reading from the spindle.
Here we have 15 thousandths.
This makes our measurement so far 0.300″ + 0.0500″ + 0.015″ = 0.3650″.
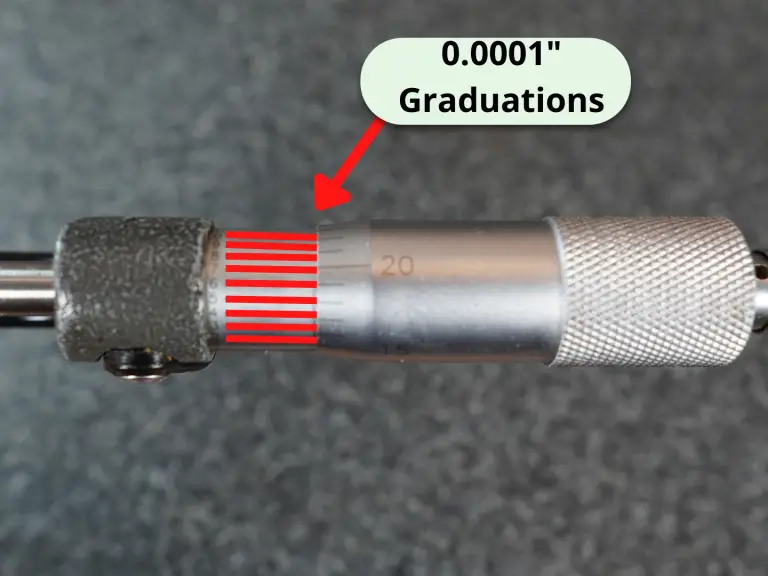
The last reading to take is the tenths reading. If the lines matched up at the 6 tenths mark, then we would have a reading of 0.0006″ which we need to add to our previous readings.
0.3650″ + 0.0006″ = 0.3656″ or three hundred and sixty five thousandths of an inch and six tenths.
Frequently asked questions about micrometers
What kinds of micrometers are available?
There are a ton of different micrometer types available.
Often specific industries have their own special type micrometers such as the auto related micrometers on our list of the most common micrometers below:
- Outside micrometers – measures various lengths, widths, thicknesses and diameters
- Inside micrometers – measures hole diameters, slot widths
- Depth micrometer – measures depth of holes, step locations
- Thread micrometers – measures various thread characteristics
- Crankshaft micrometer – specific measuring range for measuring crankshafts
- Disc brake micrometer – measures thickness of brake rotors
- Blade micrometer – measures slots, keyways and grooves
Are cheaper micrometers as good as expensive ones?
The cheaper off-brand micrometers have gotten much better in recent year, but they haven’t quite caught up to the best manufacturers yet.
Starrett and Mitutoyo still reign supreme in terms of quality and accuracy.
You can always look for used options on Craigslist or Facebook marketplace to save a buck.
What makes a good micrometer?
A good micrometer needs two things: precision and accuracy.
Some adjustments can be made with most micrometers to account for small errors in accuracy but nothing can be done to fix a tool that isn’t precise.
Quality micrometers will turn smoothly without any drag. This is the telltale sign of a good tool. If your micrometer ever feels like it is rubbing internally, we recommend disassembling the micrometer and cleaning per the manufacturers instructions to eliminate any possible contamination that may be causing the issue
How to adjust a micrometer
If your micrometer is in need of adjustment, most micrometers can be adjusted by using the wrench that came with your tool to spin the sleeve of the micrometer. This is usually done in the zero position. This can be especially useful for adjusting for the touch or feel of a mic when it does not include a ratchet or friction stop.
If you no longer have a wrench or spanner for adjustment, replacement wrenches can be purchased from most manufacturers or on Amazon.
How often should my micrometer be calibrated?
How often you need to calibrate your micrometer will vary depending on a few factors such as what you are measuring with it, how often you are using it, and what type of environment it is in.
Check out our guide to micrometer calibration to get a better understanding of the how, where, when and why of calibrating your mics.
Related articles
For more information check out these related articles: