With the right engraving tool in your hands, you can finish creative tasks with ease.
And it’s a terrific way to personalize something generic with a fun crafty hobby.
Engraving tools come in a wide variety of styles, sizes, and capabilities. It’s important to find the ideal one at is ideal for your project.
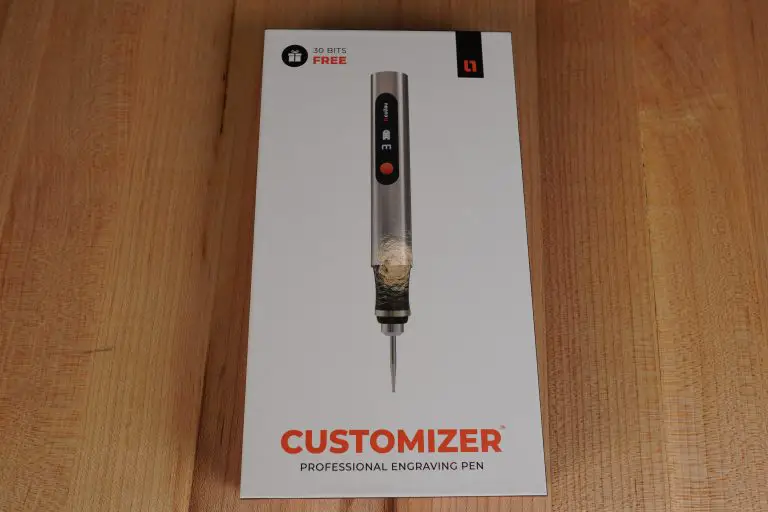
The Customizer by Culiau is an engraving pen that is more than capable of meeting most people’s needs. That’s why it’s a popular choice among home crafters and those who like to try out new tools for art.
The Customizer’s durability, power, compactness, and exceptional value for money make it an excellent professional etching tool suitable for all materials, including glass, wood, and metals.
Don’t get me wrong, it will still take practice to get a nice, finished product, but the Customizer is easier to use than some of the other bulkier engraving pens on the market.
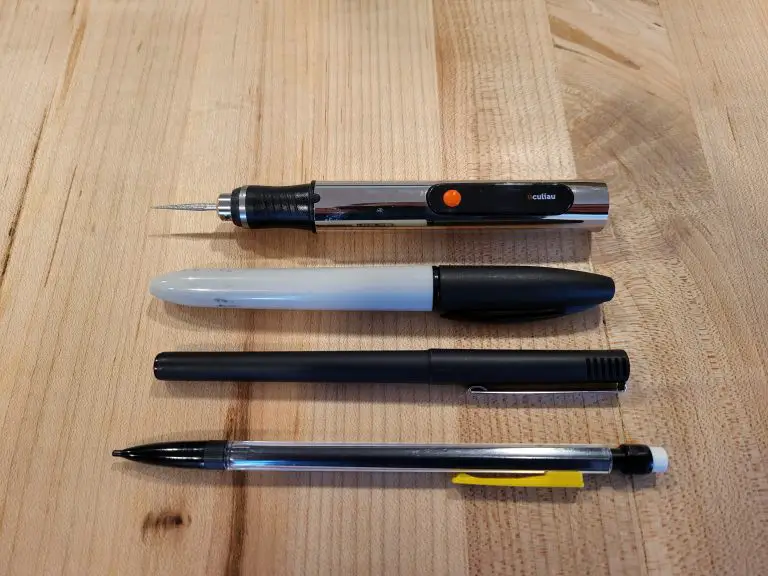
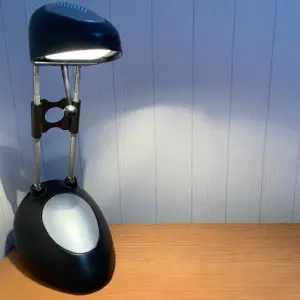
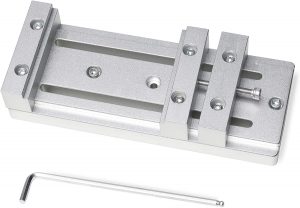
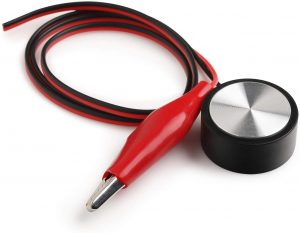
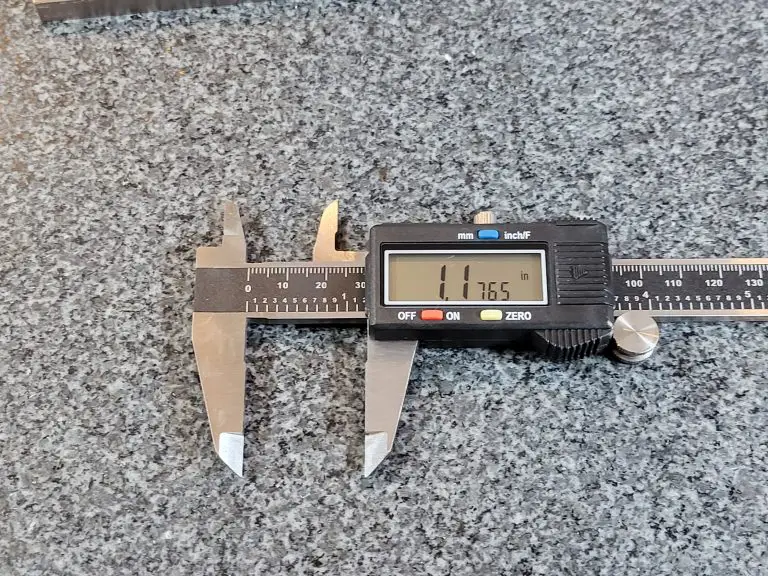
Size comparison of the Customizer
The Customizer is roughly the size of a regular marker. The textured grip and light weight make controlling the engraver while in use a snap.
You can sketch with it just like a normal pen or pencil.
The flexibility of this tool makes the job as simple as drawing on paper. It works well on wood, including hardwoods, glass, and metals such as steel, silver, and others.
The Customizer comes with a rechargeable battery and a USB charging wire. The run time is about 2 hours. And trust me 2 hours is more than enough time. Unless you are super experienced, your hand it going to get tired well before the 2 hours runs out.
Charging port and cable
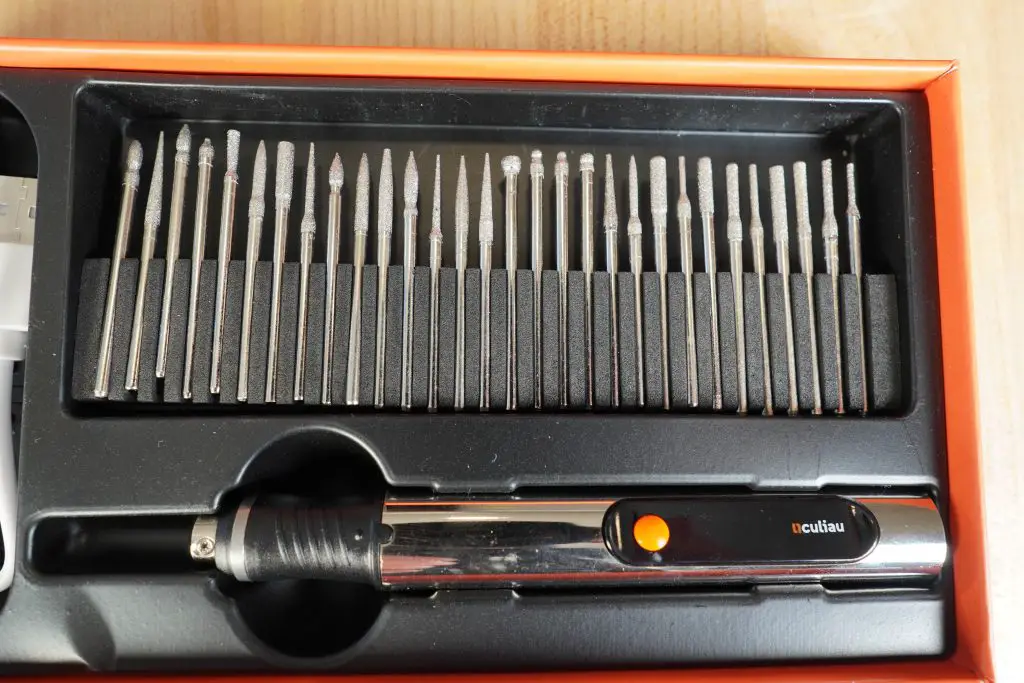
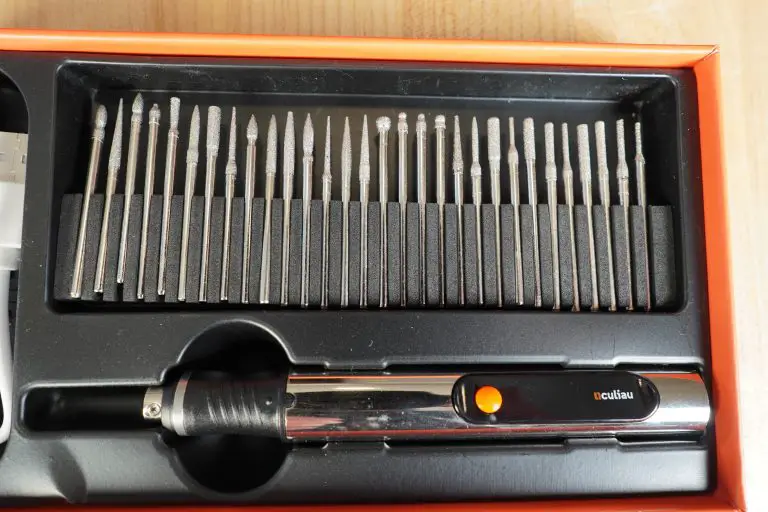
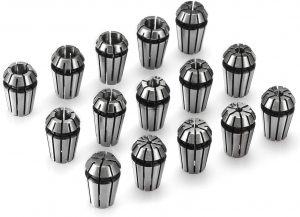
Also included is a large selection of engraving bits. They come in a variety of shapes and sizes which means you won’t need to pick up any extras for the Customizer right away.
Unless you plan to use it almost daily, there is a good chance you won’t need to get any more bits ever because the assortment that comes with the Customizer is well rounded.
The engraving bits that come with the Customizer
The engraving pen includes an LED display indicator, which shows you the battery level and speed of the tool.
One of the biggest indicators of the quality of the Customizer is the feel of the tool. This is a well built tool that feels good in the hand.
It is ergonomic, lightweight, and small. Because of this it is exceptionally comfortable to use and handle. The Customizer truly is a pocket-sized engraving machine.
The quality comes with a price though and the Customizer does cost more than some of the other engraving pens on the market. However, many of those cheaper engraving pens aren’t built as well. Often they just don’t feel good in your hand.
If you plan to use it a lot, I recommend going the Customizer from Culiau and avoiding all the generic copycats.
Above all, make sure you think safety first with any power tool. Proper eye protection. Consider gloves and a dust mask as well depending on the materials you plan to work with.
2. Use proper lighting
Nobody’s idea of a good time is engraving in the dark – and it’s not safe or productive.
Make sure your workplace has adequate light and that it is placed above or in front of you so that your head and shoulders don’t create a shadow on the work.
Proper lighting will make it much easier to see the fine details that you are creating on your workpiece.
3. Work on a clean surface
Before you begin, be certain that the surface you will be working on has been well cleaned.
Some materials can be cleaned with soap and water, others require special cleaning chemicals. Start with soap and water, it will work for most materials.
4. Use a template
Consider making a paper template to guide you. This helps in the beginning when you may lack the courage to do it all freehand.
Print out your design to trace or outline
It’s a good reference.
5. Practice
Just try.
If you want to learn it, then use it!
Practice different words and symbols on a piece of scrap material if you have it. Your first few designs will probably be rough. .
Another key point is to make sure you practice with the type of material you plan to work with. In other words, if you want to engrave on sea shells then find some to practice on.
Frequently asked questions
What kind of material can the Customizer work with?
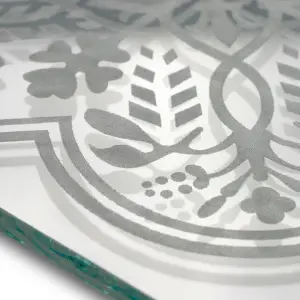
An engraved piece of glass
The Culiau Customizer is capable of working with a wide range of materials including:
Wood
Plastic
Metal
Glass
Leather
Stone
Shells
Clay
Does the Customizer use standard Dremel style bits?
Unfortunately, the Customizer does not take Dremel bits straight out of the box. For an added cost, you can purchase an adaptor that will allow you to use them however.
How is customer support?
In my opinion good customer support says more about the product than just about any other feature.
Culiau has excellent customer support through email. [email protected] is their address and in my experience they are quick to answer any questions you might have, even if you just need tips for using your new tool.
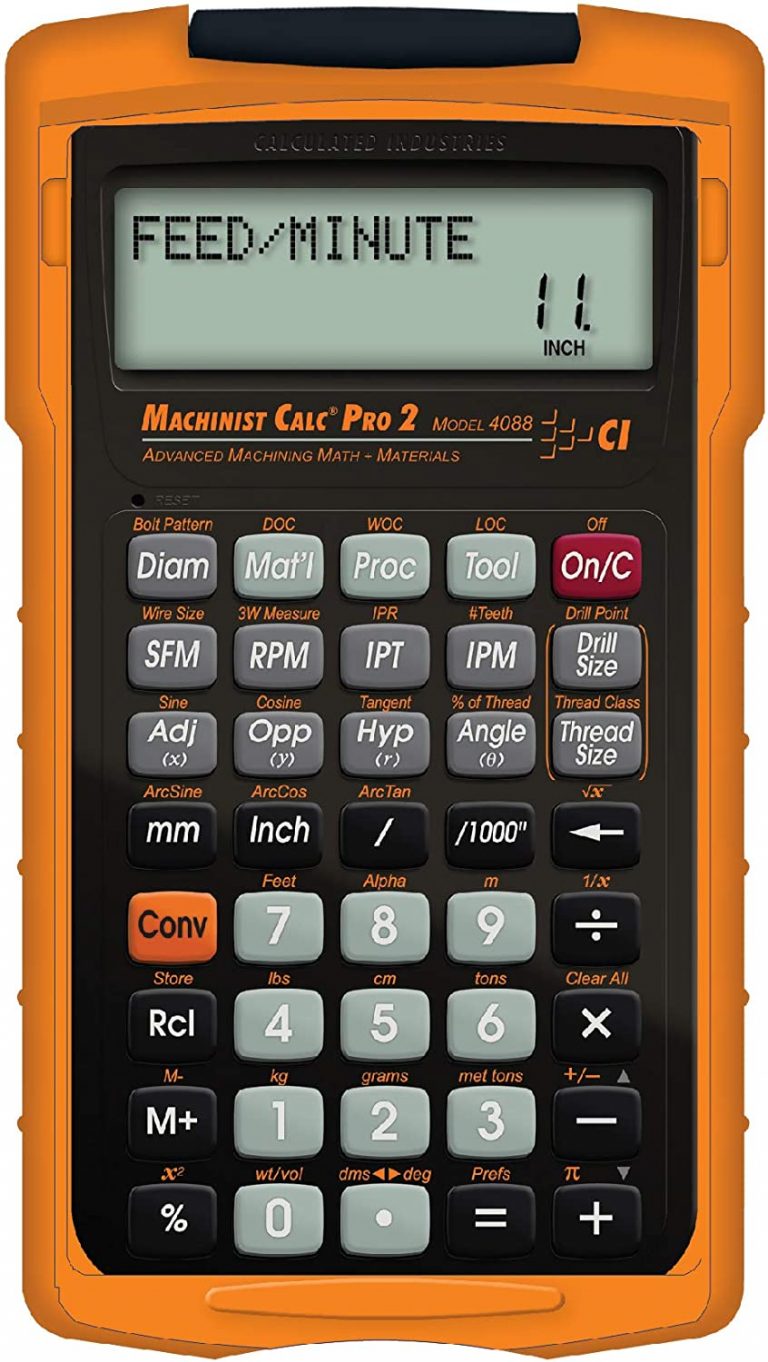
Micrometers are amazingly accurate measuring tools.
But for anyone just starting out it can be hard to know which ones are good and which ones are bad.
This has only gotten trickier in recent years as some of the once great manufacturers have moved their production to China and various other countries known for lesser quality. On top of that some of the Chinese manufacturers have really upped their game and are producing quality tools.
We’ll break it down for you and let you know which micrometers are best with some tips on what to avoid.
One last tip if you are very new to micrometers.
Think about what you plan to measure. What are the sizes involved? Most of the time people don’t need huge sets of micrometers.
My advice for someone new would be to get the best set of 0-1” micrometers that they can afford. This is the tool that will get the most use.
A common mistake the newbies make is thinking they need a micrometer when a caliper will do the job just fine.
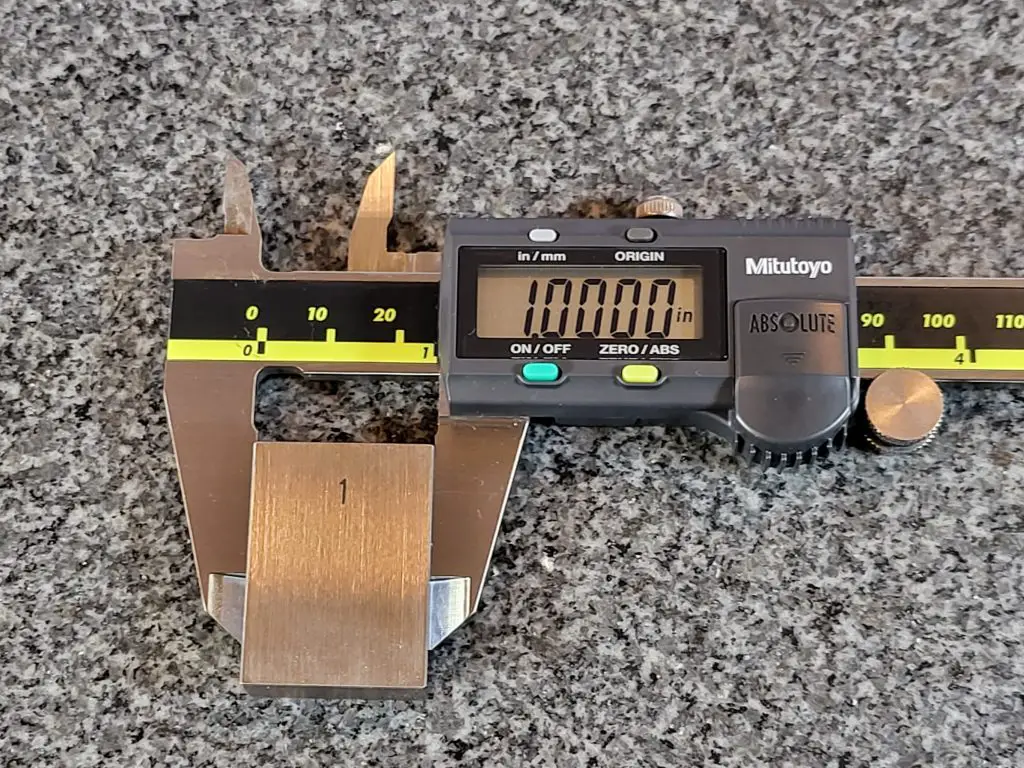
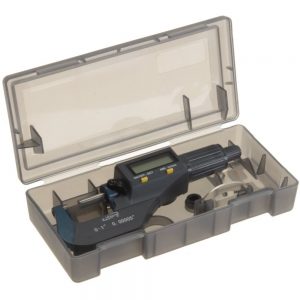
0-6″ Mitutoyo digital caliper
If your tolerances are +/- .001” or more then you can likely get by with a dial or digital caliper. These can be had for prices well below the cost of a good micrometer.
Another benefit is that calipers are much more versatile and have larger measuring ranges.
Digital micrometers are a good choice because they are quick to read. This is especially helpful for anyone just starting out.
It’s not that hard to read an analog micrometer but some people struggle a little learning to read a micrometer. For a little help learning to read a standard analog micrometer, see our post that walks you through the process – How to Read a Micrometer
Digital mics simplifies the process of reading your mic, but it is still a good idea to learn how to read a standard analog micrometer.
Digital micrometers also have the added benefit that they can be easier to see the readings. If your vision isn’t great up close or you need a new set of readers, you might want to stick with a digital micrometer.
Analog micrometers have the benefit of always being ready to use. Digital mics require a battery and some are better than others when it comes to battery life.
An analog mic will always be ready to pick up and use. If you only use your digital micrometer occasionally then it might be a good idea to take the battery out when not in use. This way it isn’t dead when you need to use it.
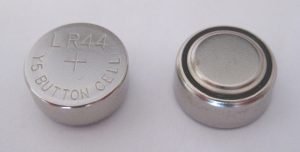
Typical button cell battery used in digital micrometers
Measurement units
Unless you are purchasing a digital micrometer, you will only get a reading in one set of units. Take note of the units you will be working with and buy accordingly.
This seems pretty self explanatory. I include it only as a reminder to double check your units before purchasing and to contemplate getting a digital micrometer if you are going to be working in both units constantly.
Measuring range
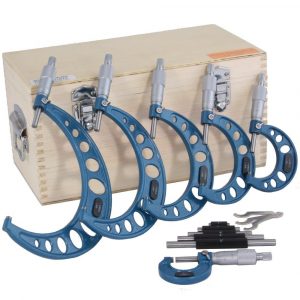
Micrometers typically are capable of taking measurements over a one inch measuring range. You will find them available individually, such as a micrometer that can take measurements from 4″-5″ and you can also find them sold as sets.
0-6″ micrometer set
Set sizes are generally sold in 0-3″, 0-6″ and 0-12″ varieties. They are available in many different configurations but these sets are the most common. Sets will usually start at 0″ and go up. Some of the bigger sets differ and only include larger size micrometers such as with a 12″-18″ set.
As the set gets bigger and the micrometers get larger, the cost gets significantly higher.
Because this is the case, don’t go out and buy a set that contains tools you won’t be using. In many instances a 0-3″ micrometer set will be sufficient for taking the majority of your measurements.
Think about the sizes you will need to measure and don’t overspend on a set larger than you really need.
Calibration certificates
Does your micrometer need to be calibrated?
Yes, but also no.
What you will want to do is check the calibration yourself. Use a known standard such as a set of gage blocks to verify the accuracy of the tool over its measuring range. At a minimum, verify the micrometer with the standard provided by the manufacturer.
What you should not do is pay extra to get a calibration certificate from the micrometer seller. Many sellers will offer a NIST traceable calibration certificate at a substantial upcharge. In reality, all the calibration certificate tells you is that the tool was found to be accurate at the time of calibration.
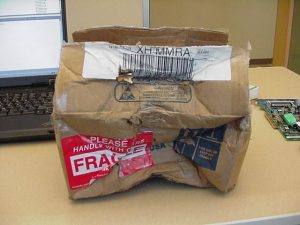
Damaged shipping box
In between the time you receive it and the time the calibration was performed, the tool passed through many hands, most notably the hands of a shipping company. I shouldn’t need to tell you that those shipping companies are not always gentle in the transportation of your precision measuring instrument.
It will probably be packaged well and everything will be fine. Remember many micrometers have withstood harsh machine shop environments for decades and continued to measure as accurately as a brand new tool.
Should you buy a used micrometer?
Used tools are an excellent way to save money when it comes to micrometers. This is even more true when talking about depth micrometers, if you can find the right deal.
Generally, I have found prices for used tools fall into two categories; cheap and priced like new. Avoid the like new prices. It just isn’t worth it. Some people just want way to much for their tools.
Personally, I wouldn’t be too excited about a standard used outside micrometer unless it was pristine and from a brand like Starrett or Mitutoyo.
There are plenty of other brands out there that put out quality tools for years. The tricky thing is that over the years some of these manufacturers have taken a step down in quality. Case in point, Fowler and Browne & Sharpe. The older stuff is much better.
If you’re looking to pick up some good tools on a budget, then keep an eye on Facebook marketplace and Craigslist along with hitting up some local yard sales. I’m sure it depends on your area, but yard sales have always been where I find the best deals.
Micrometer with a case
A good tip when looking for used tools is to look for ones that still have the original case or box. It is usually a sign that they were well cared for.
For more info about used micrometers, see our post about the best micrometer brands to find out which ones stand the test of time and the brands you should avoid.
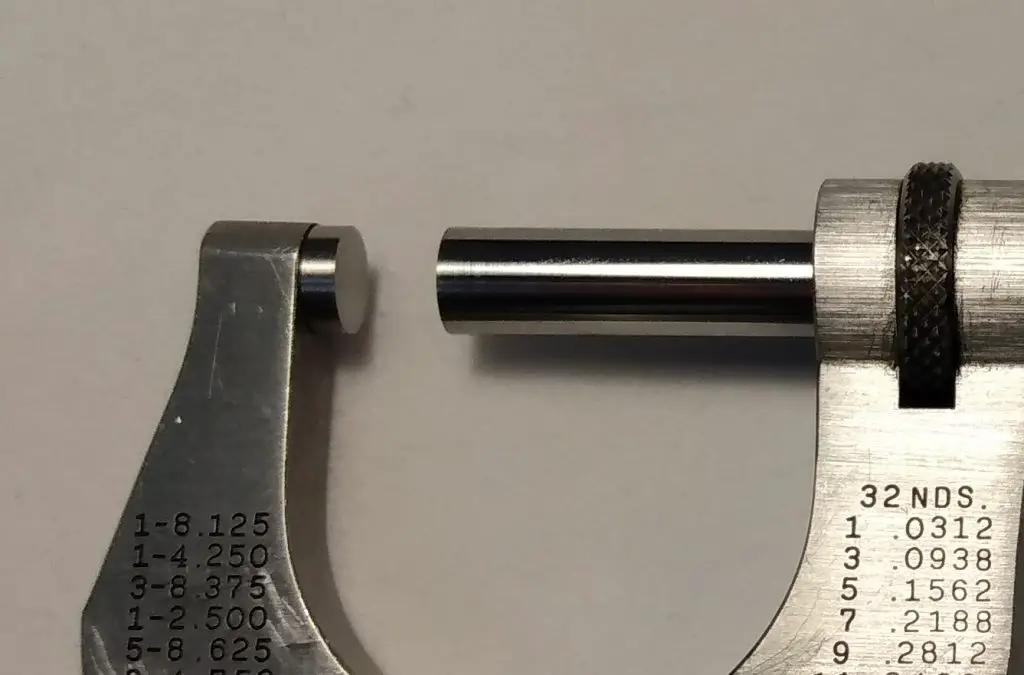
Carbide vs non-carbide tipped micrometers
Stainless steel tips
Carbide tips
Carbide tips have the benefit of increased resistance to wear. The downfall is that they are more prone to chipping of the anvil face.
If you are careful with either type, it is unlikely that wear or chipped anvils will be an issue.
Micrometer cases
A good case will go a long ways towards keeping your tool protected and safe. Whether you’re working in a machine shop or using it in your garage, there are hazards everywhere. Coolant isn’t something you want on most precision tools. The same can be said of dirt and brake dust.
Give them a good wipe down after use and keep them safely in a case or toolbox to make sure they will be in working order for years to come.
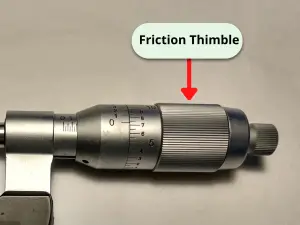
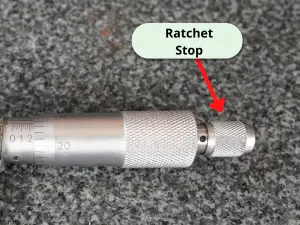
Micrometer ratchets
Friction thimble stop
Click ratchet stop
A good ratchet makes a big difference when it comes to micrometers. If the ratcheting mechanism is bad, then the tool could give bad readings.
Micrometer ratchet mechanisms come in many forms. The most common types are the click style ratchet and the friction thimble.
Personally, I prefer to use the click style or no ratchet over the friction thimble. Just a matter of personal preference.
Some companies claim that the friction thimble, which simply spins freely once it is at the correct size, is more accurate but I have never known this to be the case.
If possible, try out both the click style ratchet and the friction thimble and determine what you prefer. If this isn’t possible, I recommend starting with a click style ratchet for your micrometer.
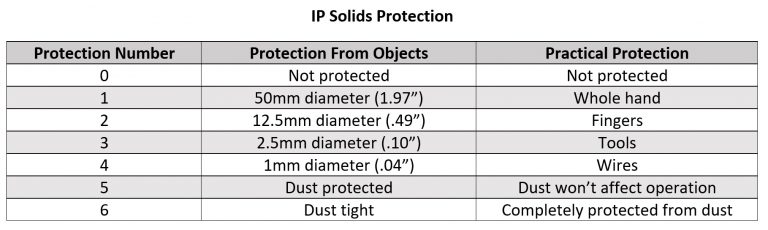
IP ratings
If you go with a digital micrometer, pay attention to the IP rating of the tool. The tables below show how well protected the device is from the elements.
The first number is for protection from solids such as chips and dust. The second number is for protection from liquids such as oil and coolant.
Both of the Mitutoyo digital micrometers recommended above are rated IP65. This is a very high level of protection. The next level down that is commonly seen is a IP54 rating which would be sufficient for most environments as well.
Data transfer
Many micrometers are capable of transferring measurement data to a computer. I don’t believe this is something that will prove useful for most users unless they are working in a high volume industrial setting so I will be brief on the topic.
Please note that there are multiple ways of transferring measurements to a computer including:
USB
SPC
RS232
Wireless, including Bluetooth
Other proprietary wired and wireless formats
If data transfer is a feature you are interested in then please pay attention to the manner in which the tools communicates and the price of any required accessories. The cost of a simple cable can often be half the cost of the micrometer itself or more.
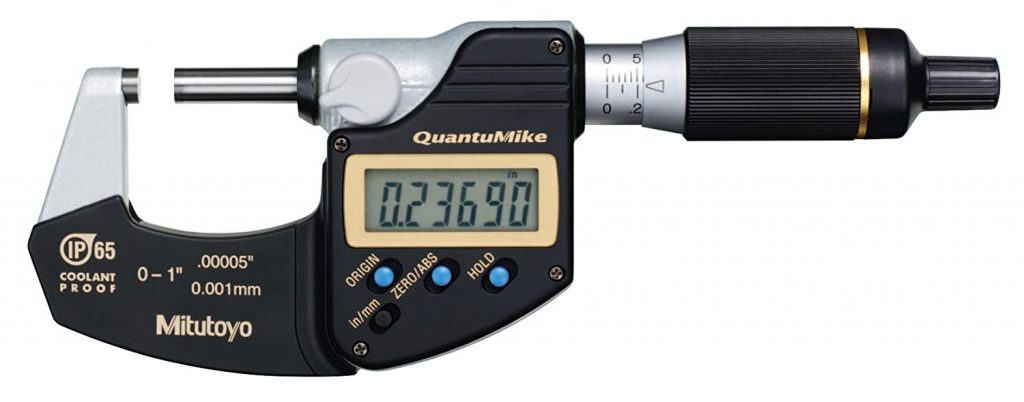
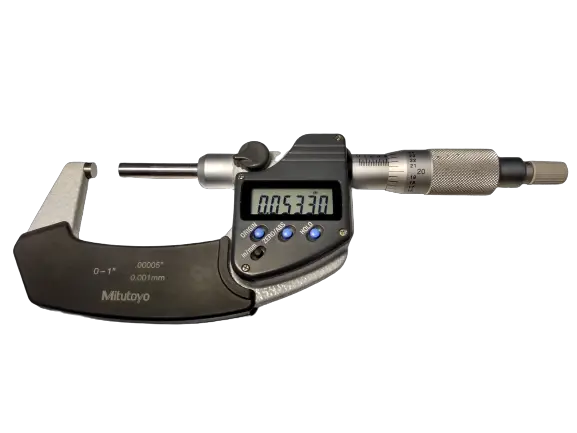
Mitutoyo has long been one of the very best micrometer manufacturers. They make top of the line tools across the board. Standard micrometers, digital mics, depth mics. You name it and they are leading the pack.
Every micrometer on our best of list is incredibly accurate but the digital micrometers from Mitutoyo, including this one, are on another level. With accuracy of .00005” or .001mm, Mitutoyo’s digital micrometers measure tolerances 2x tighter than most standard micrometers.
For reference, the human hair is about .003”. Take a strand of your hair and split it into 60 pieces and that is how accurate these micrometers are.
Besides the accuracy, the other standout feature of the QuantuMike is the speed. Anyone who has used a micrometer knows they aren’t quick to open or close.
The QuantuMike is unlike any other micrometer on the market and opens and closes four times faster. Each turn of the thimble moves the tool .100” instead of the normal .025”. No arm rolling needed.
Combining speed and accuracy is not a feat easily accomplished but Mitutoyo’s QuantuMike has done just that and more.
For a more in depth look at what makes the QuantuMike so special, see our full review.
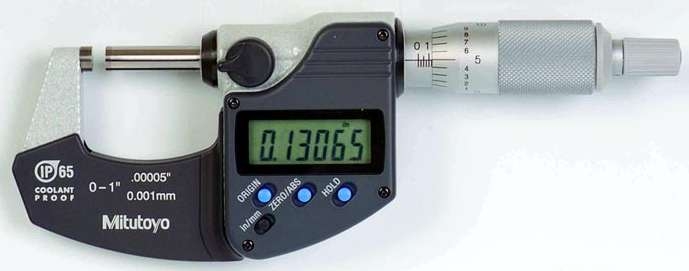
I am a huge fan of Mitutoyo’s digital micrometer line. Across the board they are quality all around.
Rather than gush over the quality of these things for paragraphs on end. I am just going to include a bulleted list of what makes them so good:
Extremely accurate
Quick to use and take measurements
Battery life is long
IP65 rating means they are protected from dust and splashing water
Great build
Excellent durability
If the price is too high, I would recommend going with a standard analog micrometer instead. If you must get digital, then go with one from one of the bigger budget brands such as iGaging.
Unlike standard analog micrometers, the cheap ones are not as close in quality to the budget tools. A budget digital micrometer is going to be a significant step down. That doesn’t mean it’s bad. It just means that the gap is bigger.
If you are still on the fence, re-read the bulleted list and contemplate whether its better to “buy once, cry once” or not.
There was a time where Chinese made knockoff micrometers were bad. I mean real bad. This isn’t the norm anymore though.
Many manufacturers such as Anytime Tools have made a name for themselves by providing quality measuring instruments at a fraction of the price of higher end tools.
And quality wise there just isn’t a big difference between the cheaper tools and the more expensive ones anymore. At least when it comes to the best of the budget tools. If the pricier tools from companies like Starrett or Mitutoyo are 5% better, honestly most won’t notice the difference.
One note about budget priced micrometers, don’t go buy some random mic made in China and expect it to have the same quality. The good brands that are cheaper are usually American companies that are purchasing the tools from Chinese manufacturers. They have performed the quality control to ensure you get a good product.
If you want a quality tool that is accurate and built to last but your budget doesn’t allow for the best from Starrett or Mitutoyo check out Anytime Tools.
For standard analog micrometers, Starrett has put out a line of excellent measuring tools for a very long time. Founded in 1880, they were one of the creators of the modern micrometer and it shows.
Having never used a micrometer from the 1800s, I can not attest to their quality from 100 years ago. What I do know is that anything made on this side of the 1950s has been excellent. In machine shops all over the world, Starrett micrometers bought decades ago are still in use.
They are built to last. Often the only tell-tale sign of their age is a slight polishing of the frame or thimble from heavy use.
The quality does come at a price though. If you won’t be using this tool all day every day or for an extremely critical measurement, it might be best to think about our best budget micrometer below. If you are going to put this tool to use constantly, you would be hard pressed to find a better tool.
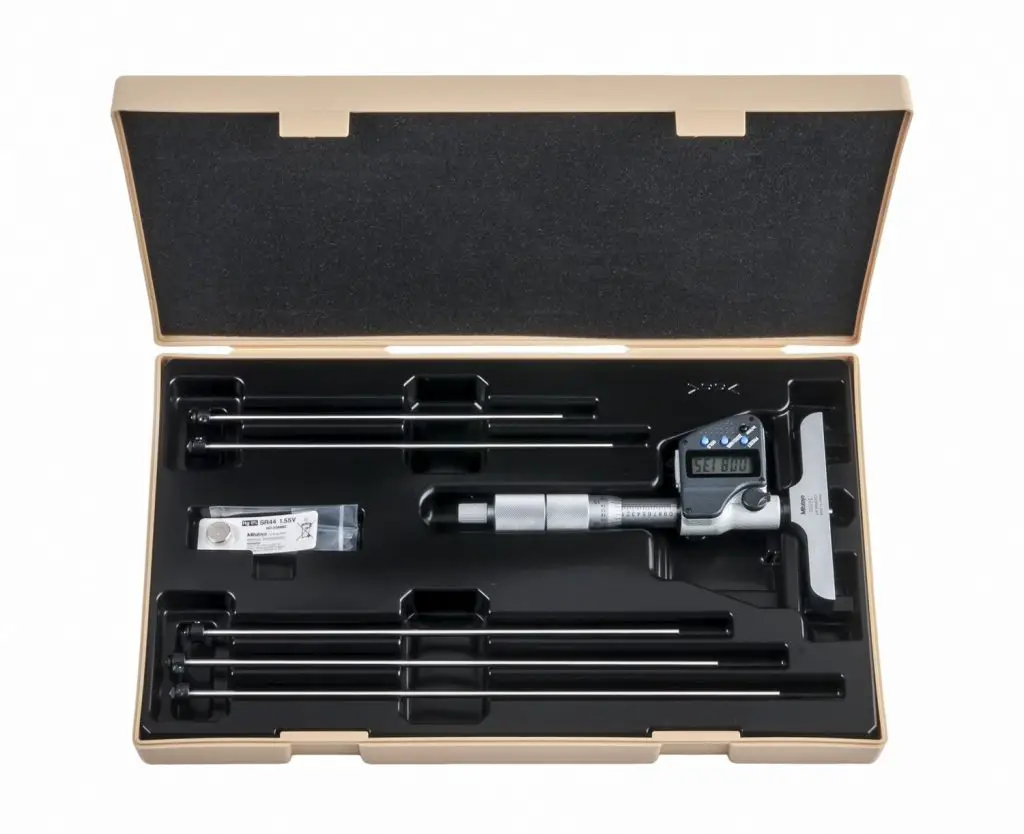
Depth micrometers are another monster. Certainly more difficult to manufacture, as a result they are quite a bit higher in price.
Because they are so expensive, I am going list a few different options.
As a side note, when it comes to depth mics think about looking for used options. Many people take excellent care of their tools and you can save a pretty penny by picking up a second hand set. My only recommendation would be to find a way to verify them before buying. Bringing a set of gage blocks along could save you quite a bit of headache in the future.
Just like their outside micrometers, the digital depth mics from Mitutoyo are excellent.
They are easy to use and easy to read. Most importantly, they are extremely accurate. Unlike normal micrometers, depth mics are one tool that the Chinese knock offs have really struggled to replicate. Many times cheaper depth mics are not accurate. The quality simply isn’t there.
This is not the case with Mitutoyo depth mics.
Mitutoyo depth mics, like their other digital micrometers, are in a league of their own. Unfortunately, their cost reflects this.
These depth mics are the best of the best but I only recommend them if you plan to put them to heavy use. If not, look into one of the non-digital options below to save more than a few bucks.
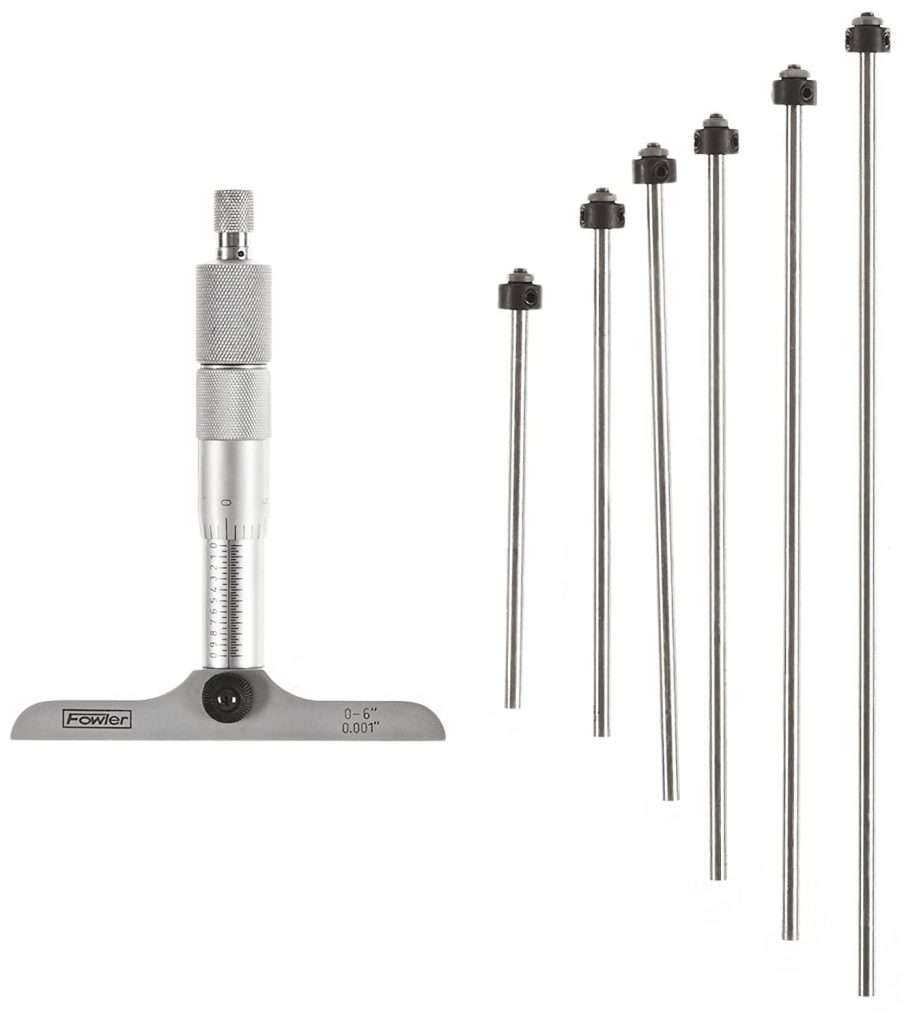
Both Starrett and Mitutoyo make great depth micrometers of the non-digital variety. Both companies make depth mics that are strikingly similar to their standard outside micrometers.
Really the differences are minor. Both are highly accurate. The ratchet on the Starrett is a little better. Additionally, the base is slightly smaller which I prefer.
The Mitutoyo depth micrometers have two types of bases. One that is larger such as what is seen on the digital version above. The other type is smaller. This makes it slightly more tipsy. The base of the Starrett depth mic feels like it is just right, smack in the middle.
It really is only small differences that give the Starrett depth micrometer the edge. You can’t go wrong with either, especially if you can find a good deal on it somewhere or pick one up used for a good price.
I’m sure you have noticed that the prices are pretty high on all of the listed depth mics so far.
This is because the quality and accuracy don’t come cheap with depth micrometers. This depth mic from Fowler is the about the closest thing you will find to cheap and accurate.
I don’t know about all of their tools but many of Fowler’s gauges seem to be made in China. Nothing wrong with that in particular as seen with some of our other mic recommendations. Unfortunately, Chinese made depth mics are not something that they have perfected.
I have used Fowler depth mics that are every bit as accurate as Starrett or Mitutoyo, I just wouldn’t count on every single one coming off the line that good.
The nice thing about many online retailers is that they have good return policies. So if you absolutely need a depth mic and need it as cheap as possible then order away. Just make sure you check it for accuracy when you get it and send it packing if it isn’t up to snuff.
Let’s face it. There just isn’t enough space at home.
We all do it. We have mountains of tools, gadgets and just plain ole stuff strewn everywhere. Sure, you can clean your garage, workshop, kitchen table or wherever you tend to work on stuff, but it just doesn’t last.
Space is at a premium, which is why we bring you our guide to the best small desktop style CNCs. While these CNCs won’t be carving up 4’ x 8’ sheets of plywood anytime soon, they are more than capable of creating some pretty cool projects on a smaller scale.
The best part is their small footprint means they can be easily stashed away when not in use. But please don’t run one in your closet. Your significant other will not approve of a sawdust and metal chips on their clothes. Don’t ask how I know.
Without further ado, check out our picks for the top desktop CNCs.
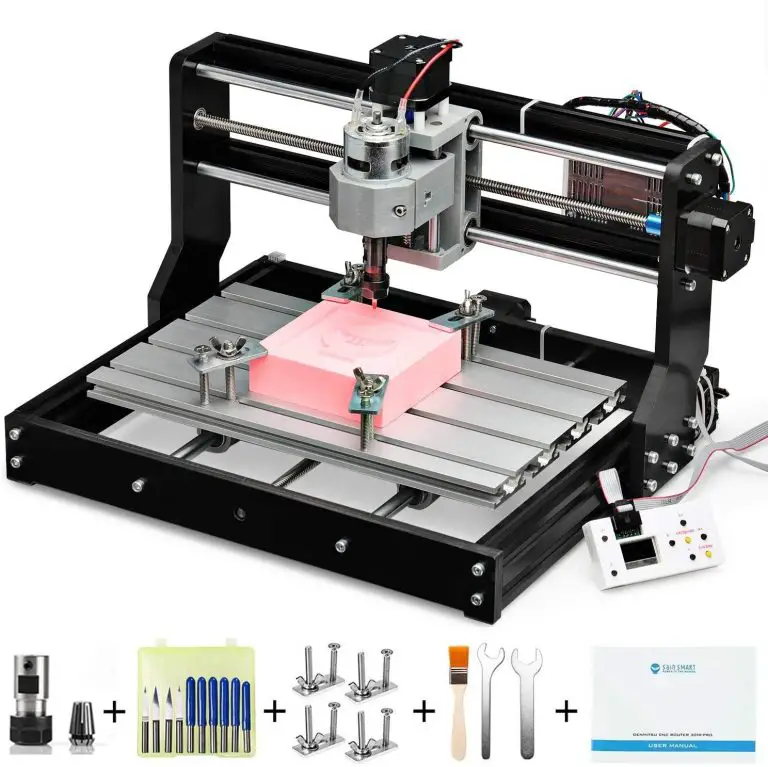
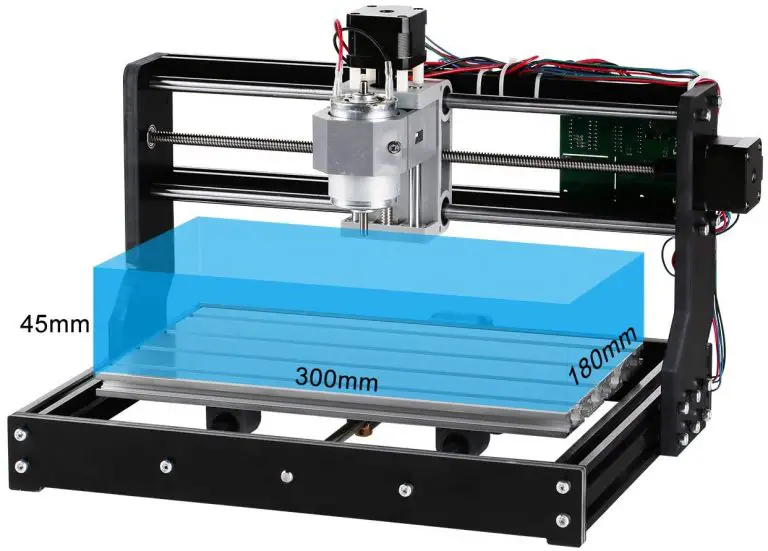
Machine Work Area: 300mm x 180mm x 45mm = 11.8″ x 7.0″ x 1.7″
Physical Machine Dimensions (Machine Footprint): 400mm x 330mm x 240mm = 15.7″ x 13.0″ x 9.4″
Weight: 21.4 pounds
Materials it Will Cut: Plywood, MDF, PCB, acrylic, nylon, carbon fiber and soft metals
Warranty: 1 Year
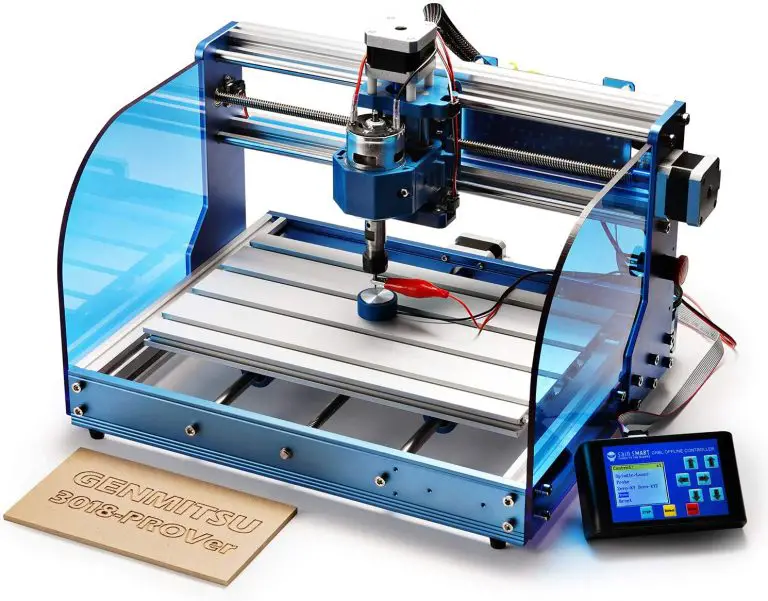
This SainSmart Genmitsu 3018-PROVer comes mostly pre-assembled, needing only about thirty minutes of assembly once out of the package. A smaller machine that is great for CNC beginners, hobbyists, and small business owners, this machine is very quiet and can operate inside an apartment or similar space without disturbing the neighbors. The smaller size also means it is easy to move around.
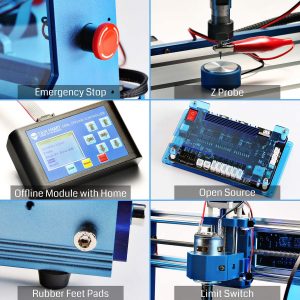
Further, the PROVer comes equipped with an emergency stop control that is very visible and easy to access for an immediate shutdown of your machine. You’re inevitably going to mess something up if you work for long enough, so having a big red button to shut off the machine is pretty helpful.
The machine also comes with acrylic safety baffles to help stop dust from spreading while you’re working, making clean up a bit easier and faster. That said, the machine does produce a lot of dust and wood chips, so you may want to make your own cover, or at least be prepared for a thorough cleaning after use.
This 3018 PROVer comes with an offline controller, which allows you to run the machine without having a computer attached.
Though the machine is not particularly wide it can be used to make pass-throughs for narrower, but longer pieces.
Even though it is a smaller machine, it is built using solid materials. Rather than being made out of wood or plastic, like a lot of cheaper models, the PROVer is made with aluminum. This solid construction also helps reduce noise and vibration while the machine is working.
Machine Work Area: 300mm x 180mm x 45 mm = 11.8″ x 7.0″ x 1.7″
Physical Machine Dimensions: 400mm x 330mm x 240 mm = 15.7″ x 13.0″ x 9.4″
Weight: 15.82 pounds
Materials it Will Cut: Wood, bamboo, paper, ivory, leather, flammable plastic, PCB, acrylic, ceramic/stone, metal surface paint, metal surface plating
Note: DO NOT work on metal, iron, glass, 201/304 stainless steel, jewelry, or silver
Warranty: 1 Year
One important thing to understand with this machine is that it is truly a machine made for CNC beginners. If you expect to get this in the mail and begin a large project, you’ll be somewhat disappointed. With that said, it is a good machine for those who want to start learning CNC.
Though the machine does not come assembled, assembly is relatively easy, taking between one and two hours. If you need some extra help, there are plenty of videos on YouTube that can assist you.
That the machine does not come pre-assembled is not a surprise given its price point, but, again, assembly is easy so don’t let that discourage you.
Initially, it may seem worrying that the frame of the machine is plastic – plastic can easily snap and break if the machine is running a hard job that causes vibrations and shaking.
However, the plastic framing is phenolic resin, meaning it’s really strong stuff that will not break easily. Such strong plastic also means that there are fewer parts needed for assembly, which is of course a bonus.
It should also be emphasized that the machine defaults to metric movements, so if your code is in inches and you manually move the machine with the offline controller you will run into some issues. So, you either have to be really careful when the machine is operating and be prepared to do conversions on the fly, or you can just make sure that your code is done using the metric system.
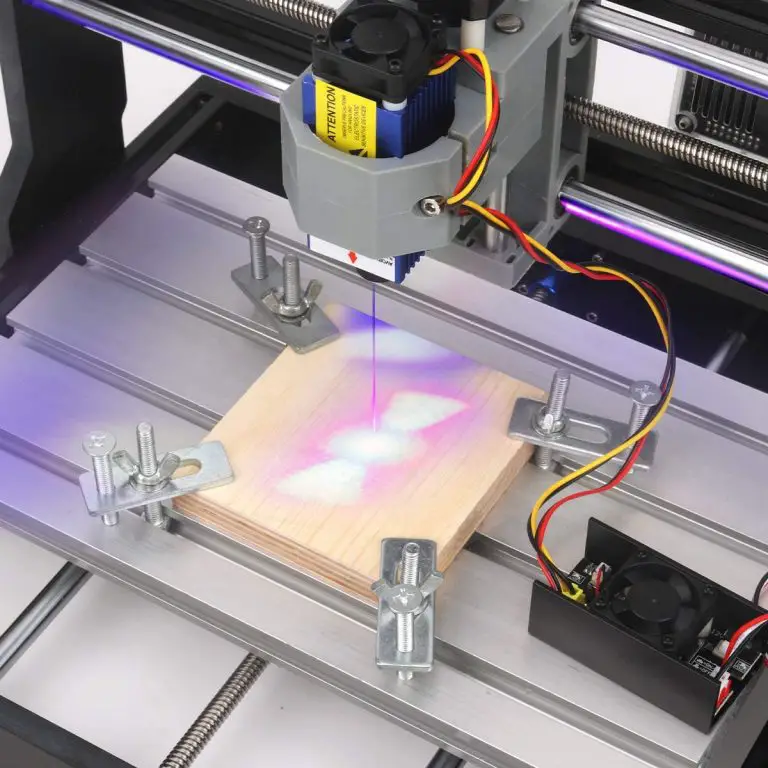
Lastly, one shortcoming of this machine is that it is mainly only for engraving on wood. This machine does not do all that well for any cutting action.
If you’re looking to engrave harder materials – such as soft metals – this machine is probably not for you. It does have the added benefit of working well for laser engraving.
For those who might want a multipurpose machine, the MYSWEETY CNC makes a good choice. The easy to use laser engraving software means most will be able to set it up and start engraving in short order (remember your laser safety glasses).
CNC work will take a little more effort because the included CNC software isn’t as user friendly, but is still very manageable.
Machine Work Area: 400mm x 300mm x 110mm = 15.7″ x 11.8″ x 4.3″
Physical Machine Dimensions (Machine Footprint): 641mm x 755.5mm x 580mm = 25.2″ x 29.7″ x 22.8″
Weight: 57.2 pounds
Materials it Will Cut: wood, MDF, plastics, foams, vinyl, and aluminum.
Warranty: 1 year
The setup for this machine is really nice. All of the hard bits – such as routing the wiring – are done for you, so what’s left only takes about an hour if you’re working hard. Maybe two hours if you’re going through it at a slow pace.
Once you get started, you’ll notice that this machine definitely has a lot of torque. It’s probably a good idea to start off with the 3018 model if you’re a true beginner, but if you have just a little bit of CNC experience this is a well-built, powerful machine. This model comes with a super rigid structure, so you shouldn’t have any difficulties with it in terms of vibrations and shaking once your work starts.
Because the PROVerXL 4030 is so powerful, it can work on a fairly wide range of materials. You can work on wood, MDF, plastics, foams and even aluminum. Some users have said that they can also cut other soft metals, though if you’re not experienced with soft metals you shouldn’t try to work with them on this machine.
4030 series CNC compared to 3018 series
In terms of workspace, if you’re doing relatively small projects there should be plenty of room to work. For beginners, or even a small wood/metalworking business you should have enough space to do virtually any CNC project for your customers within reason.
But if you are looking to do something a bit larger, there are some really nice upgrade kits that you can purchase for this machine. For more working space you can buy additional sizes 24”x 24”( 600 x 600mm), and up to 40” x 40” (1000 x 1000mm).
For even more versatility in terms of what you can make with this machine, you can buy the Rotary 4th Axis or High Powered Laser Modules.
Machine Work Area: 300mm x 180mm x 45mm = 11.8″ x 7.0″ x 1.7″
Physical Machine Dimensions (Machine Footprint): 400mm x 300mm x 240mm = 15.7″ x 11.8″ x 9.4″
Weight: 17.1 pounds
Materials it Will Cut: All types of plastics, soft aluminum, woods, acrylics, PVC, PCB
Warranty:
The biggest advantage of the VEVOR 3018 is its price. Generally coming in at a little more than $100, you’re going to get a ton of value out of this machine. Of course, a cheaper machine generally means fewer capabilities and cheaper materials, but the VEVOR 3018 is still a good CNC machine for beginners.
Speaking of its construction, the frame is mostly aluminum with some plastic in there as well. For a cheap machine, having an aluminum frame is a big bonus. Metal frames help to reduce vibration, which makes the machines more accurate.
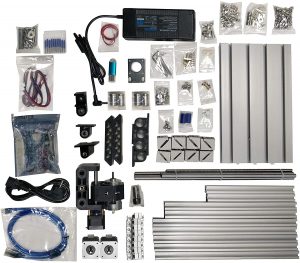
VEVOR 3018 Pieces for Assembly
One downside for this machine is its assembly. You have to do most of the work yourself, and the assembly guide comes with only pictures, no words. However, there are helpful videos that you can find on YouTube to help out.
Generally, this machine should only be used for engraving, as it is not the strongest machine on the market. You may be able to cut through some balsa wood, but don’t try anything stronger than that. Some users have said that if you push the VEVOR 3018 to its outer limits the machine begins to shake a fair amount, so that is one thing to keep in mind as well. However, if you’re using the machine within its normal range it is pretty quiet.
Generally, people have seemed to have good interactions with the manufacturer if they’ve had any issues, so that’s always a bonus.
Overall, if you’re okay with installing the machine using only pictures and YouTube, then this is a good introductory CNC machine if you do not want to spend a lot of money. But remember, you get what you pay for.
Just because these are entry level machines does not mean they aren’t powerful and cannot hurt you. Always read instructions. Also, some of these machines can cause a lot of dust and particles to fly into the air while they’re operating, so you should wear safety glasses if you’re getting close.
Size of work area
The size of the work area for any machine directly affects the size of the project you are capable of doing with that machine. All of the machines on this list are entry level, so they are not particularly large. That means they can be easily moved around and do not take up so much space, but that also means the projects you are capable of producing is limited.
It’s also important to remember that the overall size of the machine is not the same as the work area of the machine. For example, the SainSmart PROVer 3018’s overall size is 420 x 340 x 280mm, but its work area is only 260 x 155 x 35mm. That’s a big difference, so make sure you’re reading the machine specs carefully.
Machine construction
This relates to the materials the machine is made out of. When a machine has a really solid frame – typically made out of metal, like the Genmitsu PROVerXL 4030 for example – this is always preferable to a frame made out of wood or plastic.
A solid frame will reduce the shaking of the machine, which makes cuts and engravings more accurate. Reduced shaking can also make the machine quieter when it’s running.
Work materials
Not every CNC machine will cut all materials. This is especially true when it comes to smaller, desktop style CNCs.
There are two big jumps in capabilities. The first is to soft metals such as aluminum. The second is to harder metals such as steel.
Some of the machines above will handle aluminum. Not all will do it easily. None of them will be able to cut steel.
Take note of the capabilities of each machine as referenced above and you won’t be disappointed.
Tooling
Tooling is another word for cutters. Different materials require different cutters, and the type of cutter you’re using can make all the difference on a project.
Most machines will come with a few cutters for you to use right away. These bits are not usually of the highest quality, but if you’re a beginner they will do the job. Learn the pieces, and when you’re ready you can buy separate, more expensive ones.
Customer service
Customer service is really important because these are complex machines if you’re new to CNC. It’s not uncommon to have an issue during assembly, or while you’re using the machine.
In many online reviews, people note the level of customer service that they have experienced, and you should pay attention to this. Don’t be afraid to go on a company’s website and look around to see how easy it is to contact customer service, and also look for things like video tutorials that the company has provided themselves.
CNC software
There is a large variety of software that gets used on these machines. Covering them all would be a giant topic by itself. To get you started here is a quick rundown:
CAD or computer aided drafting is software that will allow you to create models to machine or engrave. This is only a drawing and needs further processing before your machine will know what to do with it. The most commonly used CAD software are Fusion 360 and Tinkercad
CAM or computer aided manufacturing is the software that takes your model and turns it into code that your CNC will understand. If you are familiar with 3D printers, CAM software is similar to slicing software. The most common CAM software are Fusion 360, CamBam, SheetCam and MeshCam.
A good starting point is to look into Fusion 360. It has an enormous number of tutorials on YouTube. You are likely to find help for any issue you run into and there are many guided courses on use of the software.
CNC routers vs spindles
When it comes to beginner level CNC machines, the terms router and spindle are used almost interchangeably. Some machines, such as the ones from BobsCNC, use an actual router like you would buy at a hardware store. Others use spindles.
Practically, they are both motors that have a collet or chuck to hold a cutting tool such as a router bit or end mill.
Related articles
For more information check out these related articles:
CNC machines have been in use for decades and most people associate them with the metalworking industry. But for many years they have been used by amateur woodworkers to machine a large variety of projects.
CNC technology, just like 3D printers has found its way into the homes and garages of people throughout the world.
Below we have outlined the best CNCs for woodworking. CNC machining can be a daunting task for many, so our picks lean more towards the beginner CNC woodworker and place an emphasis on ease of setup and use. These two aspects in particular make it easier to unlock the full potential of your CNC router so read on to find out which models top our list.
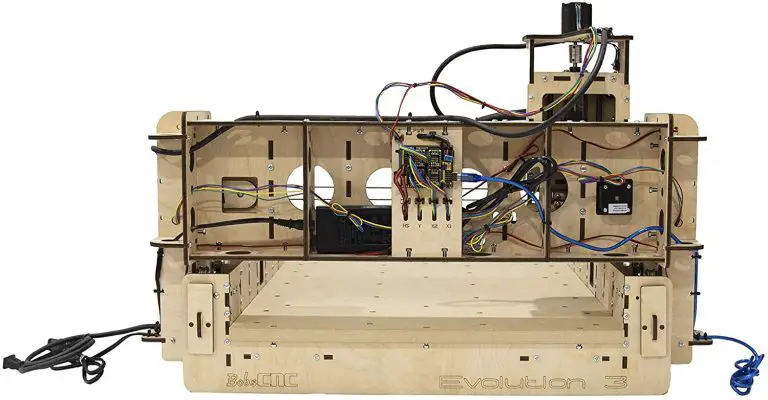
Work Area: 610 mm x 610 mm x 85 mm = 24” x 24” x 3.3”
Machine Size: 990mm x 810mm x 530mm = 39” x 32” x 21”
Weight: 42 Pounds
Materials it Will Cut: Wood, plastic, soft aluminum, acrylic, PCB, leather, others are possible with experimentation
Warranty: 60 Days
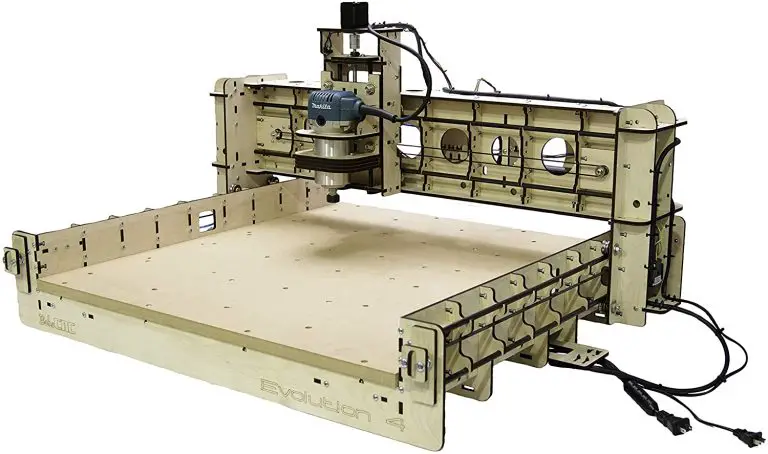
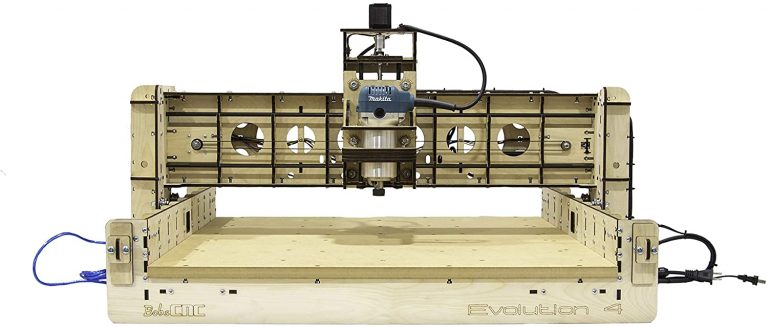
While still an entry level machine, BobsCNC machines are a cut above the rest. Their machines are typically more heavy duty, capable of cutting more materials, and are more expensive than other entry level machines. While this machine can cut a large variety of materials, including soft aluminum and leather, CNC wood routing is easily BobsCNC’s specialty.
When looking at the E4 machine, you should be aware that setting the machine up will take a good deal of time. Unlike most other beginner CNC machines, the E4 does not comes pre-assembled.
You should plan on assembly taking up most of an entire day. Keep in mind, though, that when assembly is this intense, you really get to know a machine well, which will be super helpful if you’re a beginner.
Additionally, the instruction manual is highly detailed and thorough. The assembly isn’t necessarily difficult, but instead is simply time consuming. Luckily, if you come upon any roadblocks, you can find an abundance of guidance on YouTube and Facebook to help you along.
But if you are facing any big obstacles during assembly – or even long-after you’ve got the machine running – BobsCNC has a great reputation for top notch customer support and service.
Call or email them, and you are guaranteed to get a quick response, and a simple solution to whatever problem you may be facing. As a matter of fact, Bob himself has been known to respond to users seeking help frequently.
Keep in mind that this is a big and powerful machine. As such, it can create more noise than other, smaller entry level machines. It can also create a large amount of dust and chips when it’s working, so be sure to have a shop vac ready to clean up or better yet, a dust collection system in place.
The E4 is the type of machine that you would normally want to store in a garage or workshop instead of inside your main living area.
This is a heavy-duty machine and you can expect it to be louder and a bit messier, but because it is such a solid machine you can also expect it to perform quality work for a long time to come. The E4 is a real workhorse, and many customers have found the machine to last for ages.
The BobsCNC Evolution 4 is an excellent option for a woodworking CNC. The setup will take more time than our other recommended options but there is a substantial payoff in the end. The expanded work area and power of the machine will allow a much larger variety of work than smaller machines.
Work Area: 300mm x 180mm x 45mm = 11.8” x 7.1” x 1.7”
Machine Size: 400mm x 330mm x 240mm = 15.7” x 13.0” x 9.4”
Weight: 21.4 pounds
Materials it Will Cut: Plywood, MDF, PCB, acrylic, nylon, carbon fiber and soft metals
Warranty: 1 Year
If you’re looking to get your feet wet with CNC machining, but don’t want to jump all the way in quite yet, then the SainSmart Genmitsu 3018-PROVer is a good place to start.
For a sub-$400 machine, you get a lot of value from the PROVer.
For one, the 3018 PROVer will arrive at your door largely pre-assembled, so you won’t have to spend too much time putting the machine together.
It might take you longer to put together than the 15 minutes that SainSmart advertises, but you should be able to put this together fairly quickly, and there are plenty of YouTube videos out there to give you a hand if you get stuck.
While this machine is pretty powerful for a beginner machine, one common review from users is that it is fairly quiet. If you live in an apartment and you don’t have to worry about your neighbors making a noise complaint, the 3018-PROVer makes a great option.
Another great feature of the PROVer is the aluminum frame. For a budget priced machine, having a sturdy metal frame is a big bonus.
A solid frame helps to reduce any vibration from the machine, which makes the machine more accurate, and works to reduces noise.
Along with the aluminum framing, the machine has acrylic safety baffles which help stop dust from spreading while you’re working, making clean up a bit easier and faster. A welcome addition for anyone who plans to run this CNC indoors.
Another great feature of the PROVer is the easy to see, easy to access shutdown button.
This big red button on the side of the machine makes triggering an emergency shutdown super simple. From experts to amateurs, mistakes are going to happen, so such an obvious emergency stop button will come in handy. This is a feature that all full blown industrial CNCs have and for good reason.
When you hear something start to go wrong with your run, and trust me, you usually hear it before any other warning signs. The stop button just might save your project or cutter tools.
Other safety features of the PROVer include hard stops, and limit switches to keep the machine from coming off the rails, literally. The limit switches will tell your machine to stop safely when your custom CNC program attempts to move the cutter three feet off your dining room table.
SainSmart has done a good job including many of the 3018 series CNC upgrades and accessories that people find they want after purchasing such as an offline controller, which will allow you to run the machine without needing to have a computer attached.
Overall, the 3018 PROVer is a top notch, entry-level machine that is especially useful if you’re looking to start smaller wood carving and wood cutting projects and is more than capable of tackling other materials of similar hardness.
Work Area: 300mm x 18mm x 45mm = 11.8” x 7.1” x 1.7”
Machine Size: 330mm x 400mm x 240mm = 400mm x 330mm x 240 mm = 15.7″ x 13.0″ x 9.4″
Weight: 15.82 pounds
Materials it Will Cut: Wood, bamboo, paper, ivory, leather, flammable plastic, PCB, acrylic, ceramic/stone, metal surface paint, metal surface plating
Warranty: 12 Months
The MYSWEETY 3018-PRO is truly a beginner CNC router for woodworking. The machine is easy to get started with, but it can’t handle some of the difficult materials that more powerful CNC routers can. Luckily, all can be forgiven when you look at the price.
If you’re looking for something to introduce you to the world of wood cutting and wood carving, the MYSWEETY will do that and more.
While this machine does not come pre-assembled like some other models, putting it together is not all that difficult. Set up time should take most people between one and two hours.
Setup is made even easier because there is a large selection of videos on YouTube that can help guide you through the process.
The machine’s frame is primarily made out of metal, so you know it is going to be sturdy. But even the gantry (crane type bridge), which is made of plastic is solid. It is made using phenolic resin, which is extremely strong stuff. For a CNC woodworking machine on the cheaper end of the price range, the MYSWEETY is surprisingly well built.
The MYSWEETY also has the benefit of being ready to laser engrave wood projects as well as CNC routing. Unfortunately, the machine has an issue where the laser module’s focus lens fits loosely. This can make it too easy to accidentally turn resulting in poor engravings from the laser not being focused properly.
No worries though, a small bit of Teflon tape on the threads will allow you to fix this problem yourself.
The biggest downfall of the machine is that it does leave a little bit to be desired if you want to work with something beyond wood.
It is just not all that powerful, and you shouldn’t try to push this machine too far. It will work well with wood and softer materials but don’t expect it to work well with even soft metals such as aluminum.
All in all, if you’re looking to get started with CNC routing and woodworking as a hobby, this is a good machine for just that. The laser engraving module makes a big plus as well.
The MYSWEETY CNC is a budget friendly option that is capable of producing some pretty cool woodworking projects.
SainSmart has created one of the most recognizable introductory CNC machines with its 3018 PROVer. Everything that SainSmart has been able to pull off with their flagship 3018 CNC has been replicated and upgraded on the PROVer XL 4030.
More power, more work area and more options for increasing the capabilities of the machine down the road as branch out into different projects.
Like the smaller 3018 PROVer, the 4030 comes mostly pre-assembled. Assembly is easily accomplished, just don’t expect it to take the 15 minutes that SainSmart quotes it at.
Not only is this 4030 CNC one of the best woodworking CNCs available but it is also one of the most common. This means there are plenty of quality YouTube videos to help you along the assembly process and beyond should you run into any stumbling blocks.
All in all, the SainSmart 4030 can be assembled, fired up and be cutting or engraving in no time at all.
As mentioned earlier, this machine is powerful. A great benefit that many lower end machines don’t have.
While the PROVerXL isn’t an industrial shop-level machine, if you’re a hobbyist or a small business owner you should still be able to get some good mileage out of this CNC.
The PROVerXL 4030 will cut a wide assortment of hard and soft woods, as well as plastics, foam, vinyl, and even aluminum. Keep in mind that if you plan on working with materials on the harder end such as aluminum, they will likely take more trial and error whereas you’ll find it difficult to run into trouble working with wood of any kind.
This machine also has the structure to match its power. The frame is made entirely out of aluminum. The rigidity this provides helps that you don’t sacrifice power for accuracy. With the 4030, you won’t have to worry about vibration or shaking which can result in poor surface finishes or decreased accuracy, even if you’re engraving metals.
As far as workspace goes, this machine is definitely bigger than the 3018, though in its original form you’ll still be limited to relatively small projects. However, there are some really nice upgrade kits that you can purchase for the machine.
Kits to expand the machine work area to 24”x 24”( 600 x 600mm), and up to 40” x 40” (1000 x 1000mm) are available. And for even more versatility in terms of what you can make with this machine, there is a rotary 4th Axis and a high powered laser module available as well.
If you want to get started with CNC woodworking and have the ability to work with more difficult materials in the future, the PROVer XL 4030 is the right machine for you. It also makes a great upgrade for those who are already familiar with the 3018 series because the added power and capabilities will expand what is possible to make with your CNC.
Things to consider when purchasing a woodworking CNC
Assembly
CNC routers will come in a variety of assembly stages. Some machines will come almost entirely assembled for you, while others make you put together every last part.
For some people, assembling a machine is part of the fun. Many times, it can help you learn about your new tool.
For other people – especially beginners – you will want something that is practically ready to use out of the package. Preferences will differ but keep this in mind when reviewing the different options available. Assembly difficulty is certainly a factor to keep in mind.
Safety
Wear your safety glasses!
Yes, these are entry level machines, and yes, some are more powerful than others. Take note though that any one of these CNC routers is capable of cutting not only your wood projects, but you as well!
Be sure to read the instructions, and if this is your first time working with a CNC machine then ease into it. Also, as with all woodworking, chips and particles are bound to fly around, so make sure you’re wearing eye protection if you plan on getting close while the machine is operating.
Laser engravers present their own safety hazards as well so make sure you are using any and all proper personal protective equipment when operating these as well.
Size of work area
Naturally, the bigger the work area of a machine, the bigger the project you can do with that machine.
Since these machines are on the entry level side of things, none of them are overly big. Keep the size of your projects in mind when shopping for a new CNC for your woodworking project and if you need something truly massive, think about purchasing one of the upgrade kits available for many machines or stepping up to a 4’x4’ or 4’x8’ CNC router.
Machine size comparison
On the flip side, the smaller work area for some of these machines means they are easier to move around and locate in your work space.
It’s also important to remember that the overall size of the machine is not the same as the work area of the machine.
For example, the SainSmart PROVer 3018’s overall size is 420 x 340 x 280mm, but its work area is only 260 x 155 x 35mm. That’s a big difference, so make sure you’re reading the machine specs carefully.
Software
There is a large variety of software that gets used on these machines. Covering them all would be a giant topic by itself. To get you started here is a quick rundown:
CAD or computer aided drafting is software that will allow you to create models to machine or engrave. This is only a drawing and needs further processing before your machine will know what to do with it. The most commonly used CAD software are Fusion 360 and Tinkercad
CAM or computer aided manufacturing is the software that takes your model and turns it into code that your CNC will understand. If you are familiar with 3D printers, CAM software is similar to slicing software. The most common CAM software are Fusion 360, CamBam, SheetCam and MeshCam.
A good starting point is to look into Fusion 360. It has an enormous number of tutorials on YouTube. You are likely to find help for any issue you run into and there are many guided courses on use of the software.
Construction materials
When a machine has a sturdy frame – one made out of metal, like the Genmitsu PROVerXL 4030 for example – this is always better than a machine made using wood or plastic.
A solid frame will reduce the shaking of the machine, which makes the cuts and engravings more accurate. Reduced vibration will also make the machine quieter when it’s running. A welcome addition for anyone trying to create woodworking projects in their home.
Noise
Speaking of noise, you may also want to keep this in mind.
More powerful machines will allow you to run more types of projects, but generally they are much louder as well.
If you’re working in a confined area, such as an apartment or townhouse, it may be better to start with a smaller, quieter machine. Maybe you don’t like your neighbors, in that case go all out and get yourself a full-blown industrial model.
Cutters
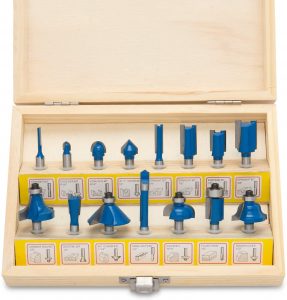
A set of CNC router bits for woodworking
Different materials will require different cutters, and the type of cutter you use can make all the difference when it comes to your woodworking projects.
Most machines will come with a few cutters for you to use right out of the box. These bits are universally found to be low quality, but if you’re a beginner they will do the job. It’s better to bust one of these starter bits than the more specialized and capable cutters you will eventually step up to.
Gain some experience with the included cutter or purchase a cheap starter set, and when you’re ready you can buy separate, more specialized versions.
Customer service
Customer service is crucial. CNC machines can be complex, and you may run into difficulties with assembly or operation, especially if you’re new to CNC.
We place a priority on customer service and look to recommend machines from manufacturers who are quick to respond and assist with any problems. If you are intimidated by the process of getting started with CNC woodworking, we advise you to look for model specific YouTube videos so you can educate yourself and build some confidence in your ability to work through the assembly and operations of the machines.
Related articles
For more information check out these related articles:
For many people looking to get into CNC machining, one of the most important aspects is the price. CNC mills and routers can cost tens of thousands of dollars or more.
These are not the type of machines we have outlined for you here.
It can be hard to find budget CNC routers with all the capabilities needed for detailed work. Luckily, we have laid out the best machines at the lower end of the price scale for you. Check out the best budget friendly starter CNCs below.
Work Dimensions: 300mm x 180mm x 45mm = 11.8” x 7.0” x 1.7”
Weight: 15.33 pounds
Materials it Will Cut: Plywood, MDF, PCB, acrylic, nylon, carbon fiber and soft metals
Warranty: 1 year
If you’re new to CNC machining and woodworking and you want “bang for your buck,” then the Genmitsu 3018-PRO is a great place to start. This machine has all the capabilities you’ll want from a starter machine, but it’s not going to go busting up your bank account. In short, the 3018-PRO is the best beginner CNC in terms of value for money.
One great thing about the 3018-PRO is that assembly is not too difficult. Though the machine does not come pre-assembled, it only takes a couple of hours to put the machine together. Some more expensive entry-level models take a day or two to assemble, so a couple of hours isn’t bad.
The machine assembles a lot like IKEA furniture: the manual utilizes pictures over words. If you do get stuck, though, there are plenty of great videos on YouTube to guide you along.
Once you have the 3018-PRO setup, you’ll notice just how solid and sturdy the build is. The frame is made out of aluminum, which is incredible for a cheaper machine. For a machine of this price, it’s not uncommon to find cheap plastic frames that allow the machine to shake or vibrate when the machine is operating. Trust me, shaking and vibrating isn’t good for your accuracy or the surface finish of your project.
With a 1.8-inch engraving depth, you’ll find that the 3018-PRO is capable of cutting all types of plastics, soft aluminum, woods, acrylics, PVCs, PCBs, and a wide range of other materials. Just don’t think you’re going to be working with anything to hard such as steel.
If you’re brand new to CNC machining, the 3018-PRO’s versatility will allow you to experiment with a wide range of materials without fear of damaging a high-end, pricey machine.
While the working area of this machine isn’t huge, it is designed to all you to pass through your workpiece. Basically, you slide your part through the machine and work on it in sections. This is called tiling and will be handled by the software. The limiting factor will be the 300mm (11.8”) width of the machine’s work area. Still, if you are dead set on building large projects, this likely won’t be the right choice for you.
As for software, the 3018-PRO is compatible with most operating systems. This is because the machine has an offline control module. Even if your desktop can’t connect straight to the machine itself, you can copy the code from your computer to an SD card and then control the machine using the offline module. This alone may save you from having to purchase additional software.
Even if your computer is compatible, an offline controller is a welcome addition, so you don’t need to always have your laptop or desktop constantly connected to the machine.
All in all, the Genmitsu 3018-PRO is the best budget CNC.
Work Dimensions: 300mm x 180mm x 45mm = 11.8” x 7.0” x 1.7”
Weight: 21.4 pounds
Materials it Will Cut: Plywood, MDF, PCB, acrylic, nylon, carbon fiber and soft metals
Warranty: 1 year
The 3018 PROVer is really just an upgraded version of the 3018-PRO. Naturally, the PROVer will take a little more out of your wallet than the PRO, but you’re paying for upgrades that are absolutely worth it. If you can afford the extra, go for it. For my money, I’d say the PROVer is the best all-around budget CNC machine.
I won’t go too much into the basics of the machine here since it’s simply an upgraded machine from the review above. Instead, I’ll stick to the upgrades.
Assembly is similar. It will take an hour or two (don’t believe the 30-minute time that SainSmart quotes) but nevertheless, that’s a quick assembly time for a CNC machine.
One big addition the PROVer has is the Toshiba TB6S109 driver, which makes the machine quieter and more precise when cutting and engraving. Upgraded drivers are a welcome addition to any CNC, especially lower priced machines such as these. They bring added accuracy and machine longevity.
When comparing this machine to the 3018-PRO, you’ll notice that this PROVer has acrylic baffles on the side. These baffles aren’t there just for looks – they work dually as a safety mechanism and a way to some of the mess from escaping when the machine is running. The baffles will prevent wood and other materials from flying off your projects at high speeds, and in doing so, they’ll contain the dust somewhat for a faster clean up.
Often people will start out with cheaper CNC machines such as the ones in this post and find out that they want quality of life upgrades for their tool. Essentially, the PROVer combines the most common upgrades and packages them together for you.
The emergency stop button is a feature that every CNC should have but unfortunately, many of the low-end machines skip this item. Imagine making an error in your program or setup and all of a sudden, your machine is trying to drill into itself or even a clamp holding your workpiece. Being able to hit an emergency stop is a welcome safety feature that may just save your machine, your tooling or at least your workpiece.
Limit switches to stop your machine from crashing into the ends of its travel provide some useful protection as well. It should be easy to see why safety features are often at the top of the list when it comes to upgrading your machine.
While the Z axis probe setter and larger offline controller aren’t quite as essential as the safety features we just noted, they do provide some nice quality of life improvements. The probe setter speeds up setup time and simplifies the process.
One thing to note is that if you plan to always have your CNC hooked up to your computer, then the bigger controller will not be of much help, but if not you’ll be happy to have a larger, more versatile display.
Overall, the 3018-PROVer is the same machine as the PRO version but with upgrades that are essential to the use of the machine. The upgrades aren’t required but many will find themselves picking them up in the long run. If budget is your main concern, go with the PRO version and pick the upgrades up one by one at a later date. However, if you can swing the extra dollars, you’ll be glad you did to make things simpler and maybe a little bit safer as well.
Working Area: 300mm x 180mm x 45mm = 11.8” x 7.0” x 1.7”
Weight: 17.1 pounds
Materials it Will Cut: All types of plastics, soft aluminum, woods, acrylics, PVC, PCB
Warranty: 1 year
If you’re new to CNC machining and you just want to test the waters with CNC, then the VEVOR 3018 is for you.
It’s rare in CNC that you can spend under $200 on a machine that is actually going to work and be able to perform some useful work. Obviously, the lower the price means lower capabilities, but you don’t necessarily need a fancy machine with all the bells and whistles if you’re just starting out.
One perk of the VEVOR is that it has an aluminum frame instead of the plastic frames you see on other super budget models. The aluminum frame helps to reduce vibration, which makes the machines more accurate.
Another great feature of this machine is that it has a fail-safe mechanism built into it. If you’re running a program and the machine senses drag along the x or y axes, the machine will stop itself. This isn’t foolproof, but it just might save you from breaking bits. It will also help to teach you what the upper limits of the VEVOR are. If you’re brand new to CNC, learning to feel out the limits of your machine will be useful.
One piece of advice for the VEVOR would be to stay away from cutting any metals or thicker pieces of wood with this machine. It is not a workhorse. Engraving is okay, but you are likely to run into trouble when trying to work with harder materials or deeper cuts.
Though the manufacturer may boast about the power of the VEVOR, this machine is really better suited as an engraver, which is okay given the price.
Another tip for the VEVOR is to look up some DIY upgrades for the machine on YouTube. There are a lot of small things you can do yourself to the VEVOR to get an extra bit of power and precision out of the machine.
Overall, the VEVOR CNC is a machine for pure value.
Given its capabilities as an engraver and occasional cutting tool, it can be considered a really good entry-level CNC machine. If you’re looking for the best value and/or cheap CNC machine, this is it.
Working Area: 300mm x 180mm x 45mm = 11.8” x 7.0” x 1.7”
Weight: 15.82 pounds
Materials it Will Cut: plastics, woods, acrylics(Only suitable for spindle milling cutter engraving), PVCs, and PCBs
Warranty: 1 year
One thing that makes this MYSWEETY 2 in 1 so great is, well, it’s 2 in 1. Unlike most beginner machines, this one comes with both an engraver and a laser, which gives you a much wider range of projects that you can work on.
The MYSWEETY gives you a lot of versatility compared to other CNCs at a similar price point, making it the best affordable CNC/laser engraver combo on the market.
Another plus side to this machine is the assembly time. Most people have said they clock in at around an hour for assembly, though it could be a little longer if this is your first time putting something like this together. Like most of these entry-level CNCs, if you get stuck during assembly, you can hop on YouTube or Facebook and find some solid instructional videos.
As for the machine itself, it is a little unfortunate that the frame is not metal. Instead, it boasts a plastic frame which can lead to a bit more inaccuracy when you start pushing the machine to its limits. With that said, the plastic is a phenolic resin which is pretty rigid stuff.
Overall, a plastic frame isn’t ideal, but it’s also not necessarily a reason not to buy the MYSWEETY.
If you’re mostly looking to do woodworking, then this is a really solid machine for you to use. Between the engraver and laser, you’ll gain a good feel for how woodworking operates at the CNC level. While the MYSWEETY is mostly designed for wood, you can venture out to other materials such as plastics if you’re careful. However, you really should avoid working with any kind of metal with the MYSWEETY – that is just not what this machine is meant for.
MYSWEETY themselves advertise this machine as one for “the absolute beginner,” and that is correct. If you’re new to the CNC world, and you want to get some experience in both carving and laser projects, then the MYSWEETY 3018 is going to give you the best value on the market as far as combo machines go.
Working Area: 610 mm x 610 mm x 85 mm = 24” x 24” x 3.3”
Weight: 42 Pounds
Materials it Will Cut: Wood, plastic, soft aluminum, acrylic, PCB, leather, others possible with experimentation
Warranty: 90 Days
If you’re looking to do larger projects but you’re still working on a budget, BobsCNC Evolution 4 is the machine for you. While it isn’t as cheap as the other options we detailed, this machine is more than worth it.
When reviewing CNC machines for home use, you’ll quickly realize that prices shoot up significantly as the machine size increases. Many have hopes of woodworking projects only to realize that the signs they want to make simply aren’t possible with cheaper machines. The Evolution 4 provides the needed capabilities while still managing to keep the cost down.
When it comes to the Evolution 4, the first thing most people note with this machine is the setup. Unlike most beginner CNCs, you’re going to have to assemble this thing piece by piece, screw by screw.
For most folks, you’re going to be looking at around a full day – possibly a little bit more – before the E4 is up-and-running and ready start your project. However, for many users the assembly is part of the fun. The assembly is certainly more detailed but has the added benefit of getting you intimately familiar with the workings of the CNC router.
As usual, if you get stuck during assembly, you can go onto YouTube and find some helpful tutorials, but the routers from BobsCNC have an added bonus: absolutely top-notch customer service. BobsCNC is famous for being the gold standard in customer service.
If you drop them a question – be it about assembly or a project you’re working on – they’ll get back to you with a speedy, meaningful response. You can tell this company truly cares about its customers and their customers CNC experience.
Once you have the Evolution 4 working, you may notice that it’s a little louder than other entry-level machines. What you’re hearing is the power. Running on a Makita RT0701C router, part of what you’re paying for with the Evolution 4 is this machine’s capability.
With the Evolution 4, you can work on a really wide range of materials from wood to leather to soft metals such as aluminum.
It costs quite a bit more than our other budget options, but the added cost substantially increases the capabilities.
If you want to work on larger work with your CNC router such as making big signs or something similar, then you’ll find that the Evolution 4 is a very capable machine that provides great value for the price.
Safety first. Safety second, third and fourth. You really shouldn’t be operating any of these machines without a pair of safety glasses. When cutting and engraving, these machines move materials at a high velocity, and getting something in your eye could lead to serious damage. If you don’t have them already, you’ll definitely need to buy some safety glasses along with your machine.
You should be very much aware that these are powerful cutting tools. Treat them with respect.
Materials being machined
These machines are pretty useless if they don’t have anything to engrave, so remember that you’re going to need to buy materials to machine.
Materials will vary in cost but most of these machines are designed to work with wood. Different woods will cost different amounts, and if you’re attempting to cut metals, some will be pricier than others. Also, if you’re new, it’s a good idea to over-buy on the cheaper materials because CNC machining takes some learning, and you’re bound to mess things up. Practice makes perfect and you are bound to mess some of your first projects up.
Bits and accessories
Just as you’ll mess up with materials, you’ll mess up and break bits. It happens to us all. This is especially true if you’re using the bits that come with the machines because those bits are usually on the cheaper end. You should plan on purchasing some extra bits at some point if not immediately.
One thing to think about also, is your work holding accessories. Most of these machines come with clamps, but the clamps may not be enough if you start pushing the machines to their upper limits. Higher quality/easier to use clamps will be a welcome addition at some point.
You may also buy a machine without a laser, and somewhere along the way, you’ll want one. Or perhaps you’ll want a work-area extension or a more powerful spindle. It isn’t easy but try to think about what you ultimately want to be able to accomplish with your machine. Often it is better to upgrade your capabilities from the outset until patching on upgrades.
Clean up
As we talked about in the bit on safety, when these machines are working, there is a lot of excess material flying around. In other words, expect a good amount of dust.
At the very least make sure you have a shop vac handy to clean up. A dust boot or shoe will help also, especially with larger machines. Cleaning is going to cost you some money, keep it in mind when purchasing.
Ease of use
If you don’t know much about software, you’re not going to be able to easily operate any of these machines. Most entry-level CNC’s will use Universal Gcode Sender (UGS) software platforms. You can easily find this open-source code for free on the Internet.
Most machines are also going to use GRBL software to run the machine. So, for example, you can use Fusion360 to create your project design, then have Fusion360 communicate the code to UGS, then from UGS to your machine.
If you’re new to coding this may all take a bit trial and error, so tinker around with the code and the machine until you’re comfortable. When in doubt, you can always search YouTube and Facebook for tutorials and guides to help you out with the software aspects of CNCing.
Engraving pens come in a wide range shapes, sizes and capabilities. You want to find the one that is just right for you project.
As you read our guide to the best engraving pens, make sure to keep your planned project in mind to determine what tool will work best for you.
Some applications such as jewelry engraving will benefit from a smaller tool for more precise strokes. Other materials such as metal or glass will engrave better with a more powerful tool such as one of the engravers by Dremel below.
No matter what you are working with, we have laid out the best tools on the market and an extensive list of items at the bottom of the article for you to consider when looking for your right fit tool.
The Culiau Customizer Engraving Pen is excellent choice for novices. Because the tool is so light, engraving is as simple as using a pen.
Don’t get me wrong, it will still take practice to get a nice, finished product but the Customizer is easier to use than some of the other bulkier engraving pens on the market.
The Customizer is roughly the size of a regular marker. The grip and light weight make controlling the engraver while in use a snap.
Size comparison
You can sketch with it just like a normal pen or pencil.
One of the biggest indicators of the quality is the feel of the tool. This is a well-built tool that feels good in the hand.
The flexibility of the Customizer makes the job as simple as drawing on paper. It works well on wood, including hardwoods, glass, and metals like steel, silver, and others.
Plenty of included bits
It is ergonomic, lightweight, and small. Because of this it is exceptionally comfortable to use and handle. The Customizer truly is a pocket-sized engraving machine.
The quality comes with a price though and the Customizer does cost more than many of the other engraving pens on the market. The cheaper engraving pens aren’t built as well, but if you only plan to use it for the occasional project then it might not be a big deal.
If you plan to use it a lot, I recommend going with an engraving pen that is a step above such as the Customizer from Culiau and skipping all the generic cheapy ones.
The Easy Etcher is an excellent engraving pen for beginners. The tool is so lightweight that engraving with it is as close to using an actual pen as you will get. The Easy Etcher is actually about the size of a standard marker.
The rubberized grip also helps keep the engraver under control while using it. While the 12,000 RPM speed may seem under powered when compared to other engraving pens, it actually helps keep the tool stable during use.
Runtimes will vary depending on the type of material you are working with, but the Easy Etcher runs on AAA batteries which means there is no waiting around for the tool to recharge. The batteries aren’t included but other extras are.
The Easy Etcher comes with 10 sets of stencils that make engraving text or designs on your material a piece of cake. It also comes with a nice starter selection of bits that allow you to create a variety of textures and finishes.
The Easy Etcher won’t be the be all, end all for engraving every material but it is a great tool to get you started without breaking the bank.
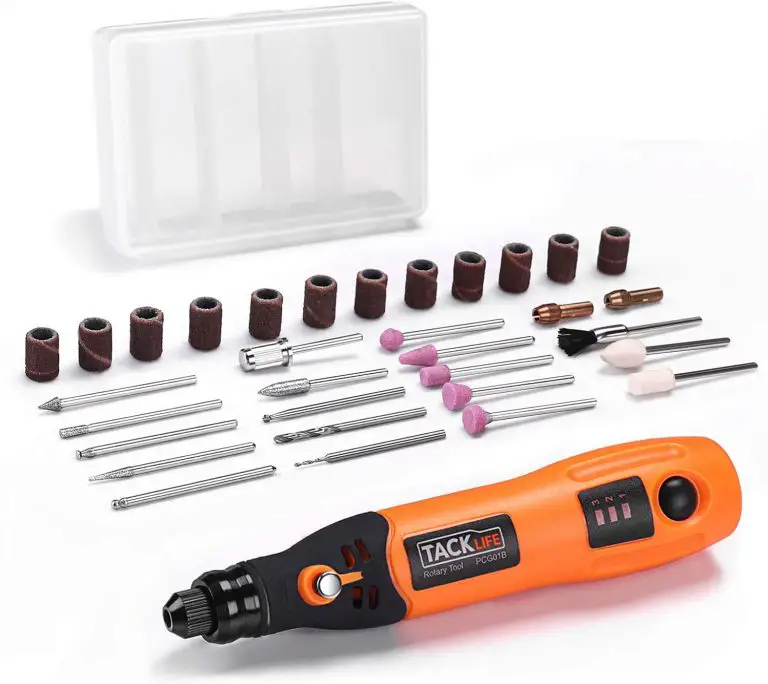
While the TACKLIFE PCG018 is not as nimble as the Easy Etcher it does a good job of making up for it in the power department. With similar price points, it would be wise to determine whether power or maneuverability is more important to you.
The PCG018 has 3 speed settings of 5, 10 and 15,000 RPMs. This means it will work well for a variety of materials.
This TACKLIFE engraving pen is cordless and rechargeable. It charges over USB which has some benefits and drawbacks.
The charge time is fairly long at 2 hours but with a runtime of 90 minutes it lasts long enough to complete most jobs.
Additionally, the tool comes with 31 different accessories for engraving, sanding and finishing along with a case to contain them all. Two collets to accommodate different bit sizes of 3/32” and 1/8” is also a nice addition.
The TACKLIFE PCG018 is a solid choice when it comes to cordless engraving pens.
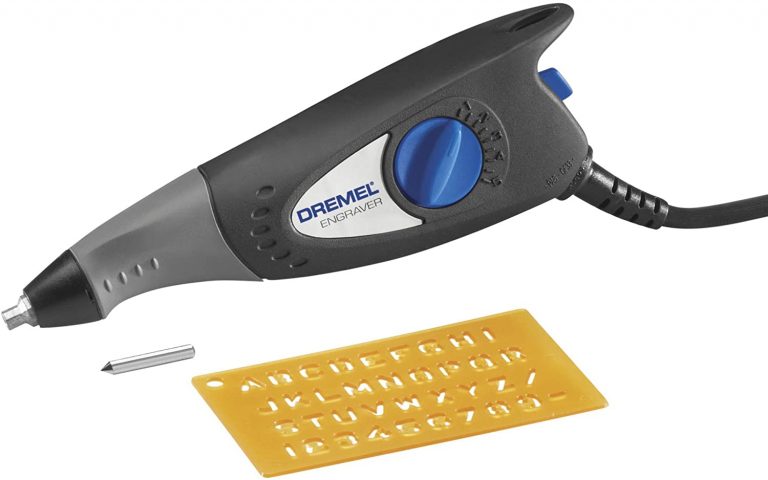
The Dremel 290-01 is different than most of the other engravers on this list. Instead of being a rotary engraver, it has a vibrating tip that moves in and out. Basically, it operates like a mini jackhammer.
Corded engraving pens like this Dremel have some advantages and disadvantages.
Being corded means that you are tethered to your power outlet and it can be slightly cumbersome to work with the power cord snagging on objects in your work area. The 290-01 is pretty lightweight though which makes maneuvering it around your workpiece a little easier.
A nice benefit of using a corded engraver is that you won’t ever run out of power. This is helpful for harder materials that may take multiple passes to get the amount of engraving you desire.
The power of the 290-01 is controlled with a dial that allows five depth settings. This works well to adjust for different material types such as wood or rock. All that power comes with the side effect that the tool is quite loud when running. You should expect it to be noisy. It is a power tool after all but take note that the other tools on this list are quieter.
There are a couple minor downfalls for the 290-01. The biggest one is that the bit can be difficult to install. The set screw that locks it is tiny and it can be challenging to work with.
Also, the provided stencil comes in handy but is somewhat lacking. Many other engravers come with a wider variety of stencils so keep in mind that you may want to purchase some extra stencils if you plan on engraving a lot.
On the plus side, just like this engraving pen’s cordless counterpart, the Dremel 290-01 comes with a two-year warranty which is well above what most competing engravers come with.
Overall, the Dremel 290-01 is a solid engraving pen. A couple minor inconveniences are balanced nicely by the higher, non-stop power that comes from being always plugged in.
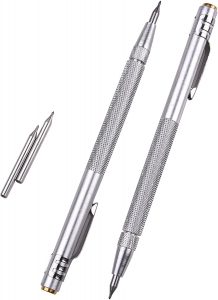
If all you need is something basic and reliable for engraving then the manual scriber from IMT may be your best bet.
It requires no batteries or power cord. The tool is extremely lightweight and its tungsten carbide tip will engrave a large variety of materials including steel, ceramics and glass. If you are working with plastics though, a powered tool would be a better choice.
The IMT scriber will actually perform an operation that is more akin to scratching your material than actually engraving it. For many use cases, this is more than enough. Just keep this in mind when choosing your engraving pen.
It also comes with extra tips in case one snaps. They are somewhat brittle because they are so hard. They aren’t fragile but can break if you aren’t dropped or handled roughly. Luckily, the scriber comes with a protective cap that will help shield the point from damage.
The IMT scriber is definitely more low tech than some of the other engraving pen options available but if all you need is a simple engraver then it may be a great choice at a cheap price.
Remember that these tools can be dangerous, especially to your eyes. Be careful handling them and use eye protection to protect you from things such as flying chips or broken bits.
Corded vs cordless engraving pens
Corded engraving pens generally have more power than their cordless counterparts. The downside is that the cord can get in the way and make the tool more difficult to maneuver. The easiest engraving pens to use are those that are lightweight and battery operated.
Cord length
If you choose to use a corded engraving pen to have more power, keep in mind that the length of the power cord is very important. If the cord is short, then make sure that you have an extension cord handy because some of the power cords can be very short.
Speed
RPMs do not equal power. Being able to adjust your RPMs over a wider range is more beneficial than simply having a higher RPM overall. Different materials will require different RPMs. In general, materials such as glass or metal which are harder will benefit from a higher RPM and softer materials will engrave better at lower RPMs.
Bits and accessories
It is a nice bonus for an engraving pen to come with a good selection of bits and accessories but not a necessity. There are many bit or accessory kits available that allow you to perform different types of engravings or finishing to your piece for a fairly cheap price.
Extra bits aren’t required to start but before too long you will definitely want to expand your bit collection if your engraving pen doesn’t come with many. Different bits will allow you to different styles of engraving.
Battery
If you go the cordless route, make sure you find a tool that charges quick and has a long runtime.
Cheaper tools tend to run off standard AA or AAA batteries which means they can run out of power quickly but also that more power can easily be on standby. Keep extra batteries nearby but consider the amount of power you will need for your project when choosing which engraving pen to go with. Harder materials require more power.
Warranty
Pay attention to the length of the warranty for your tool. Just like many other power tools, a good warranty is a solid indicator of the quality of the tool. This doesn’t mean that good tools don’t come with shorter warranties, just that it is something to be mindful of.
Stencils
Stencils can be very important for getting the correct design on your part. There are many different stencil kits available but it is definitely a bonus to have a couple to start with. Creating visually appealing designs freehand is going to take some practice so having a template to follow when getting started will be helpful.
Engraving vs cutting
Engraving pens are just that, engravers. They generally are not meant for cutting. If you are looking for a tool that is capable of doing more than simply scratching the surface of a part, then you will want to look into something with more power like the various Dremels or other higher power rotary tools.
Related articles
For more information check out these related articles:
Whether you are a seasoned machinist or a machine operator starting a new career, a good book can go a long way towards developing your understanding of the parts, pieces and processes involved in the machining trade.
We have laid out our recommendations for all skill levels and even included some quality choices for topics such as CAD and GD&T.
Check out Machinist Guides picks for best machining and CNC related books!
Best Beginner Machining Book
Machining Fundamentals
It’s not quite machining for dummies, but this text is easily the most beginner friendly book while also going in depth on the subject.
If you take a beginner machining course, this is likely the textbook that will be used. It covers everything from manual machining to CNC and everything in between. This textbook does a good job of not assuming you have previous knowledge and instead teaches all the basics and then some in an easy-to-understand format.
One of the best things about this title is that there are a lot of pictures to show you what is being taught. There is no better beginner’s book for machining. If you are looking for something that is primarily focused on CNC machining then look for one of the books listed below instead.
Machining and CNC Technology is a great overall machining book similar to our Best Beginner Machining Book.
Where this book excels is in providing an excellent introduction to CNC related topics. Too often the actual operation and setup of the machine are not given enough coverage.
This book gives a great introduction to CNC machining and covers everything from machine setup to program planning and g code tutorials.
Machining and CNC Technology is another textbook that is so thorough it is often used for training in machine tool classes.
Not a book for beginners. The CNC Programming Handbook by Peter Smid goes in depth on just about every CNC programming related topic.
Everything is covered and in great detail. Personally, this isn’t the type of text I would read straight through. Instead, I recommend using it like a CNC version of the Machinery’s Handbook.
This is absolute CNC reference grade material.
The CNC Programming Handbook makes a great comprehensive desk reference. When it comes to learning CNC programming, if this book doesn’t have it then most likely no book does.
You won’t need it on a daily basis but when you come across a topic that you don’t understand, it will be an invaluable resource.
Luckily, there are many different “pocket guides” out there that condense it down to a beginner level so you can comprehend the basics.
This pocket guide does a good job of covering the most common applications of GD&T and it’s likely that unless you are working in inspection, it will cover everything that you need.
Even experienced inspectors can benefit from having a quick reference handy.
Best Geometric Dimensioning and Tolerancing (GD&T) Book
GD&T: Application and Interpretation
Geometric dimensioning and tolerancing can be a difficult subject to tackle. Fortunately, this book by Bruce Wilson does a great job of breaking it down into smaller pieces.
In my opinion, when it comes it GD&T related matters, a picture says a thousand words. Luckily this book contains countless examples to make understanding some of the more difficult concepts of GD&T much simpler.
One item worth noting is that this book is based on the ASME Y14.5 2018 revision. This is the most recent revision of the drawing standard and many other textbooks available are based on older revisions of the standard. For reference, 2009 was the previous revision of ASME Y14.5.
Note: If your shop doesn’t have a copy (which they should), more experienced GD&T users may want to consider a copy of the ASME Y14.5-2018 standard to have around for reference as well.
This is the book by which all other references are judged. Machinery’s Handbook, which is often referred to as the Machinist Handbook, is the quintessential reference for all machining.
This is not a book for beginners, but instead for someone who already has some knowledge of machining. Every machine shop should and likely already does have a copy or two laying around. Each new edition continues to add new and relevant content to an already extensive collection of important information.
Don’t be afraid to pick up a previous edition if you can find it used or cheaper. The difference between one edition isn’t that great. Just avoid a copy that is five or ten editions out of date.
Every machinist should have a copy of this book available to them.
If you are just getting started with CAD, then in all likelihood you will be working with Fusion 360. Fusion 360 is a free (for personal use) piece of CAD software from Autodesk, makers of Inventor. Inventor is one of the most popular pieces of drafting software used in machine shops around the world.
Learning Fusion 360 will teach you skills which will transfer to other more advanced pieces of software. Although, I should point out that Fusion 360 is no slouch and will allow you to create some pretty advanced widgets and doodads if you take the time to learn it.
Fusion 360 for Makers is a great starting point for newbies to learn the basics and get acquainted with the software.
If you are just getting started with lathes and are looking for a guide to start you off cheap then this is the book. It is not the most comprehensive, but it does a good job laying things out for beginners.
The abundance of pictures helps machining newbies wrap their head around the parts and processes involved with metal lathes. The only complaint would be that the pictures are in black and white which makes it a little bit harder to see some of the finer details in the photos.
If you aren’t ready to dive into a literal textbook yet, then this book can get you started at a budget friendly price.
Just like Basic Lathework for Home Machinists, this book is a good starter book.
One area where The Milling Machine for Home Machinists excels is the color pictures. There are a lot of them and they make it easier to understand the topics being covered.
This is not the book you want if you have been running a mill for any length of time. It covers entry level material only. Once you fully understand the information covered, think about stepping up to one of the more comprehensive machining books for beginners such as Machining Fundamentals or Machining and CNC Technology.
Why do they have to make so many cool toys for adults?
Actually, I suppose it’s not the toys that are the problem, but instead it’s the cost of the toys.
Luckily if you recently purchased a 3018 series CNC such as the SainSmart Genmitsu series, MYSWEETY or one of the numerous other manufacturers out there, there are some relatively cheap or homemade upgrades to trick out your new machine.
Check out our list below to find out how to improve your 3018 CNC without breaking the bank.
Safety glasses
First and foremost, you should make sure you have a quality set of safety glasses. While these are small machines that are not as high powered as industrial CNCs, they are still dangerous.
Read your instructions. Wear safety glasses and it’s a good idea to have ear protection too.
An enclosure is one of the best upgrades for any hobbyist CNC. These machines can create a lot of dust and noise. It is a good idea to reduce both, especially if running the machine in your normal living area.
The enclosures are pretty straight forward. Assemble the box and place it over your machine to start reducing the volume of dust and noise created by your CNC.
If you have a 3D printer and are so inclined, it is possible to construct your own with some PLA, pieces of plexiglass and a little elbow grease.
Larger CNCs use a machinist vise to hold the workpiece. This vise is a smaller version for the 3018 series of CNC machines. They work great to secure a variety of materials.
This tool is especially useful for holding parts which are an unusual shape such as jewelry or some electronics.
Many different forms of work holding are available such as clamps and T nuts but a vise is a simple way to hold a large assortment of material. Compared to other types of workholding, a vise will decrease setup time and increase productivity.
If a vise is too costly for securing your workpiece. Think about some T nuts. They aren’t as fast but they are versatile and a vast improvement over the typical clamps included with most of the 3018 series CNCs.
Check out our bonus tips for ways to protect your workpiece while using T nuts.
Upgraded router bits and end mills are an important addition.
But not every type of bit is worth buying.
Check out our Beginner’s Guide to CNC Router Bits to figure out which ones you need to get started and which ones are fun toys for later on.
Rotary engraving module
The 3018 series of CNC are capable of laser engraving but for anyone looking to laser engrave cylindrical objects such as cups, tumblers, etc. this is the perfect solution.
The rotary engraving module will allow you to rotate the workpiece to allow the part to stay in the lasers ideal path. This will allow uniform engraving of the workpiece around the circumference of the engraved piece.
This isn’t an upgrade for everyone but if you have a specific application in mind which requires laser engraving a circular object then think about checking out this upgrade.
Different collets are a great addition for a 3018 series CNC. They allow you to use many different size bits or end mills to machine your workpiece with. At the bare minimum it would be wise to consider adding a ¼” ER11 collet. For a little more you can get a set that will allow just about any bit or end mill that you would want to use.
There is no need to break the bank on ER11 collets for a 3018 CNC. The added quality and reduction in runout won’t translate to a big difference in quality for your projects. A simple set is the best choice.
No one likes setting Z axis heights with paper. It feels imprecise and clumsy. Luckily, there is a simple and cheap upgrade which will allow you to make the process simpler and more accurate.
The probe is very easy to use. First connect the probe to your control board. Now measure the height of the probe with a tool such as a digital caliper or micrometer.
The thickness of the probe now needs to be entered into the CNC software. Place the probe on the workpiece and then connect the clip to the cutting tool. Run the probing program and lower the cutting tool slowly until it contacts the probe. The Z axis will now be set.
For more detailed instructions check the manufacturer’s website, they have a nice tutorial.
You can make your own if you wish but for the price it is hard to justify messing with a homemade tool.
If a homemade tool is more your speed then check out this tutorial which will walk you through creating your own Z axis touch setting probe.
The cost of the homemade tool is close to the cost of an actual probe but you might have some of the supplies on hand already which will bring the cost down.
Limit switches are a great addition to a 3018 CNC machine. Without them it is all too easy to crash your machine. While crashing the machine won’t always cause damage, it is a definite possibility.
Honestly, the machines should all come with limit switches to protect the machine from damage but I am sure that the manufacturers are trying to keep the cost down as much as possible and therefore did not include them in some versions of the 3018 CNC.
The 3018 series of CNC machines are pretty budget friendly but that doesn’t mean you want to scrap the machine right away.
Take note that adding limit switches will reduce your work area by a small amount. While this is unfortunate, it is definitely a recommended upgrade to protect your machine especially at the relatively small cost of the upgrade.
As you gain more experience with your CNC machine, it is inevitable that you will develop quite the collection of bits and end mills. A good storage solution is a must to protect your bits from damage.
The storage tray has holes for many different sizes of bits and end mills along with storage for miscellaneous other tools. The tray from Genmitsu does a great job of organizing all the little odds and ends along with your cutting tools.
If you have a 3D printer then check out Thingiverse for storage trays. You should be able to find something similar that will meet your needs. If you don’t have a 3D printer then you might be able to find something that will work at the dollar store.
The important thing is to keep your tools organized and protected so that they will remain sharp and ready for your next project.
Those with experience working with a 3D printer will likely recognize the value of a good wire/cable protector. This is often one of the first things printed when someone buys a new 3D printer and for good reason.
The movement of the machine back and forth in the process of cutting or engraving means that there is some risk that the wires will snag on some portion of the machine. The cable protectors will keep this from happening.
If you have a 3D printer already, take a peek on Thingiverse to see if there are any plans or find a premade alternative somewhere else like Amazon.
One great way to hold down projects that are difficult to secure for all types of reasons is to place blue painters tape on the bed and the workpiece. Now use an adhesive to glue the two sections of painters tape together. The tape and glue combo will hold the part and once you are done, you can simply peel the painters tape off.
3D printed holding fixtures can be a great addition and allow more versatility in what you can machine. Check out Thingiverse for all kinds of 3D printed addons.
Use felt furniture sliders from the dollar store with clamps or t nuts to protect surface of delicate workpieces.
If you have any additional tips you learned experimenting with your 3018 CNC please let us know and we will happily share them here to save others some of the headaches that come with learning how to work with a new machine.
Related articles
For more information check out these related articles:
Machinists, CNC Machines Operators, and hobbyists often need to work with complex engineering and mathematical equations daily. With practice they get easier to work with, but a good calculator tailored to machining can speed up the learning process.
After all, a miscalculation can be the difference between a scrapped part or crashed machine and a perfect part.
Standard hand-held calculators are designed for basic arithmetic calculations of addition, subtraction, multiplication, and division.
A good machinist calculator will perform all the functions of a standard calculator along with other specialized functions such as trigonometry, logarithms, and exponential functions.
At the very least you will want to get a calculator that can perform all of the necessary operations.
If you want to step things up and make those calculations easier, then some of the specialized calculators below simplify the formulas and calculations.
In this article, we discuss some of the best machinist calculators and apps for machinists available while including tips for making the most out of these mathematical tools.
Our pick for the best machinist calculator is the Calculated Industries 4088 Machinist Calc Pro 2.
The Machinist Calc Pro 2 Model 4088 easily ranks among the best machining calculators because of its ease to use, and rugged build. This calculator is ideal for machinists, engineers, programmers, and hobbyists.
The Machinist Calc Pro 2 Model 4088 makes solving the most common formulas used such as speeds, feeds and trigonometry super simple. Adjusting those calculations, with a larger depth of cut for example, is also easy. A couple button pushes to adjust the value in the calculator and it quickly spits out your new speeds and feeds. No need to run through the whole calculation step by step again.
It also solves right-angle triangle and bolt-circle patterns problems with ease. The trig functions are great. Enter what you know, any combination of angles or sides, and the Calc Pro 2 will spit out all the unknown values.
Also, the calculator comes with built-in charts that you can look up information for calculating milling, boring, spindle speed, cut speed, chip-load, etc.
Back to speeds and feeds because that is a large portion of what this calculator is so good at.
The calculator makes solving for any of these values quick and easy:
Surface feet per minute (SFM)
Revolutions per minute (RPM)
Inches per revolution (IPR)
Inches per tooth (IPT)
Inches per minute (IPM)
Width of cut (WOC)
Depth of cut (DOC)
Length of cut (LOC)
On top of this, there are a ton of variables that can be adjusted to accurately setup your machine. You can pick the type of cutting tool you are using as well as the material you are cutting.
It comes loaded with material info for various steels as well as aluminum and titanium alloys among others. The tool choices are high speed steel, carbide, and high-performance tools.
The pre-programmed processes built in are:
Turning
Drilling
Boring
Slot milling
End milling
Face milling
The Machinist Calc Pro 2 is handy but also built tough. Things don’t always get treated as carefully as they should in the shop which is why the included case/cover is important. Just remember that the case isn’t waterproof, it is only meant to protect it from a splash, don’t go dipping it in your coolant.
The case has a quick tips guide to the most important functions and this thing practically comes with a textbook. It can seem overwhelming, but it is pretty well laid out and you can find what you need pretty quickly.
The Calc Pro 2 isn’t necessarily a calculator replacement. It isn’t meant to do all math calculations, but it is meant to do a large selection of the ones that anyone working in machine shop would need.
Let’s be real, not everyone wants to break the bank when picking up a calculator. If you fall into this category, keep it simple and go with one of the classics.
The TI-30XIIS scientific calculator by Texas Instruments is solid calculator fully capable of any calculation the average machinist or CNC operator might need.
While it won’t step you through the formulas and calculations like the Calc Pro 2, it is still more than capable of getting to the end result.
The TI-30XIIS has all the functions you will need for solving your machining formulas. Algebra, geometry and trigonometry functions are all built in.
The TI-30XIIS is both solar and battery powered, and the battery practically lasts forever. I have used literally dozens of these calculators in my time working in machine shops and I can’t recall ever having one that had a dead battery.
They are simply built to last. This isn’t cheap plastic. I feel like you could use the thing as a hammer and it would keep on ticking.
Please don’t though. Using the calculator as a hammer will likely void your one-year warranty.
The only thing I have seen kill one of these calculators is chemicals. But in fairness, a heavy dose of acetone will put an end to most things plastic.
If you simply need a calculator to do your job and aren’t looking for something super specialized, then stick with one of the classics and grab a Texas Instruments TI-30XIIS scientific calculator.
Everyone uses the calculator on their smart phone. But this is not your ordinary calculator app.
The CNC Machinist Calculator Pro app is an extremely powerful machining tool. It features all the standard calculator functions you would expect along with a wide assortment of specialized functions.
It has functions for milling, drilling and turning calculations.
The app also includes a nice variety of charts and references to use. This is a great all around app that has a little bit of everything and enough of it to help anyone using the app along.
For example, not everyone will need to reference the G code library or the GD&T symbols guide but both sections of the include a nice amount of info and examples to prove useful.
I really like the mini apps that are included in the Machinist Calculator Pro app.
The trigonometry solver and geometry solver are very handy.
I also really enjoy the quiz function called Brain Check. It has various quizzes on different machining related topics. Seems like a fun way to figure out what you might need to brush up on for subjects.
Overall, the app is well made and easy to use. While it isn’t a $1 or $2 app, it does pack an extensive amount of functions into the package while still being quite a bit less expensive than some of the competing machining apps.
There’s an app for nearly every gadget, tool, or piece of equipment you can think of. This even applies to calculators for machinists.
The best premium app is a no-brainer. It is Machinist Calc Pro 2. Yeah, you read that right. Calculated Industries have literally made an app that replicates their physical calculator.
The mobile app features all the same functions of the handheld version with a built-in help function for when you can’t figure out your next move. By pressing and holding specific keys, the app displays clear explanations of what the key does alongside elaborate examples.
Everything we said about the physical calculator still applies to the digital replica.
The app is available for all android and iOS devices and the best part is that you can get it for about half the price of the physical handheld version.
FSWizard Machinist Calculator by Zero_Divide is an amazing calculator and overall machining resource especially considering the price of admission.
It has a ton of different calculators for things such as speeds and feeds, triangles, bolt circles, and more.
In addition, there are a huge quantity of references and charts that will come in handy. Most of the references aren’t intended to be the ultimate resource on the topic but instead simply a quick reference.
Many machinists, especially those just starting out, will enjoy the all-in-one app that includes GD&T, G code and speeds and feeds info all in one place.
FSWizard Navigation Menu
The biggest downfall of the free version of FSWizard is the limited selection of materials available in its speeds and feeds calculator. There are enough to get by, but the numbers won’t be exactly tailored to your workpiece. The additional materials are available in the Pro version of the tool.
Overall, FSWizard provides a ton of value for free. The app is available for all android and iOS devices.
There are a large number of machining calculators available online. It can be a pain to have a bunch of bookmarked sites for all the different calculators you might need.
The Neiko 0-6” digital caliper is made of stainless steel. It features a metric measuring range of 0-150mm. It is capable of measuring in inches, millimeters and fractions. Although most people won’t use the fractional mode, it is nice to have the option.
Metric measurements
Fractional measurements
The Neiko caliper is capable of taking outside, inside, step and depth measurements. The manufacturer claims that the caliper has an accuracy of .001” or .02 mm.
I tested that claim by measuring various gauge blocks sizes over the entire measuring range of the calipers and found them to be well within the claimed accuracy. Quite a feat for a budget friendly tool.
The most important quality of any set of digital calipers is good accuracy and these Neikos got it.
Three small digits when measuring in inches, Two when measuring in mms
The display on the 01407A reads out to .0005” or .01 mm when in metric mode. The fraction mode has a resolution of 1/128 of an inch.
Unfortunately the caliper is incapable of rounding to a different fraction such as 1/32. 1/128th of an inch isn’t exactly the most practical units to use. The display does display reduce the fractions down so you will see 1/2″ instead of 64/128″ which is nice.
The display is large which makes it easy to read, but I am not a fan of the format. It is obvious that it is made like that to read the fractional measurements, but having 2 or 3 of the digits smaller is just weird. It’s not a deal breaker but it does take a little getting used to.
Open battery compartment
The digital caliper comes with an extra LR44 button cell battery which is handy because many report issues with dead batteries on arrival. I ran into the same issue and quickly swapped in the fresh battery.
Luckily the battery is easily changed with no tools required. The battery cover simply slides off with a swipe of your thumb.
Additionally the caliper is often reported to turn itself on frequently which causes the battery to die quickly. The caliper can be locked in place to keep it from turning itself on but it still might not be a bad idea to try and keep an extra battery on hand.
The caliper also comes with a sturdy plastic case to protect it.
The case is solid with nice padding and room to store an extra battery
One of the harder qualities to convey is the overall build. Some might call it the “feel” of the tool. This is where the Neiko 01407A excels.
They feel like a much higher priced tool. The jaws slide smoothly along the frame. This is one area that many budget level calipers struggle with. Often they can get the accuracy but the tools just feels like junk when using it. Not the case here.
The only other build quality item I would note is the fine adjustment roller wheel. While other cheap calipers either tack on a bad one or skip it entirely, Neiko has added one that is comparable to much higher priced calipers.
When you combine the smoothness and the excellent fine adjustment, it is much easier to get the accuracy you want because over time you will be able to feel your measurements. This is not something that would be possible without this kind of build quality.
Verdict
The Neiko 01407A digital caliper is not the best caliper that money can buy, but it just might be the best value.
The display is a little quirky but it is definitely something that you can get used to.
In the end, the overall accuracy and the build quality at a bargain price are what make the Neiko 01407A digital caliper one of the best around.
To provide the best experiences, we use technologies like cookies to store and/or access device information. Consenting to these technologies will allow us to process data such as browsing behavior or unique IDs on this site. Not consenting or withdrawing consent, may adversely affect certain features and functions.
Functional
Always active
The technical storage or access is strictly necessary for the legitimate purpose of enabling the use of a specific service explicitly requested by the subscriber or user, or for the sole purpose of carrying out the transmission of a communication over an electronic communications network.
Preferences
The technical storage or access is necessary for the legitimate purpose of storing preferences that are not requested by the subscriber or user.
Statistics
The technical storage or access that is used exclusively for statistical purposes.The technical storage or access that is used exclusively for anonymous statistical purposes. Without a subpoena, voluntary compliance on the part of your Internet Service Provider, or additional records from a third party, information stored or retrieved for this purpose alone cannot usually be used to identify you.
Marketing
The technical storage or access is required to create user profiles to send advertising, or to track the user on a website or across several websites for similar marketing purposes.