G00 Code: CNC Rapid Traverse Explained with Examples

G00 is the rapid traverse command in CNC G-code. It moves the machine at maximum speed — ignoring any programmed feed rate — along any combination of the X, Y, and Z axes.

It’s one of the first codes you’ll see in almost every CNC program.

Key Takeaways

  • G00 moves the machine at maximum speed — no cutting, no feed rate control
  • Use it to position the tool before a cut, after a tool change, or when moving to a safe height
  • Never use G00 while the cutter is in contact with the part
  • G00 is modal — it stays active until you switch to G01, G02, or G03
  • G0 and G00 are identical — the extra zero is optional
G00 – At A Glance
FunctionRapid Traverse (position at maximum speed)
FormatG00 X__ Y__ Z__
TypeModal (Group 1 – Motion)
Cancelled byG01, G02, G03
Feed rateIgnored – machine runs at maximum rapid speed

WHAT DOES G00 DO?

G00 puts the machine into rapid traverse mode, sometimes referred to as rapid travel. When active, the CNC ignores any feed rate set with the F code and instead moves at the machine’s maximum speed. You can move any combination of the X, Y, and Z axes in a single G00 block.
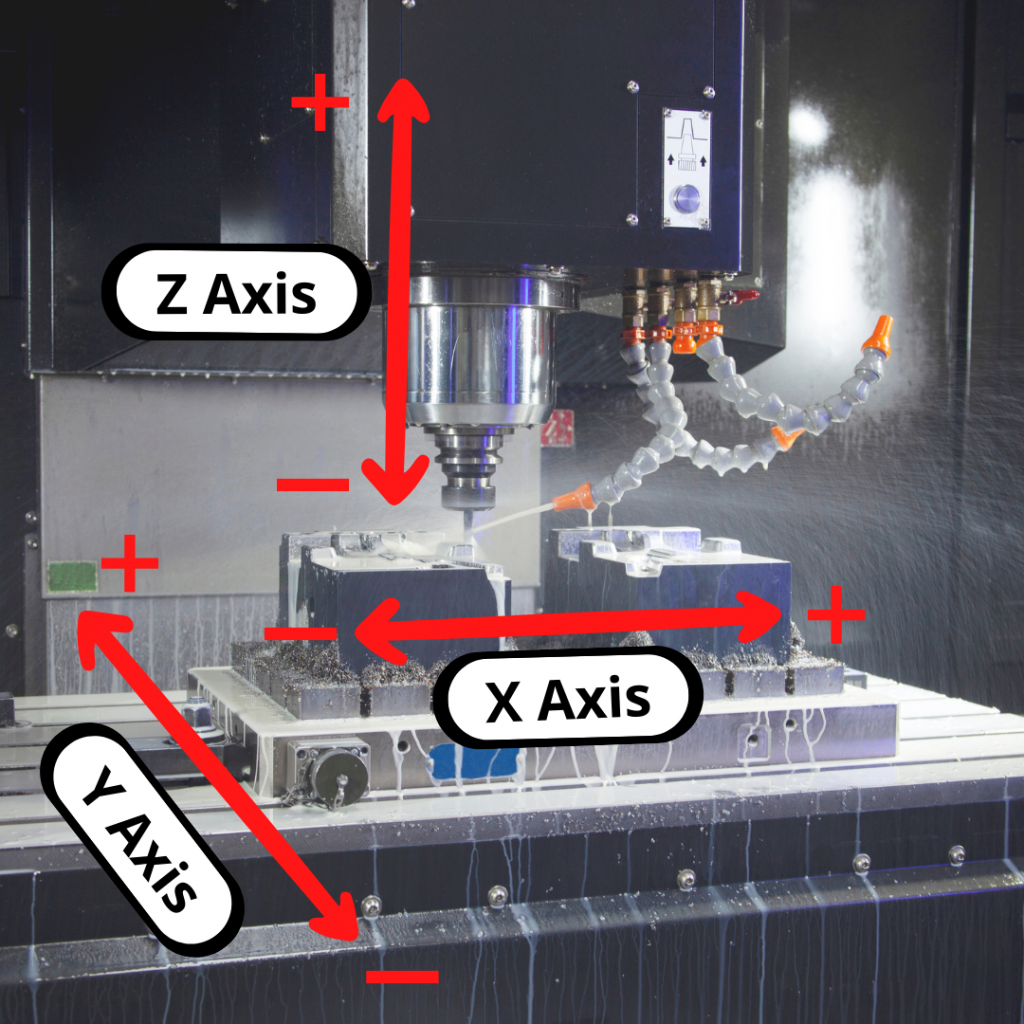
an illustration that shows the X, Y and Z axes on a CNC machine

Because G00 is a modal code, you don’t need to repeat it on every line. Once active, it stays on until you switch to another motion mode — G01 for linear cutting, G02 for clockwise arcs, or G03 for counterclockwise arcs.

CODE EXAMPLE — Rapid to Start Position

G90 G54 (Absolute positioning, Work offset 1)
G00 Z1.0 (Rapid Z to safe height)
G00 X1.5 Y2.0 (Rapid to XY start position)
G43 H01 Z0.1 (Tool length comp, move to clearance plane)
G01 Z-0.5 F10.0 (Linear feed into the part — cutting begins)

G00 is only used while the cutter is clear of the part. G01 takes over the moment cutting starts, where feed rate control actually matters.

G0 VS G00 — IS THE EXTRA ZERO REQUIRED?

No. G0 and G00 are read identically by the CNC controller. The leading zero is a formatting preference, not a functional difference.

Textbooks and formal reference materials tend to use G00 while many programmers will use G0 to save a keystroke. If your shop has a standard, follow it — otherwise use whichever you prefer.

WHEN TO USE G00

G00 shows up constantly throughout a CNC program. Use it any time you need to move the tool quickly and there’s no cutting happening including:

  • Positioning to the start of a cut after a tool change
  • Pulling Z up to a safe clearance height between features
  • Moving to the tool change position (often combined with M05 and M09)
  • Repositioning to a new XY location between holes in a drilling pattern

COMMON MISTAKE – Cutting with G00

Never use G00 while the tool is in contact with the part.

Rapid traverse gives you no control over cutting conditions — the machine will move at full speed regardless of material, chip load, or tool diameter. The result is usually a broken tool, a scrapped part, or a machine crash.

Always switch to G01 (or G02/G03) before any cutting motion.

G00 FORMAT

Specify the destination coordinates for any axes you want to move:

G00 X__ Y__ Z__

You don’t need to include all three axes. These are all valid G00 commands:

G00 Z1.0  (move Z only)
G00 X3.0 Y4.5   (move X and Y simultaneously)
G00 X1.0 Y2.0 Z3.0  (move all three axes)

Because G00 is a modal code, you don’t need to repeat it on every line. If G00 is already active, the next line with coordinates will also execute as a rapid move.

IMPORTANT CONSIDERATIONS WHEN USING G00

Units — Inches or Millimeters

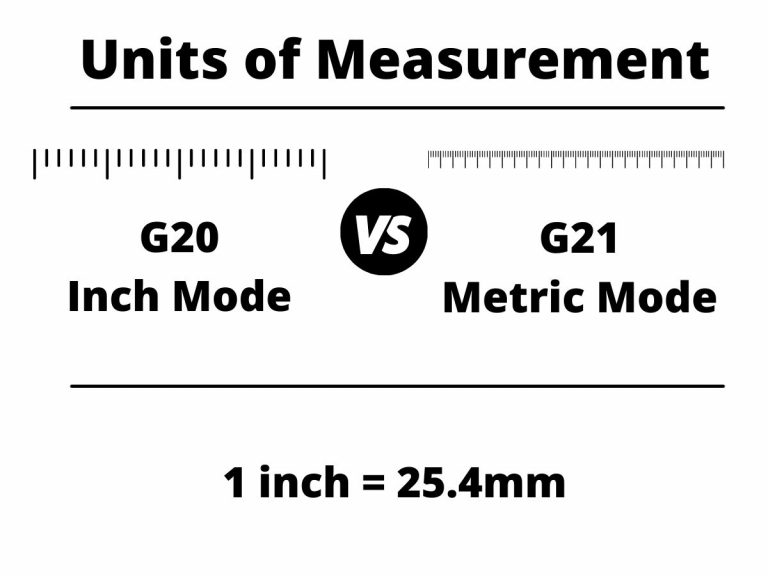
Make sure G20 (inches) or G21 (mm) is set before your G00 command. Moving 10 inches instead of 10 millimeters is a significant difference — and the machine won’t warn you.

Absolute vs. Incremental Mode

How the controller interprets your coordinates depends on whether you’re in G90 (absolute) or G91 (incremental) mode.

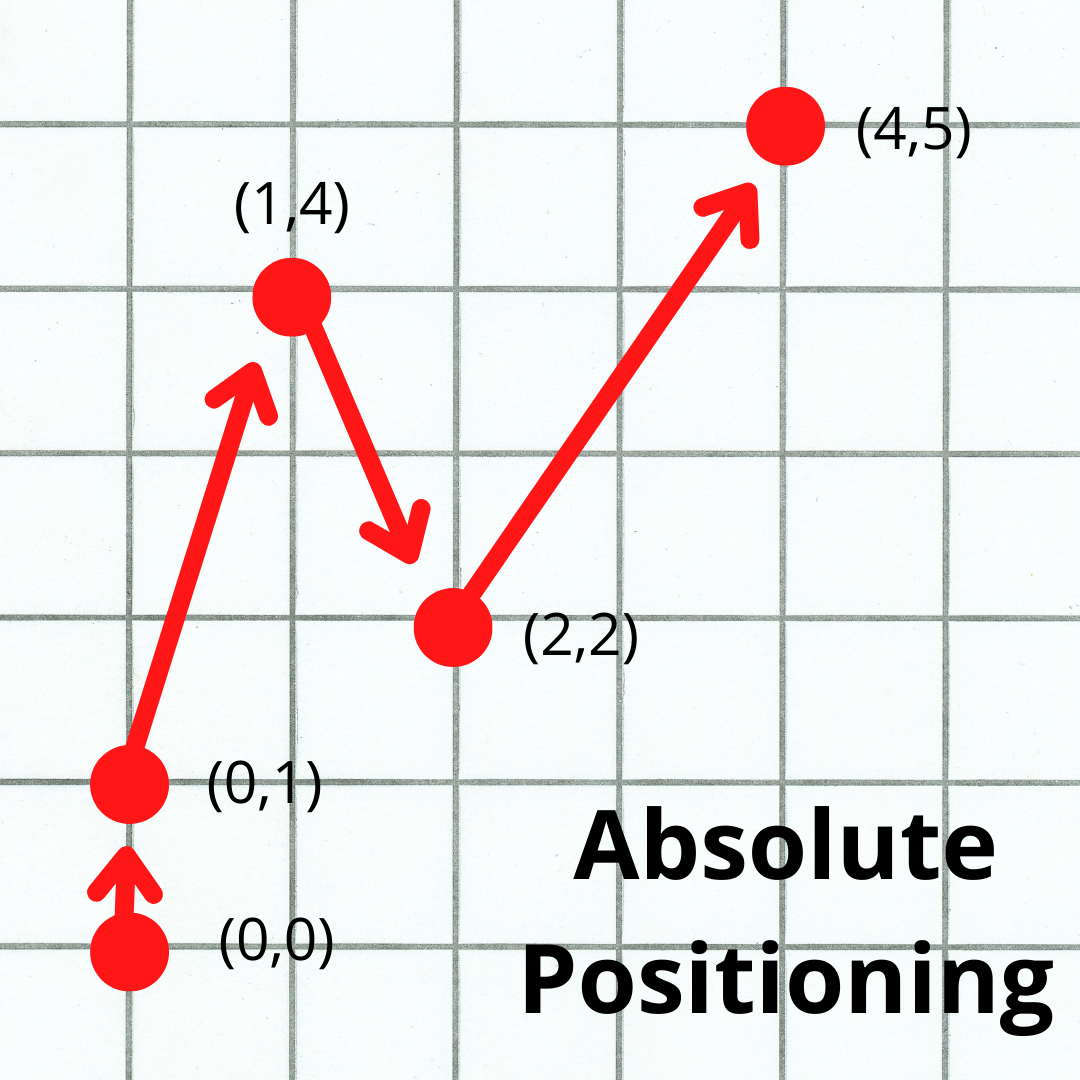
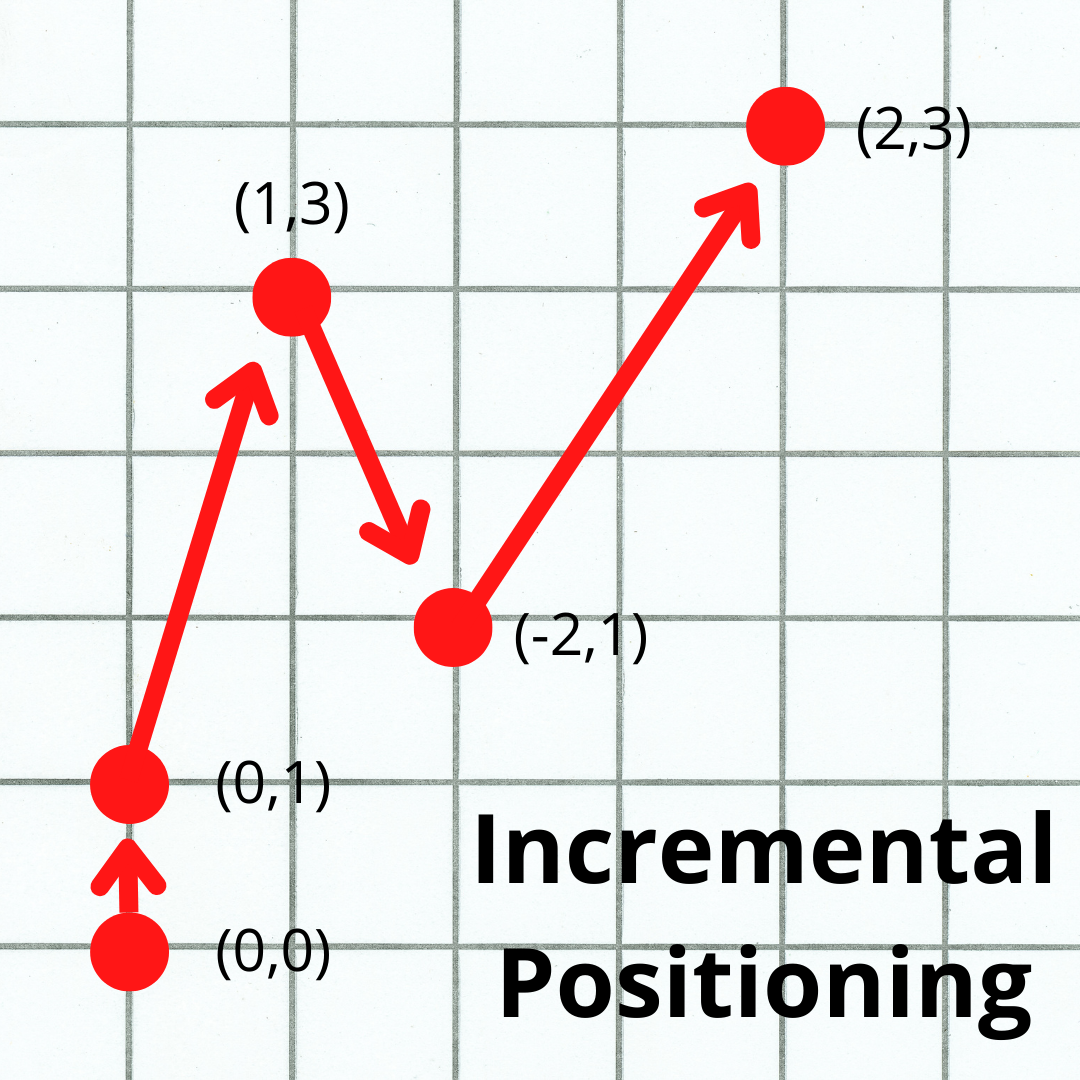
  • Absolute (G90): coordinates are measured from the program zero. G00 X3.0 Y2.0 always moves to the same fixed location.
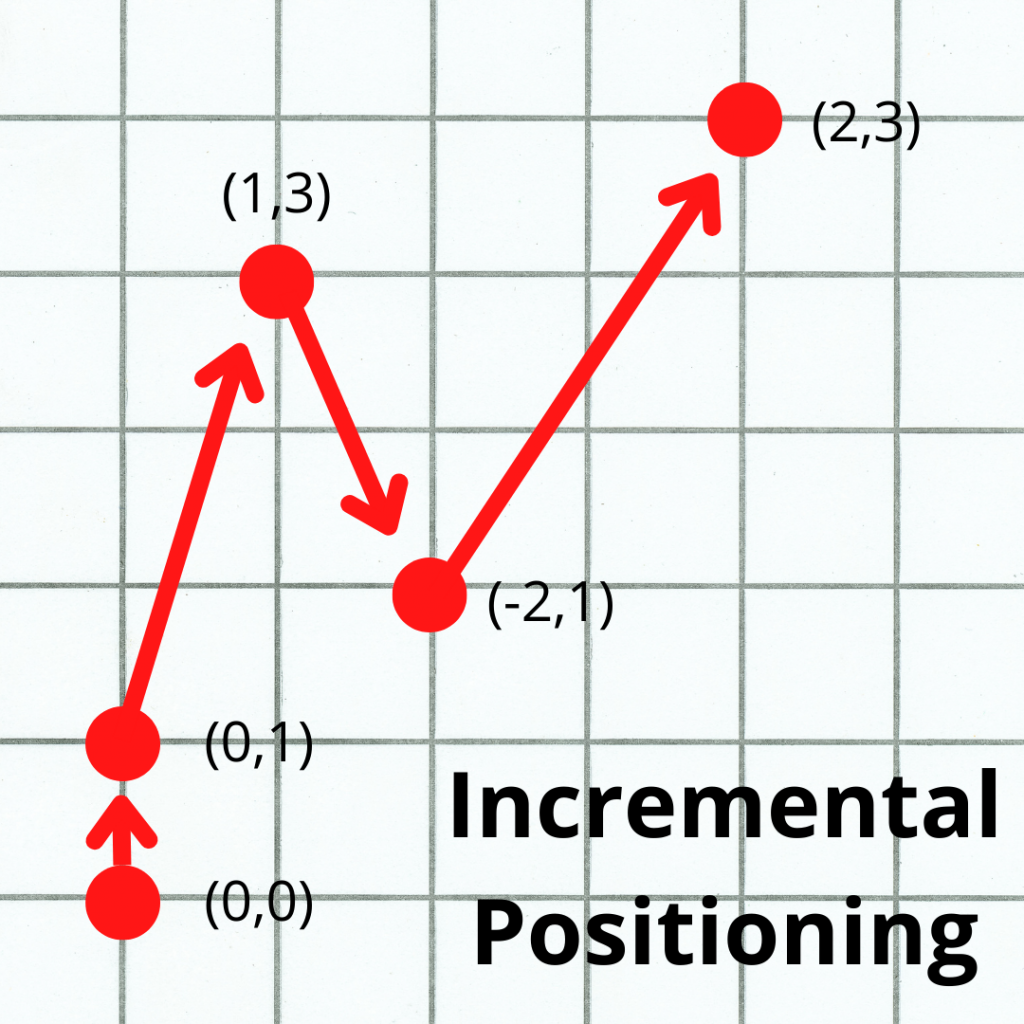
  • Incremental (G91): coordinates are measured from the current position. G00 X3.0 Y2.0 moves 3 inches in X and 2 inches in Y from wherever the tool is now.

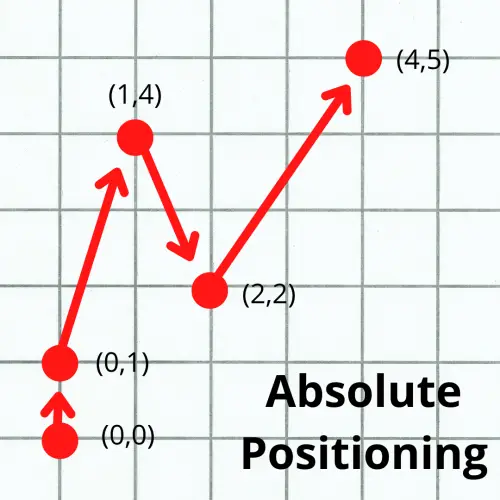
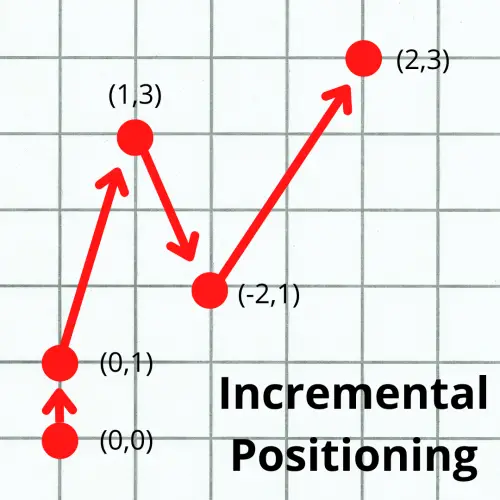
The images below show the difference between the absolute and incremental positioning modes. The numbers in parentheses are the locations given to the the machine to make the move.
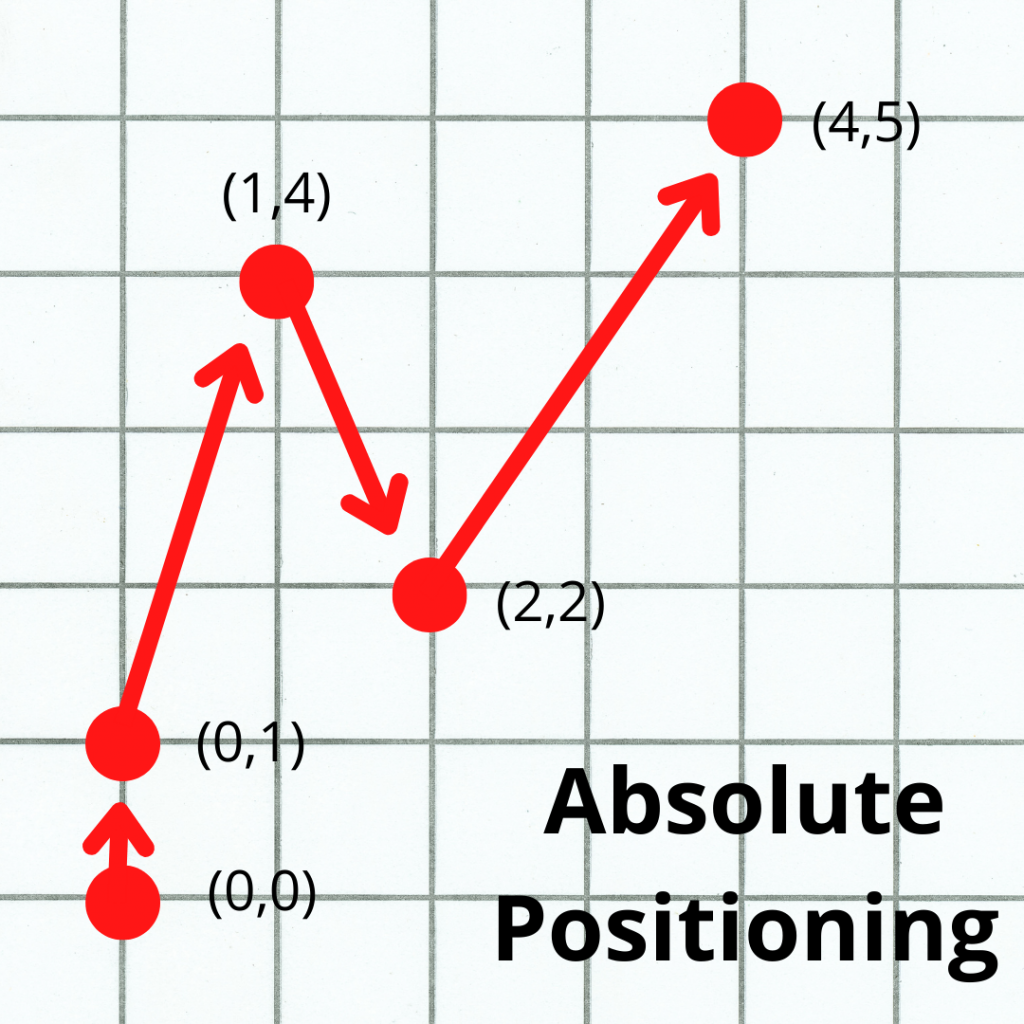
graph paper example of absolute positioning with multiple points as examples
graph paper example of incremental positioning with multiple points as examples

Most production programs run in G90. Check your setup block to confirm which mode is active before editing any G00 lines.

Know Your Path — Check for Obstacles

Before running a G00 move, think through the full path from start to finish. Where is the tool now, where is it going, and is there anything in between such as clamps, fixtures, the part, or the machine table itself.

G00 moves fast. There’s no time to react if something is in the way.

Machine Movement Behavior

Not all CNC machines behave the same way during rapid moves. Most will move all three axes simultaneously, which produces a straight-line path. Some machines move axes one at a time or at different speeds, producing a “dog-leg” path where the tool doesn’t travel in a straight line.

COMMON MISTAKE — Dog-Leg Movement: Don’t Assume a Straight Line

If your machine runs X, Y, and Z at different rapid speeds, a move that looks diagonal on paper can actually travel in a stepped path — potentially colliding with a clamp or part feature that a straight-line move would have cleared.

When in doubt, break the move into separate single-axis rapids or test at reduced rapid override before running full speed.
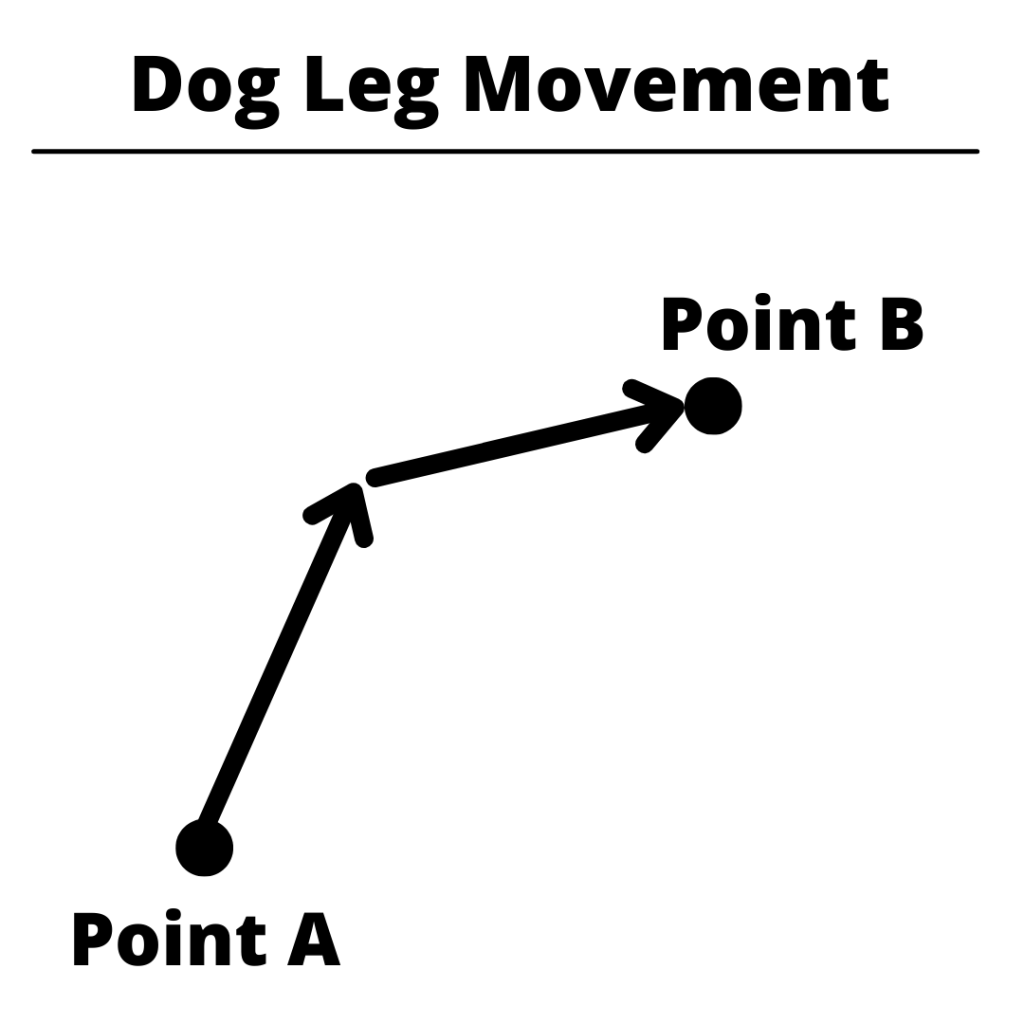
illustration of dog leg movement on a CNC machine

HOW TO CANCEL G00

There’s no dedicated cancel command for G00. To exit rapid traverse, switch to another motion code in Group 1 such as:

Using any of these codes will turn G00 rapid movement off and switch to the new movement mode.

G00 VS G01 — WHAT’S THE DIFFERENCE?

G01 also moves in a straight line, but at the feed rate set by the F code. G01 is the code used for cutting in a straight line. G00 is for rapid movement.

The rule is simple: if the tool is touching the part, use G01. If it’s not, G00 is faster.

FAQS

What is the difference between G00 and G01?

G00 moves the machine at maximum rapid speed with no feed rate control — it’s for positioning, not cutting. G01 moves in a straight line at the feed rate you specify with the F code. Use G01, G02, or G03 whenever the tool is in contact with the part.

Can I use G00 to cut material?

No. G00 ignores the feed rate and moves at the machine’s maximum speed. Using it while cutting gives you no control over chip load, surface finish, or tool load — and will almost certainly break the tool or damage the part.

Does G00 move in a straight line?

It depends on the machine. Most modern CNC machines move all axes simultaneously during a rapid, which produces a straight-line path.

However, there are still many older CNC machines in use and some machines move axes independently or at different speeds, creating a “dog-leg” path. Check your machine’s documentation or test at reduced rapid override if you’re unsure.

What cancels G00?

Any other motion code in Group 1 will cancel G00 — typically G01 (linear feed), G02 (clockwise arc), or G03 (counterclockwise arc). There’s no dedicated cancel command like there is for canned cycles.
Is the Resparked Customizer Worth the Price? An In-Depth Review

Engraving can be a relaxing and rewarding craft.

With the right engraving tool in your hands, you can finish creative tasks with ease.

And it’s a terrific way to personalize something generic with a fun crafty hobby.

Engraving tools come in a wide variety of styles, sizes, and capabilities. It’s important to find the ideal one at is ideal for your project.

The Customizer by Resparked is an engraving pen that is more than capable of meeting most people’s needs. That’s why it’s a popular choice among home crafters and those who like to try out new tools for art.

The Customizer’s durability, power, compactness, and exceptional value for money make it an excellent professional etching tool suitable for all materials, including glass, wood, and metals. 

Best cordless engraving pen

Resparked Customizer

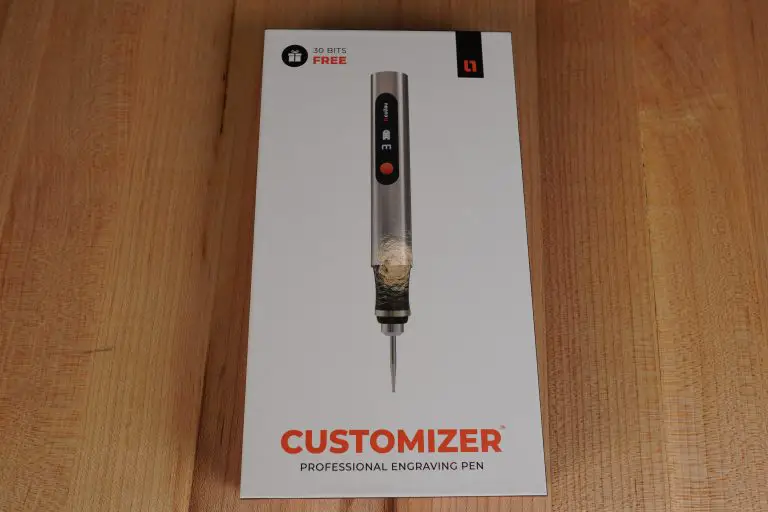
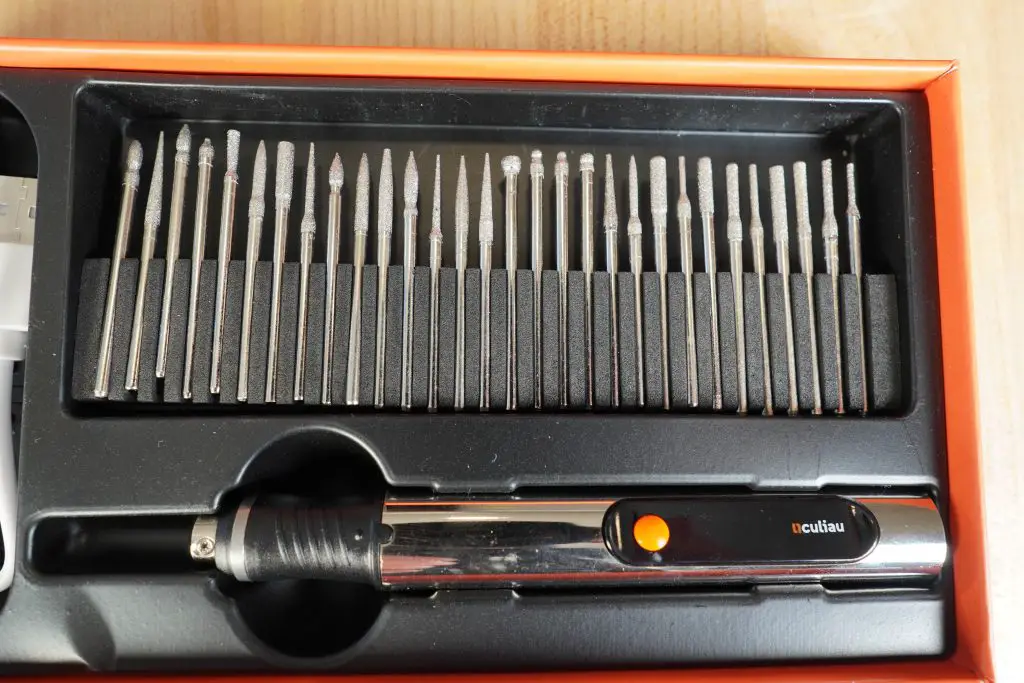
culiau customizer in box with engraving bits
Check Current Price

About the Resparked Customizer

For beginners, the Resparked Customizer Engraving Pen is excellent. Because the tool is so light, engraving is as simple as using a pen. 

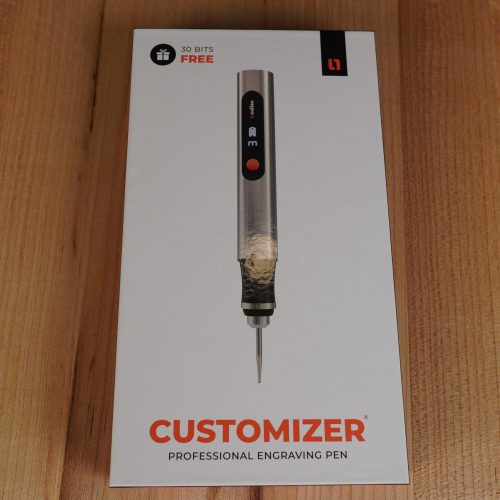
box/packaging for the culiau customizer
It comes in a surprisingly nice box. Makes a nice first impression

It’s easier to move around the Customizer than say a corded Dremel engraver.

Don’t get me wrong, it will still take practice to get a nice, finished product, but the Customizer is easier to use than some of the other bulkier engraving pens on the market.

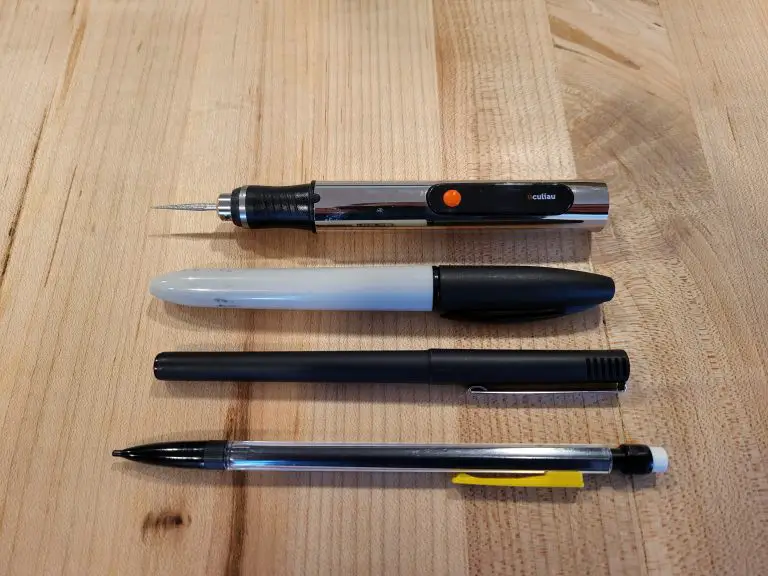
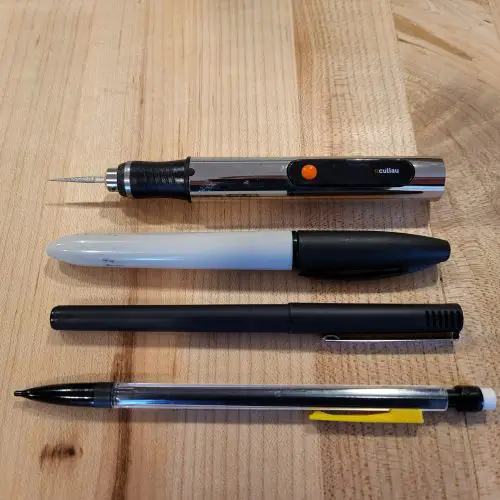
culiau customizer compared to sharpie, pen and pencil
Size comparison of the Customizer

The Customizer is roughly the size of a regular marker. The textured grip and light weight make controlling the engraver while in use a snap.

You can sketch with it just like a normal pen or pencil.

The flexibility of this tool makes the job as simple as drawing on paper. It works well on wood, including hardwoods, glass, and metals such as steel, silver, and others.

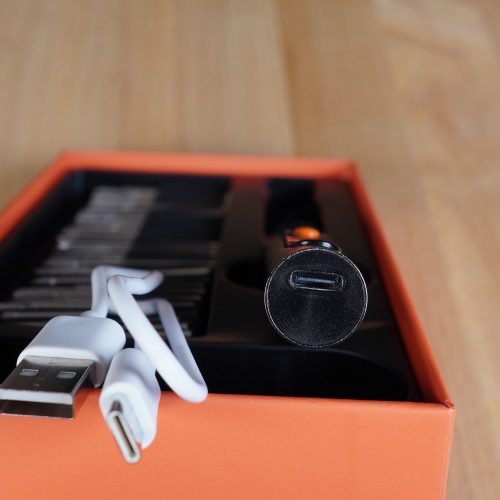
The Customizer comes with a rechargeable battery and a USB charging wire. The run time is about 2 hours. And trust me 2 hours is more than enough time. Unless you are super experienced, your hand it going to get tired well before the 2 hours runs out.

charging port and cable of culiau customizer
Charging port and cable

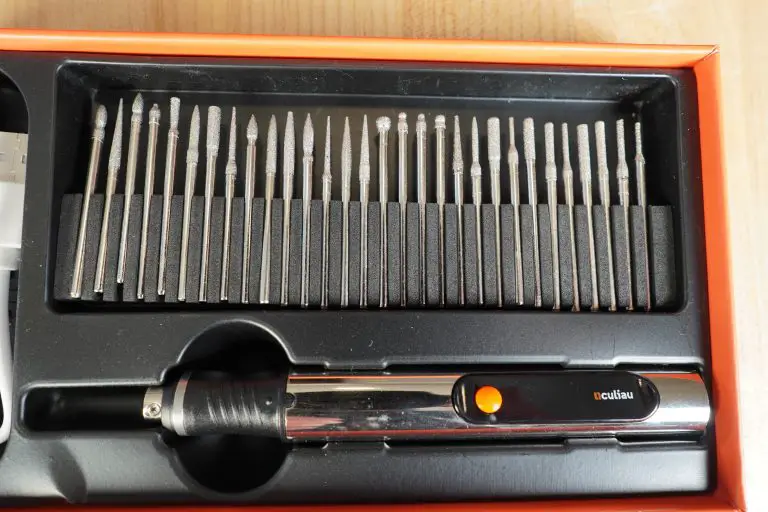
Also included is a large selection of engraving bits. They come in a variety of shapes and sizes which means you won’t need to pick up any extras for the Customizer right away. 

Unless you plan to use it almost daily, there is a good chance you won’t need to get any more bits ever because the assortment that comes with the Customizer is well rounded.

culiau customizer in box with engraving bits
The engraving bits that come with the Customizer

The engraving pen includes an LED display indicator, which shows you the battery level and speed of the tool.

One of the biggest indicators of the quality of the Customizer is the feel of the tool. This is a well built tool that feels good in the hand.

It is ergonomic, lightweight, and small. Because of this it is exceptionally comfortable to use and handle. The Customizer truly is a pocket-sized engraving machine.

The quality comes with a price though and the Customizer does cost more than some of the other engraving pens on the market. However, many of those cheaper engraving pens aren’t built as well. Often they just don’t feel good in your hand.

If you plan to use it a lot, I recommend going the Customizer from Resparked and avoiding all the generic copycats.

Check Current Price

How to use the Resparked Customizer

1. Safety first!

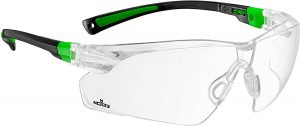
safety glasses

Above all, make sure you think safety first with any power tool. Proper eye protection. Consider gloves and a dust mask as well depending on the materials you plan to work with.

2. Use proper lighting

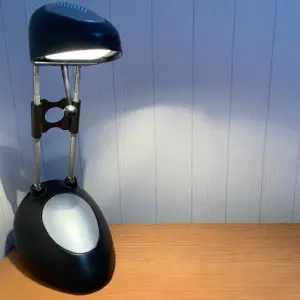
a desk lamp sitting on a desk

Nobody’s idea of a good time is engraving in the dark – and it’s not safe or productive.

Make sure your workplace has adequate light and that it is placed above or in front of you so that your head and shoulders don’t create a shadow on the work.

Proper lighting will make it much easier to see the fine details that you are creating on your workpiece.

3. Work on a clean surface

Before you begin, be certain that the surface you will be working on has been well cleaned.

Some materials can be cleaned with soap and water, others require special cleaning chemicals. Start with soap and water, it will work for most materials.

4. Use a template

Consider making a paper template to guide you. This helps in the beginning when you may lack the courage to do it all freehand.

Print out your design to trace or outline

It’s a good reference.

5. Practice

Just try.

If you want to learn it, then use it!

Practice different words and symbols on a piece of scrap material if you have it. Your first few designs will probably be rough. .

Another key point is to make sure you practice with the type of material you plan to work with. In other words, if you want to engrave on sea shells then find some to practice on.

Frequently asked questions

What kind of material can the Customizer work with?

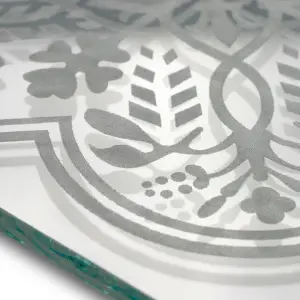
an engraved piece of glass
An engraved piece of glass

The Resparked Customizer is capable of working with a wide range of materials including:

  • Wood
  • Plastic
  • Metal
  • Glass
  • Leather
  • Stone
  • Shells
  • Clay

Does the Customizer use standard Dremel style bits?

Unfortunately, the Customizer does not take Dremel bits straight out of the box. For an added cost, you can purchase an adaptor that will allow you to use them however.

How is customer support?

In my opinion good customer support says more about the product than just about any other feature.

Resparked has excellent customer support through email. Support@resparked.com is their address and in my experience they are quick to answer any questions you might have, even if you just need tips for using your new tool.

Related articles

Best Engraving Pens for Every Budget and Material

Engraving pens come in a wide range shapes, sizes and capabilities. You want to find the one that is just right for you project.

As you read our guide to the best engraving pens, make sure to keep your planned project in mind to determine what tool will work best for you.

Some applications such as jewelry engraving will benefit from a smaller tool for more precise strokes. Other materials such as metal or glass will engrave better with a more powerful tool such as one of the engravers by Dremel below.

No matter what you are working with, we have laid out the best tools on the market and an extensive list of items at the bottom of the article for you to consider when looking for your right fit tool.

Name

Awards

Where to Buy

Culiau Customizer

Best Overall Cordless Engraving Pen

Tidalpool Easy Etcher

Best Budget Cordless Engraving Pen

Tacklife PCG01B

Best Value Cordless Engraving Pen

Dremel 290-01

Best Corded Engraving Pen

IMT Scriber

Best Manual Engraving Pen

Best Overall Cordless Engraving Pen

box/packaging for the culiau customizer

Resparked Customizer

plus symbol

Pros

Easy to handle and use
Customer service
Plenty of included bits

minus symbol

Cons

Not the cheapest option

The Resparked Customizer Engraving Pen is excellent choice for novices. Because the tool is so light, engraving is as simple as using a pen. 

Don’t get me wrong, it will still take practice to get a nice, finished product but the Customizer is easier to use than some of the other bulkier engraving pens on the market.

The Customizer is roughly the size of a regular marker. The grip and light weight make controlling the engraver while in use a snap.

culiau customizer compared to sharpie, pen and pencil
Size comparison

You can sketch with it just like a normal pen or pencil.

One of the biggest indicators of the quality is the feel of the tool. This is a well-built tool that feels good in the hand.

The flexibility of the Customizer makes the job as simple as drawing on paper. It works well on wood, including hardwoods, glass, and metals like steel, silver, and others.

culiau customizer in box with engraving bits
Plenty of included bits

It is ergonomic, lightweight, and small. Because of this it is exceptionally comfortable to use and handle. The Customizer truly is a pocket-sized engraving machine.

The quality comes with a price though and the Customizer does cost more than many of the other engraving pens on the market. The cheaper engraving pens aren’t built as well, but if you only plan to use it for the occasional project then it might not be a big deal.

If you plan to use it a lot, I recommend going with an engraving pen that is a step above such as the Customizer from Resparked and skipping all the generic cheapy ones.

Check Current Price

Best Budget Cordless Engraving Pen

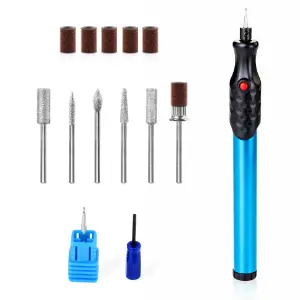
tidalpool easy etcher with bits

Tidalpool Easy Etcher

plus symbol

Pros

Lightweight
Easy to control
Included stencils

minus symbol

Cons

Underpowered

The Easy Etcher is an excellent engraving pen for beginners. The tool is so lightweight that engraving with it is as close to using an actual pen as you will get. The Easy Etcher is actually about the size of a standard marker.

The rubberized grip also helps keep the engraver under control while using it. While the 12,000 RPM speed may seem under powered when compared to other engraving pens, it actually helps keep the tool stable during use.

Runtimes will vary depending on the type of material you are working with, but the Easy Etcher runs on AAA batteries which means there is no waiting around for the tool to recharge. The batteries aren’t included but other extras are.

The Easy Etcher comes with 10 sets of stencils that make engraving text or designs on your material a piece of cake. It also comes with a nice starter selection of bits that allow you to create a variety of textures and finishes.

The Easy Etcher won’t be the be all, end all for engraving every material but it is a great tool to get you started without breaking the bank.

Check Current Price

Best Value Cordless Engraving Pen

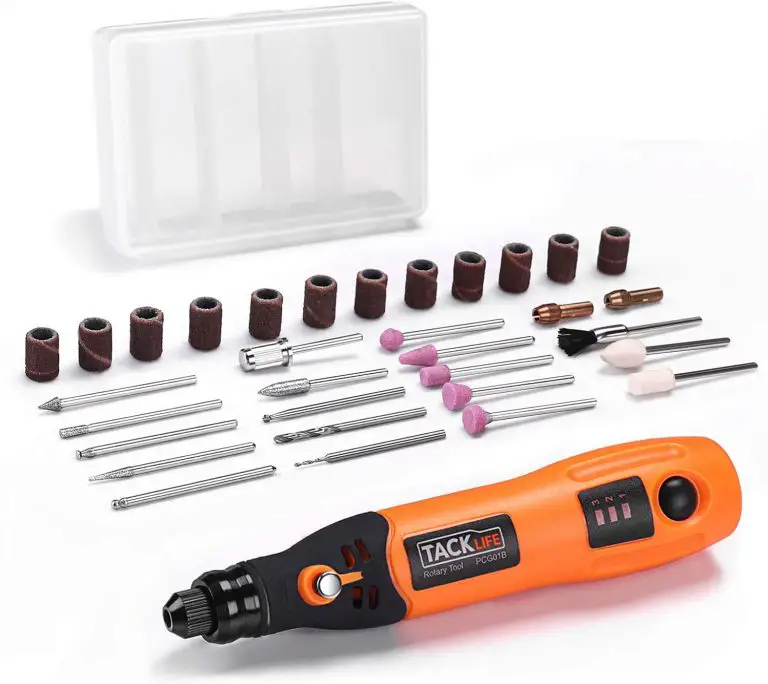
tacklife pcg01B rotary tool with accessories

TACKLIFE PCG01B

plus symbol

Pros

Good power

minus symbol

Cons

Charge time

While the TACKLIFE PCG018 is not as nimble as the Easy Etcher it does a good job of making up for it in the power department. With similar price points, it would be wise to determine whether power or maneuverability is more important to you.

The PCG018 has 3 speed settings of 5, 10 and 15,000 RPMs. This means it will work well for a variety of materials.

This TACKLIFE engraving pen is cordless and rechargeable. It charges over USB which has some benefits and drawbacks.

The charge time is fairly long at 2 hours but with a runtime of 90 minutes it lasts long enough to complete most jobs.

Additionally, the tool comes with 31 different accessories for engraving, sanding and finishing along with a case to contain them all. Two collets to accommodate different bit sizes of 3/32” and 1/8” is also a nice addition.

The TACKLIFE PCG018 is a solid choice when it comes to cordless engraving pens.

Best Corded Engraving Pen

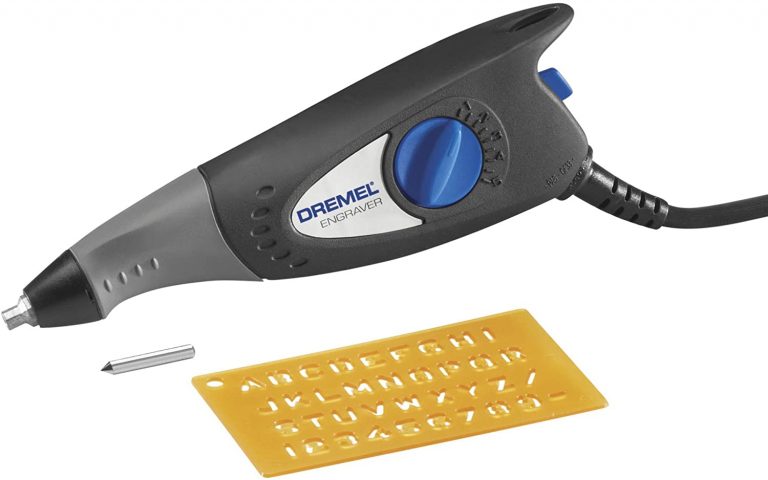
dremel 290-01 with stencil

Dremel 290-01

plus symbol

Pros

Adjustable depth setting
Warranty

minus symbol

Cons

Cost

The Dremel 290-01 is different than most of the other engravers on this list. Instead of being a rotary engraver, it has a vibrating tip that moves in and out. Basically, it operates like a mini jackhammer.

Corded engraving pens like this Dremel have some advantages and disadvantages.

Being corded means that you are tethered to your power outlet and it can be slightly cumbersome to work with the power cord snagging on objects in your work area. The 290-01 is pretty lightweight though which makes maneuvering it around your workpiece a little easier.

A nice benefit of using a corded engraver is that you won’t ever run out of power. This is helpful for harder materials that may take multiple passes to get the amount of engraving you desire.

The power of the 290-01 is controlled with a dial that allows five depth settings. This works well to adjust for different material types such as wood or rock. All that power comes with the side effect that the tool is quite loud when running. You should expect it to be noisy. It is a power tool after all but take note that the other tools on this list are quieter.

There are a couple minor downfalls for the 290-01. The biggest one is that the bit can be difficult to install. The set screw that locks it is tiny and it can be challenging to work with.

Also, the provided stencil comes in handy but is somewhat lacking. Many other engravers come with a wider variety of stencils so keep in mind that you may want to purchase some extra stencils if you plan on engraving a lot.

On the plus side, just like this engraving pen’s cordless counterpart, the Dremel 290-01 comes with a two-year warranty which is well above what most competing engravers come with.

Overall, the Dremel 290-01 is a solid engraving pen. A couple minor inconveniences are balanced nicely by the higher, non-stop power that comes from being always plugged in.

Check Current Price

Best Manual Engraving Pens

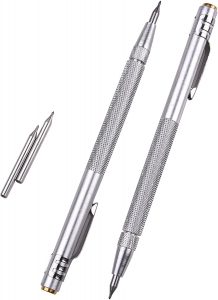
imt scriber two pack

IMT Scriber

plus symbol

Pros

No power required

minus symbol

Cons

Doesn’t engrave as deep

If all you need is something basic and reliable for engraving then the manual scriber from IMT may be your best bet.

It requires no batteries or power cord. The tool is extremely lightweight and its tungsten carbide tip will engrave a large variety of materials including steel, ceramics and glass. If you are working with plastics though, a powered tool would be a better choice.

The IMT scriber will actually perform an operation that is more akin to scratching your material than actually engraving it. For many use cases, this is more than enough. Just keep this in mind when choosing your engraving pen.

It also comes with extra tips in case one snaps. They are somewhat brittle because they are so hard. They aren’t fragile but can break if you aren’t dropped or handled roughly. Luckily, the scriber comes with a protective cap that will help shield the point from damage.

The IMT scriber is definitely more low tech than some of the other engraving pen options available but if all you need is a simple engraver then it may be a great choice at a cheap price.

Check Current Price

Things to consider when buying an engraving pen

Safety

Remember that these tools can be dangerous, especially to your eyes. Be careful handling them and use eye protection to protect you from things such as flying chips or broken bits.

Corded vs cordless engraving pens

Corded engraving pens generally have more power than their cordless counterparts. The downside is that the cord can get in the way and make the tool more difficult to maneuver. The easiest engraving pens to use are those that are lightweight and battery operated.

Cord length

If you choose to use a corded engraving pen to have more power, keep in mind that the length of the power cord is very important. If the cord is short, then make sure that you have an extension cord handy because some of the power cords can be very short.

Speed

RPMs do not equal power. Being able to adjust your RPMs over a wider range is more beneficial than simply having a higher RPM overall. Different materials will require different RPMs. In general, materials such as glass or metal which are harder will benefit from a higher RPM and softer materials will engrave better at lower RPMs.

Bits and accessories

It is a nice bonus for an engraving pen to come with a good selection of bits and accessories but not a necessity. There are many bit or accessory kits available that allow you to perform different types of engravings or finishing to your piece for a fairly cheap price.

Extra bits aren’t required to start but before too long you will definitely want to expand your bit collection if your engraving pen doesn’t come with many. Different bits will allow you to different styles of engraving.

Battery

If you go the cordless route, make sure you find a tool that charges quick and has a long runtime.

Cheaper tools tend to run off standard AA or AAA batteries which means they can run out of power quickly but also that more power can easily be on standby. Keep extra batteries nearby but consider the amount of power you will need for your project when choosing which engraving pen to go with. Harder materials require more power.

Warranty

Pay attention to the length of the warranty for your tool. Just like many other power tools, a good warranty is a solid indicator of the quality of the tool. This doesn’t mean that good tools don’t come with shorter warranties, just that it is something to be mindful of.

Stencils

Stencils can be very important for getting the correct design on your part. There are many different stencil kits available but it is definitely a bonus to have a couple to start with. Creating visually appealing designs freehand is going to take some practice so having a template to follow when getting started will be helpful.

Engraving vs cutting

Engraving pens are just that, engravers. They generally are not meant for cutting. If you are looking for a tool that is capable of doing more than simply scratching the surface of a part, then you will want to look into something with more power like the various Dremels or other higher power rotary tools. 

Related articles

For more information check out these related articles:

Guide to Becoming a CNC Operator

Overview

Being a CNC operator is easily the simplest of all CNC jobs. A CNC operator is typically an entry level position and they are tasked with keeping the machines running and constantly making parts.

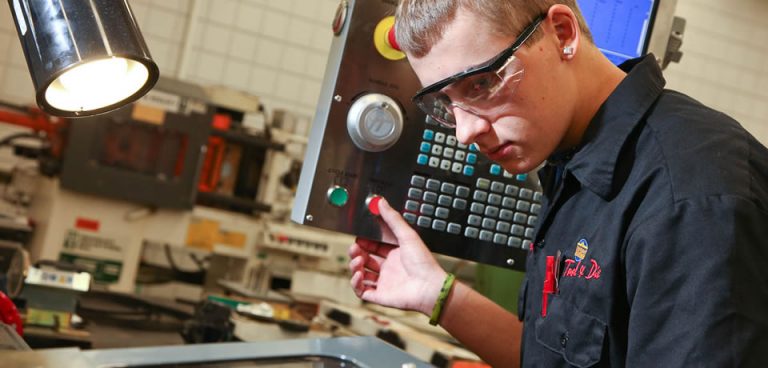
cnc operator pushing button on control panel

In most cases, someone else will program and setup the machine while an operator is asked to keep it between the lines. This often means checking parts in some fashion as they come off the machine and occasionally making small adjustments to keep everything within the allowable tolerances.

CNC operators are often referred to as button pushers. Quite honestly, operating a CNC isn’t the most highly skilled position. As a result, the pay isn’t that high, but most will find it still beats working retail and isn’t nearly as backbreaking as something you might find in one of the construction trades.

So, let’s jump right in to some of the most frequently asked questions about becoming a CNC operator.

What does a CNC operator do?

A CNC operator pushes buttons to keep the CNC machines running while performing basic inspection of the machined parts.

As an entry-level position, all of the skills necessary for a CNC operator to possess would be taught to a new employee. Any experience or knowledge that an applicant bring with them would be icing on the cake.

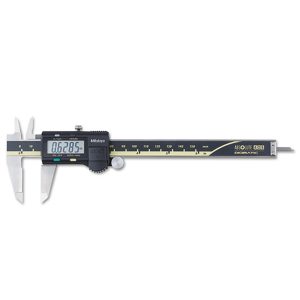
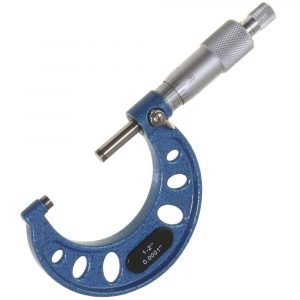
Operators will be expected to do simple math such as adding and subtracting. Additionally, they will use measuring gauges such as micrometers, calipers, a pocket comparator and often dial indicators.

mitutoyo digital caliper
A digital caliper
anytime tools 1-2" micrometer
Typical outside micrometer

Basic hand tools including screwdrivers, mallets and deburring tools will get everyday use as well. The real benefit of being a CNC operator is that it can be a great stepping stone to an extremely in demand profession once you have expanded your skillset and advanced to the level of CNC setup and/or programming.

Experience with blueprints, trigonometry or handheld measuring equipment such as micrometers and calipers would be very sought after for any company.

Typical CNC operator job description

MachinistGuides.com is seeking a quality-oriented CNC Machine Operator to join our dynamic team.

The CNC Machine Operator will work with other team members and report to the Shop Manager. This role is responsible for reading blueprints, checking finished parts, and operating CNC mills and/or lathes.

The CNC Machine Operator will:

  • Safely operate a CNC machine to create precision components
  • Read and interpret blueprints, diagrams, sketches, and verbal instruction
  • Maintain pace of production to meet scheduled demands
  • Safely load and unload CNC production equipment
  • Have the ability to lift 50+lbs and stand for several hours

Desired Skills:

  • CNC machine operator/manufacturing experience
  • Thorough knowledge of standard manufacturing concepts, practices, and procedures
  • Have a strong work ethic and a positive attitude
  • Attentive to detail and instruction

Compensation commensurate with experience. A list of benefits which may include paid time off, 401k, medical, dental, life insurance, and/or holidays.

CNC operator skills

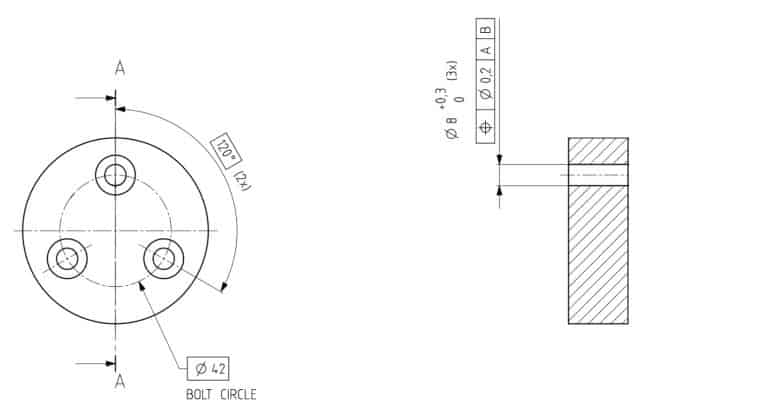
basic dimensions of bolt hole circle on blueprint
Blueprint example
  • Blueprint reading
  • Simple math including addition and subtraction of decimals
  • Hand tools
  • Handheld measuring equipment use
  • Some light trigonometry

Check out our Beginner’s Guide to Blueprint Reading to gain a leg up on the competition. 

Our guide to machinist lingo will help you talk the talk at your new job as well.

How much does a CNC operator make?

20, 10 and 5 dollar bills

According to GlassDoor.com, the average pay for a CNC operator is $38,490 per year. With a typical 40-hour week that comes out to $18.50 an hour.

Keep in mind that pay will vary by region, but this should give you a good idea of where you will start. The nice thing about CNC and machining work is that there is often quite a bit of room for growth.

For reference, CNC programmers can often make $30+ an hour.

How long does it take to become a CNC operator?

Being a CNC operator is an entry level position and as a result, you can be a CNC operator on your first day on the job.

You might not the most productive employee on day one, but you will be tackling the normal everyday responsibilities of more experienced operators.

Is it difficult to learn how to be a CNC operator?

CNC operation is not a difficult job to learn. As an entry level position, the skills needed to be a great CNC operator can be learned in a pretty short amount of time.

Is being a CNC operator stressful?

Generally speaking, CNC operation is not a stressful job. Of course this will vary from company to company but because the position is entry level, there is very little responsibility on the operators part.

It will be possible to find some businesses that work with a very heavy “produce, produce, produce” mentality and in these cases, the job can get more stressful. This is more of a product of the management style than the actual position itself so make sure to do some research online to check out some reviews for any potential employers.

Is being a CNC operator boring?

cnc operator inspecting part in front of machine

This is a very subjective question, but I believe many would find the position boring. A CNC operator job will usually be fairly repetitive while not being overly difficult mentally or physically.

The good news is that if your are looking for something to keep things a little more interesting then there will often be opportunities for advancement if you are willing to learn and put in a little effort.

You should also know that boring is also a term for precision machining of a hole by a machine such as a CNC mill or lathe.

Do you need a degree to be a CNC operator?

high school degree

Being a CNC operator does not require a college degree in any form. Local community colleges often offer certificate programs or crash course type coursework that will be looked upon very favorably for any new hire.

Many companies however will require a high school degree or equivalent. Larger companies are usually the ones who have this requirement. Smaller shops are generally more lenient.

What kinds of certifications and training are available to become a CNC operator?

Training, courses, classes, and certifications are available at colleges across the country with many community colleges leading the way.

Check out your local community college’s website to see if they offer training that may be beneficial. You will likely be surprised at the number of different options they offer.

Another valuable resource is your states manufacturing extension program. These organizations are usually aimed more at helping businesses with workforce development, but they often offer subsidized training that can give you a huge leg up in the job market.

YouTube is a great resource as well and there are thousands of high-quality videos out there to teach you all about every aspect of CNC work.

If you want a more structured approach, then check out our post on the best CNC and machining books. Many of these books are the same reference material that the college classes mentioned above will use.

What should you put on a resume to get a position as a CNC operator?

To get a job as a CNC operator make sure to mention any of the following items that may apply:

  • Math skills, especially anything related to trigonometry
  • Blueprint reading experience of any kind
  • Mention your attention to detail
  • Describe how reliable and dependable you are

Tips for finding a good position as a CNC operator

Research, research, research.

Actually it’s not that hard. A single research is probably enough. It is actually pretty easy to find a good job as a CNC operator.

Look for company reviews on sites such as Indeed or GlassDoor. Take it all with a grain of salt but in my experience, any company who has more than a few reviews will be pretty easy to determine the overall “vibe” of the business.

Look for a company that stresses quality over quantity and you will be headed in the right direction.

Related articles

For more information check out these related articles:

How to Learn CNC Programming [Best Resources]

What is CNC programming?

CNC programming is the process of creating and running a program consisting of G code in a CNC machine to move the machine and control its functions.  

There are a large range of CNC machine types available, from industrial mills and lathes to home machines such as 3d printers, laser engravers and CNC routers.

All of these CNC machines use the same G code language to control the machine.

How difficult is it to learn CNC programming?

Learning basic CNC programming is fairly easy. It involves learning how the CNC machine will react to a series of codes. Most of the codes are easy to remember with a little practice (F for feedrate, S for spindle speed) and for any of the harder to remember codes, cheat sheet type references are usually not too far away.

Learning advanced CNC programming will take more time. Practice and repetition help, as does attending local training programs or completing an online training course.

When learning CNC programming expect to apply math skills, learn to read manufacturing blueprints and work with specialized computer programs.

Ready to master CNC programming?

Try the free 30 minute intro course to see how simple and easy G code can be. Take the shortcut to becoming a G Code Master today!

View Free G Code Course

What are the steps involved in CNC programming?

infographic that shows three steps to making a cnc program

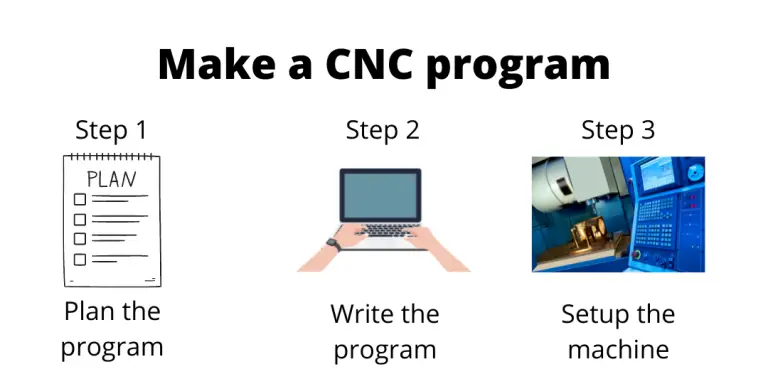
Plan the program

The first step in CNC programming is planning out your program. In this step you will choose the machine and tools that will use to make your part. The operations to create the part (shape part, drill hole, mill slot, etc.) as well as the order of those steps will be determined.

Write the program

Now that you know what you will use to make the part (machine and tools) and how you will make the part (the order of operations), the program can be written.

When writing the program, you will create code either by hand or with the help of software to create the instructions for the machine to run.

In this step, documentation is usually created that lists any special requirements for running the program such as the tooling to be used, offset information, and fixturing information.

Setup the CNC machine

The role of the CNC programmer will sometimes end once the program is written and documented. However, in many machine shops programmers are also responsible for setting up and/or operating the machines too.

Setting the CNC machine up will involve loading the correct tools, setting offsets, loading the program and running a first piece to verify everything is running as planned.

Types of CNC programming

Manual programming

Manual programming is when the programmer creates the G code by hand. This involves controlling all of the machine’s functions and movements through the use of code.

Manual programming of CNC programs is usually only done with very simple programs.

Conversational programming

Conversational programming involves giving the machine specific parameters or dimensions that are required and the CNC machine generates the code for you based on the input.

Conversational programming is a middle point between manual programming and programming with CAD/CAM systems. Conversational programming simplifies the programming of features that may be difficult to program manually.

Conversational programming can allow quicker programming times when compared to CAD/CAM programming options. It also generally requires far less training than what is required to work with CAD/CAM packages.

Programming with CAD/CAM

two computer monitors with CAD-CAM software running
Example CAD/CAM software

The majority of CNC programming today is done with the use of various computer aided drafting (CAD) and computer aided manufacturing (CAM) software packages. These software programs allow the creation of long, complex CNC programs with much less work when compared to manual or conversational programming.

CAD/CAM programs are capable of programming things that wouldn’t be possible with manual or conversational programming. There are many different CAD/CAM software programs available with some of the most common being AutoCAD, Fusion 360, SolidWorks, Mastercam & EDGECAM.

How to start learning CNC programming

Local college/training

One of the best ways to start learning CNC machining is to look for local education resources such as colleges, community colleges, training programs and your state’s manufacturing extension partnership (MEP).

These resources often provide unequaled instruction and hands on use of equipment.

In some areas, companies have created their own training programs which they operate to help educate their local workforce.

Self-guided training

If you don’t have local training options available, there are a large number of resources that allow you to learn CNC machining and programming on your own schedule.

YouTube has a wealth of informative instructional videos and there is an abundance of information available on other online resources such as MachinistGuides.com.

We recommend reviewing our list of the Best CNC and Machining Books to find the best reference material available.

Learning on your own can be daunting, especially when you don’t know where to start. For this reason, we have put together A Roadmap to Learn CNC Programming to help guide you and make sure you focus on the important stuff first.

Online training

For those looking for a more structured approach, there are online CNC training resources and courses available such as GCodeTutor.

The biggest benefit of online training is that it allows you to work at your own pace. The best online training programs will have help resources available as well as quizzes and projects to test your knowledge.

Types of CNC machines

CNC machines used to be extremely expensive machines that only large companies were capable of purchasing.

In recent years, the cost of CNC machines has come down quite a bit. Large scale industrial machines are still available, but they are accompanied by a new generation of machines aimed at hobbyists and makers.

Home/hobbyist machines

cnc wood router
CNC router
  • CNC routers
  • CNC plasma cutters
  • CNC laser engravers
  • 3d printers

Industrial level machines

a cnc mill with multiple fixtures and coolant lines
Industrial CNC
  • Mills
  • Lathes
  • Electrical discharge machines (EDM)

Frequently asked questions

Do you need a degree to get a job in CNC programming?

No degree is needed to become a CNC programmer, although previous training or certifications are looked at very favorably by employers.

Many employers are willing to provide on the job training to teach new employees the skills needed to perform the job.

How long does it take to learn CNC programming?

The basics of CNC programming can be learned in a short amount of time.  Learning the basics will only take a few short months.

However, CNC programming is a wide field, and it will take much longer to have a solid understanding of everything that goes into CNC programming.

To become a highly skilled CNC programmer will likely take years. Training programs vary in length from 1-4 years on average. In addition, hands on experience will be needed to truly become a master of the craft. Certainly, anyone who applies themselves and works hard to learn will shorten that timeframe considerably especially when working in a good training program.

Is CNC programming a good career?

CNC programming is a great potential career. There is a high level of demand for skilled CNC workers across the globe. Many experienced CNC programmers and machinists are expected to retire in the coming years and a lower rate of younger workers entering the field has created a high demand for skilled CNC workers.

The demand for skilled CNC workers is so large that many in the CNC industry refer to it as “the skills gap”.

This skills gap has created a good opportunity for anyone seeking a well-paying job in the industry.

What is the salary for a CNC programmer?

According to GlassDoor.com, the average CNC programmer makes about $85,000 per year.

That comes out to about $40 an hour.

CNC programming is similar to other skilled trade jobs and can pay quite well without the need for a college degree. Getting training or certifications will help improve your chances of landing that well-paying position.

What skills does a CNC programmer need?

Because most CNC programming positions require the use of specialized CAD/CAM software, the best programmers have solid computer skills.

CNC programming positions often require math skills as well. Trigonometry, geometry and algebra are all commonly used when programming. Often the computer software will perform the necessary calculations but there are many times where calculations must be verified by hand.

Luckily, most of the math skills only use a limited number of formulas. To get a better idea of the type of math skills involved, check out our Beginner’s Guide to Machine Shop Math.

title image that shows a triangle drawn on a paper with pencil next to it

What other jobs take similar skills to CNC programming?

CNC and machine operators are the closest related job to CNC programming. Often, operators are the ones who will be running the CNC programs.

It is quite common for operators to gain some experience in their machine shop and work their way up to a position in CNC programming.

CNC and machine operator positions are typically much less demanding when it comes to computer and math skills and are a great starting point for anyone interested in learning CNC machining.

Quick Guide to CNC Safety Lines [Common Codes]

What are CNC program safety lines?

Safety lines, sometimes called a safety block, are a section of code within a CNC program which are used to protect the machine, the workpiece, and the operator.

Safety lines are used to make sure the machine is in the proper mode/state which means that the machine will understand all the commands we give it correctly.

If you need the machine to work in inches (or mm in some parts of the world), it is important to frequently set the machine to work in those units. 

This is especially true if you will be switching between units when machining.

While many won’t switch between imperial and metric units, it is common to switch between absolute and incremental positioning modes.

The safety lines used will vary by machine, however there are many which are common between the majority of machines.

Ready to master CNC programming?

Try the free 30 minute intro course to see how simple and easy G code can be. Take the shortcut to becoming a G Code Master today!

Types of codes found in a safety line

Safety lines can contain G codes for coordinate systems, measurement units, tool compensation, and cancel functions. 

Each one of these commands is necessary to move the tool safely. 

Modal commands and cancel commands are two of the most common codes used in CNC safety lines.

Below are the most common safety codes found in CNC programs:

Positioning mode – G90/G91

The first code normally found in a safety line will be the machine’s positioning mode.

There are two positioning modes available to use. Absolute and incremental positioning.

Absolute positioning uses the G90 command. 

Absolute positioning mode tells the machine to interpret all locations it is given as measured from a fixed zero location (origin).

graph paper example of absolute positioning with multiple points as examples

Incremental positioning uses the G91 command.

Incremental positioning modes tells the CNC that the zero location is wherever the machine currently is. 

Once the CNC makes a move in incremental mode, the new location becomes the zero location.

graph paper example of incremental positioning with multiple points as examples

Units mode – G20/G21

Selecting the system of units you will be working in is important. This is why the units mode is found in the safety lines of the program.

Imperial units are set with G20 (inches) and metric units are set with G21 (mm).

You don’t want to move 4 inches when you meant to 4 millimeters.

Setting the units mode is critical to running your CNC.

comparison of units of measurement for cnc programming

Plane selection – G17/G18/G19

Selecting the plane you will be working with is necessary. Not because you will often switch between planes, but because it’s possible.

Most people will never use anything other than the standard XY plane with G17, but setting it will make sure that it is set correctly.

The alternatives to G17 are G18 for the ZX plane and G19 for the YZ plane.

Canned cycle cancel – G80

G80 is the g code used to cancel any active canned cycle.

Canned cycles are used to perform repetitive machining. This includes drilling, reaming, boring, counterboring and other operations.

Canned cycles are modal which means they are on until they are switched or turned off. 

In the case of a drilling canned cycle, once it is turned on every new location the machine reads will be a spot where it drills a hole.

Obviously, you need to stop drilling holes eventually. Using G80 cancels the drilling canned cycle or another other canned cycles that might be active.

Cutter compensation cancel – G40

Cutter compensation is when the CNC machine control changes how it reads the program. With cutter compensation on, the machine will shift a set distance based on the size of the cutting tool when running the program.

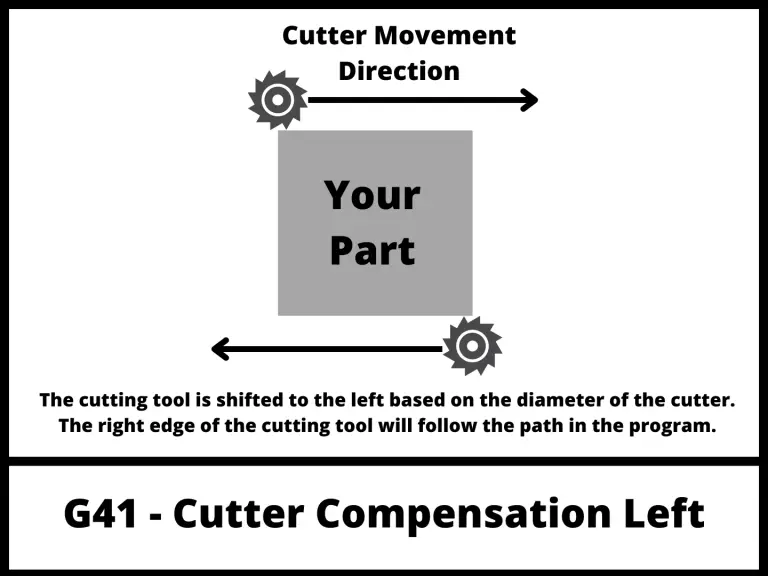
illustration that shows how a CNC will act when using cutter compensation left with the G41 code

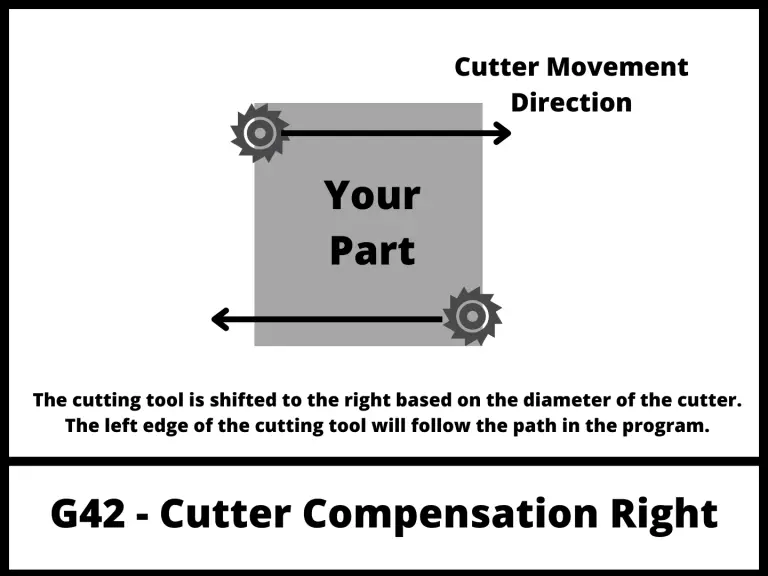
Cutter compensation is turned on with either G41 or G42. G41 shifts the tool left and G42 shifts it right.

illustration that shows how a CNC will act when using cutter compensation right with the G42 code

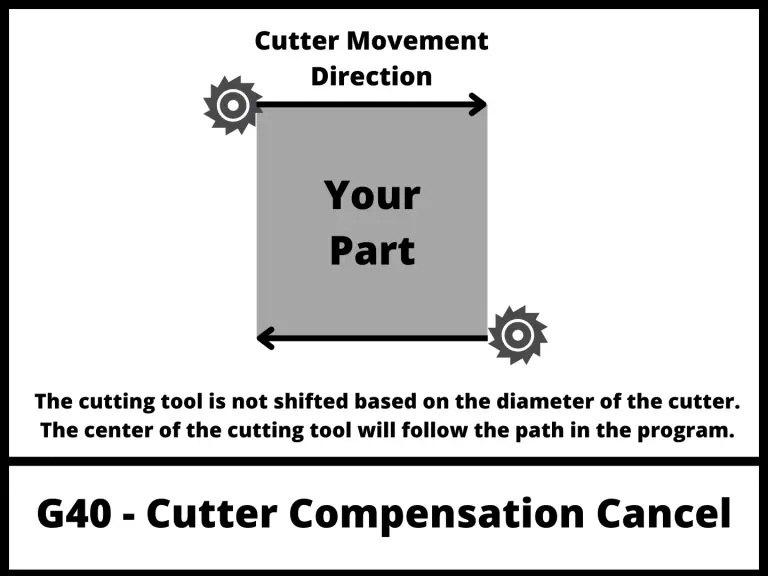
The G40 code turns cutter compensation off.

illustration that shows how a CNC will act when there is no cutter compensation mode active

Tool length compensation cancel – G49

Cutter compensation is accounts for the diameter of the cutting tool.

Tool length compensation accounts for the length of the cutter from the CNC spindle.

G49 is the code used to cancel tool length compensation.

Both compensation modes adjust for the size of your cutter. This allows you to run the same program with different tools.

Other safety codes

Codes will vary by machine. Check your instruction manual for the specific codes you need to use in the safety lines.

The codes listed here are certainly a good start.

an illustration of a cnc machine that shows how a g43 code offsets the program

Safety lines for starting up your CNC

Setting the initial modes for your machine is an important part of every CNC program. If the modes are not set then the machine will stay in it’s initialized state.

Modes such as the unit system (mm/inch) can be set in the machine parameters. If no code is specifically given in the program then the machine will remain in the initialized state.

This is not a good programming practice because there is plenty of opportunity for errors to occur. Use safety lines to make absolutely sure your CNC is in the correct mode.

Here is an example of a safety line to use at the beginning of a program:

O1000
(Start of safety code)
G20 G17 G40 (G20 inch, XY plane, cancel cutter compensation)
G49 G64 G80 (cancel tool length compensation, normal cutting mode, cancel canned cycles)
G90 G94 G98 (absolute mode, feed per minute, initial plane for canned cycles)
(end of safety code)

Frequently asked questions about CNC safety lines

Can you put all of your safety codes on the same line?

The number of codes that can fit in the same line depends on the CNC machine.

Many machines have limitations for how many M-codes you can put on one line. G codes are generally only limited to one code from each group.

For example, G00, G01, G02 and G03 are all in the same group (movement). Only one of the codes from this group should be used on any particular line.

Ready to master CNC programming?

Try the free 30 minute intro course to see how simple and easy G code can be. Take the shortcut to becoming a G Code Master today!

CNC Spindle Controls Explained [M03, M04, M05 and More]

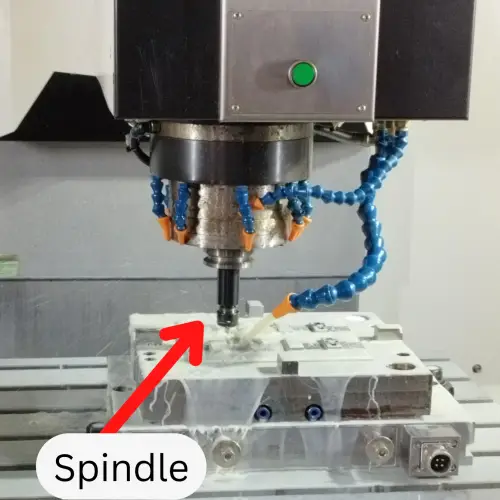
Getting started with CNC spindle controls

The most basic codes to control your CNC spindle are:

But there is more to controlling your CNC spindle than simply turning it on and off.

For instance, most CNC machines have multiple ways to turn the spindle off and each way has it’s own use case. 

Controlling the spindle speed is another function that has multiple modes. Choosing the wrong one could potentially be disastrous. 

Learn the ins and outs of controlling your spindle below.

picture of the inside of a cnc machine with the spindle identified

Ready to master CNC programming?

Try the free 30 minute intro course to see how simple and easy G code can be. Take the shortcut to becoming a G Code Master today!

Codes for turning your spindle on

There are two CNC commands for turning the spindle on, M03 and M04.

The S code is used together with these codes to set the speed of the spindle.

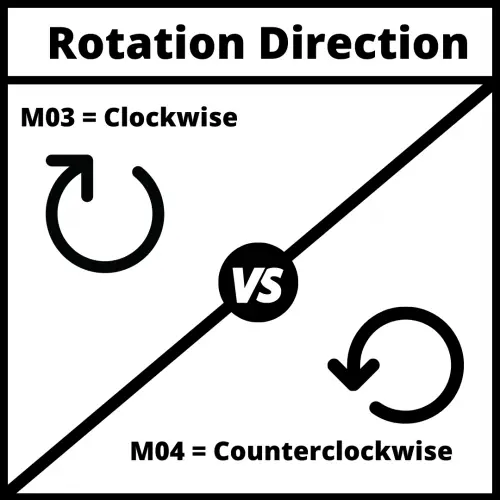
Spindle direction

M03 [spindle on, clockwise]

The M03 code turns the spindle on in a clockwise direction at a set speed.

The speed is set with the most recent S code.

Clockwise rotation with M03 is the most common spindle rotation direction when CNC machining. 

Clockwise rotation is used with right hand cutting tools.

M04 [spindle on, counterclockwise]

The M04 code turns the spindle on in a counterclockwise direction at a set speed. 

Just like M03, the set speed is the value used with the most recent S code.

M04 is used with left hand cutting tools.

Counterclockwise spindle rotation is much less common than clockwise. 

This is especially true for machining centers (mills). For lathes, M03 is still more common but M04 gets more use.

Codes for turning your spindle off

The M05 code is the only code that just turns the spindle off.

However, there are other codes listed below that turn off multiple machine functions and the spindle is included in those functions.

M05 [spindle off]

The M05 code is used to stop the spindle.

It is normally used when there is a tool change or other change in the machining process.

When the spindle is turned back on with an M03 or M04 code after being stopped, the spindle will return to the same speed it was previously set at with the last S code.

M00 [program stop]

The M00 code is called a program stop. It stops the current program in the middle of running.

Using the M00 code turns off the following functions:

  • Movement of all axes
  • Spindle rotation
  • Coolant flow
  • The machine pauses reading the program

When the M00 code is used, nothing is reset. In other words, any active modes or parameters will stay as they are.

The program is merely paused when it reads the M00 code.

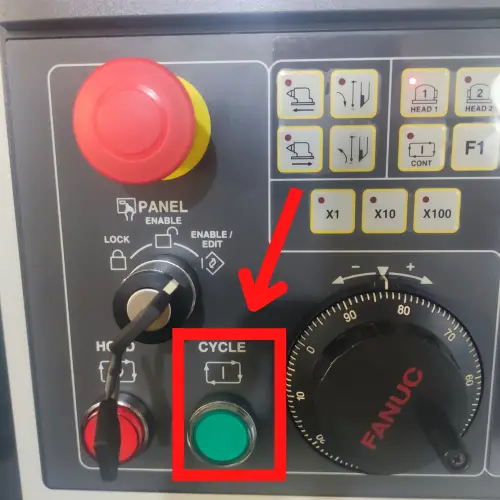
fanuc cnc control panel with cycle start button highlighted
Cycle start button on a Fanuc control panel

The machine will resume reading the program when the cycle start button is pressed after the program stop has occurred.

One thing to keep in mind is that the machine doesn’t turn on functions when cycle start is pushed. 

If the M00 code turns something off such as the spindle, it will need to be turned back on in the program.

M01 [optional stop]

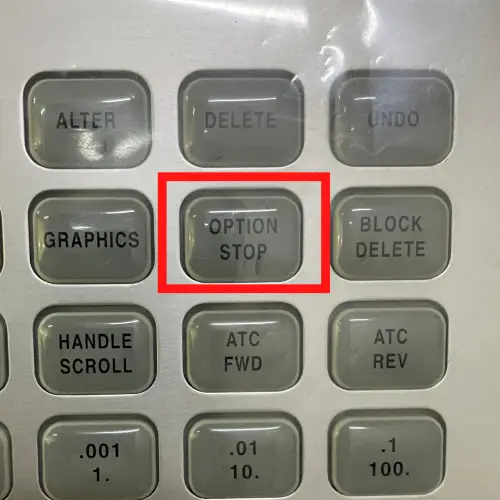
The M01 code is called an optional stop. 

It stops the current program in the middle of running, but only if the optional stop switch or button is on.

If the optional stop switch is not on, then the machine will ignore any M01 codes it reads and continue running the program like normal.

haas cnc control panel with optional stop button highlighted
Optional stop button on a Haas CNC

When the machine reads an M01 code and the optional stop switch is on, it will turn off the following functions:

  • Movement of all axes
  • Spindle rotation
  • Coolant flow
  • The machine pauses reading the program

When the M01 code is used, nothing is reset. Same as with the M00 code.

In other words, any active modes or parameters will stay as they are. The program is merely paused when it reads the M01 code.

The machine will resume reading the program when the cycle start button is pressed after the program stop has occurred.

One thing to keep in mind is that the machine doesn’t turn on functions when cycle start is pushed. 

If the M01 code turns something off such as the spindle, it will need to be turned back on in the program.

M30 [program end]

The M30 code ends the program. 

This makes it different from M00, M01 or M05.

M00 and M01 shut down various machine functions and pause the program.

M30 shuts down machine functions and ends it. 

Pressing cycle start after an M30 code will start the entire program over again.

How to set spindle speeds

CNC spindle speeds are set using the S code.

S code

Using the S code sets the spindle speed that will be used whenever the spindle is turned on. The units are revolutions per minute (RPM).

The same spindle speed value will be maintained until it is changed.

Below is a small section of code with comments in parentheses that show what will happen as the machine reads the code.

M03 S3000   (Spindle On CW, Speed = 3,000 RPM)
M05              (Spindle Off)
M04              (Spindle On CCW, Speed = 3,000 RPM)

Notice how the spindle turns back on at the same set speed. This happens even if the spindle rotation direction is changed from clockwise to counterclockwise or vice versa.

S codes show up frequently in programs at the beginning of a new section of code. This can be switching tools or switching machining operations such as going from cutting the outside profile of the part to drilling holes.
Some other notes about the S code:

  • Must be a whole number (no decimals such as 3000.5)
  • Most machines have a limit to the range of spindle speeds that can be used. 1-9999 is common but 1-99999 is also used by some machines

Spindle speed modes

In CNC programming there are two codes that control the spindle speed mode, G96 and G97.

G97 is the most common and sets the spindle mode to RPM.

G96 sets the spindle mode to constant surface speed which adjusts the speed of the spindle based on the size of the part being machined.

G97 [speed in RPM]

When the G97 mode is active, the machine will maintain a constant spindle speed based on the RPM value set with the most recent S code.

If G97 is active, spindle speed will only change when the S code is changed.

G96 [constant surface speed]

When the G96 mode is active, the machine will maintain a constant surface speed.

Imagine a monster truck tire. Now picture rolling the monster truck tire one complete revolution in one minute. In that one minute, you might move 20 feet.

Now imagine you have a normal car tire. If you roll the car tire one revolution in one minute, you might only travel 4 feet.

You covered a lot less distance in that one minute, which means you traveled at a slower speed.

When things are spinning based on an RPM speed, the actual speed that the cutting edge of the tool is traveling can change.

Using constant surface speed with the G96 code tells the machine to change the spindle speed over time as the size of the part changes so that the speed where the cutting action is happening remains the same.

This is a simplified explanation of how G96 works. For more information about G96 see our full guide to the G96 command.

How to change the tool in your spindle

Most machining centers have automatic tool changers that can switch tools into and out of the CNC spindle.

an automatic tool changer on a dmg mori cnc machine
Automatic tool changer holding multiple tools in a DMG Mori CNC

The tool to be placed into the spindle is called up with the T code. This places the new tool in location so that it is ready to be switched.

The M06 command is then used to perform the tool change.

Here is an example section of code:

T01    (Tool 1 is readied for change)
M06    (Tool 1 is placed in the spindle)
T02    (Tool 2 is readied for change)
T03    (Tool 3 is readied for change)
M06    (Tool 3 is placed in the spindle)

Notice that even though tool 2 was readied for change, it never actually was put in the spindle. Instead, tool 3 was readied before the tool change occurred and it was placed in the spindle instead.

Ready to master CNC programming?

Try the free 30 minute intro course to see how simple and easy G code can be. Take the shortcut to becoming a G Code Master today!

CNC Offsets Explained [D, H and Work Offsets]

What is a CNC offset?

Offsets are the adjustments that the CNC machine will make based on different features of the machine.

There are three types of offsets:

  • Diameter offsets
  • Height offsets
  • Work offsets

Ready to master CNC programming?

Try the free 30 minute intro course to see how simple and easy G code can be. Take the shortcut to becoming a G Code Master today!

Types of CNC offsets

Each of the three offset types has a specific purpose. 

They each allow for flexibility when running your program. This includes allowing you to use the same program even if you need to change cutting tools.

Height (H) offsets

illustration of a cnc cutting tool that shows what an H offset is

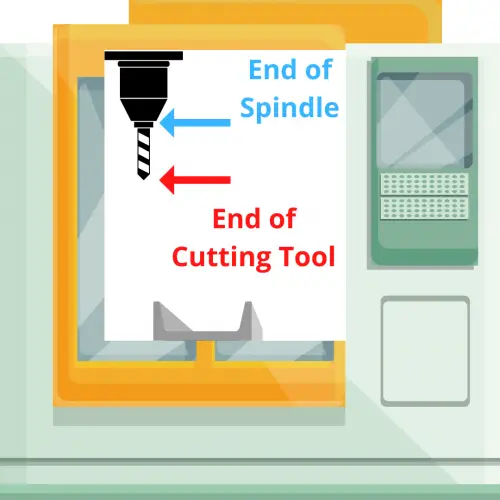
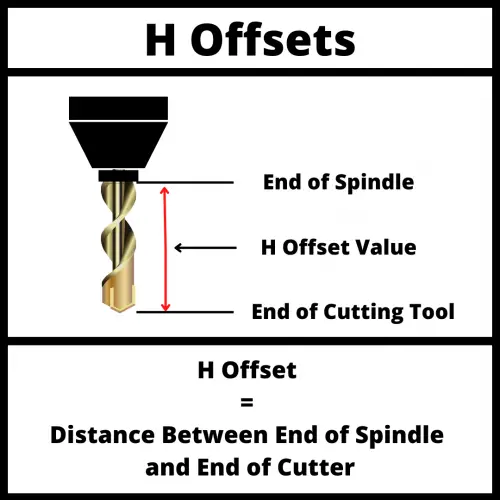
The height offset refers to the location difference between the spindle and the cutting tool.

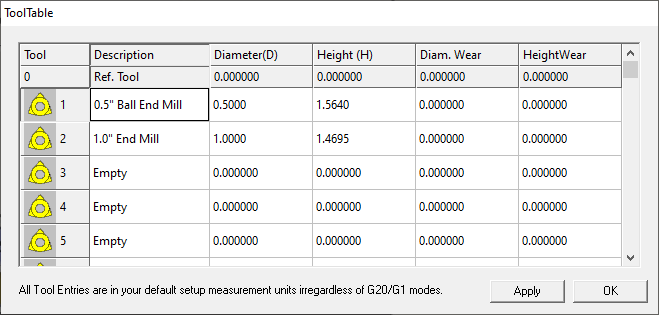
This difference in location is stored in the machines offset library. Height offsets are usually stored in the same number location as the tool.

mach 3 tool offset table
Example offset library

For instance, T01 (tool 1) and H01 (height offset 1) or T05 (tool 5) and H05 (height offset 5).

This makes it easier to match up the necessary offset with the correct tool.

The G43 code is used to turn on tool length compensation using an H offset.

For example, G43 H01 turns on tool length comp with the first H offset.

Once tool length compensation is turned on with the G43 code, it will stay on until it is turned off with the G49 cancel code or switched to a new H offset such as H02 or H05.

Diameter (D) offsets

illustration of a cnc cutting tool that shows what an D offset is

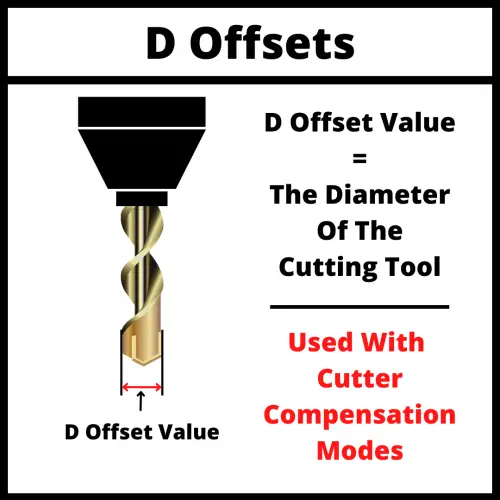
While H offsets adjust for the length of the cutter, D offsets compensate for the diameter of the cutting tool.

D offsets are also stored in the machines offset library. D offsets are usually stored in the same number location as the tool they are used with.

T04 (tool 4) and D04 (diameter offset 4) would usually be matched together.

G41 and G42 are the two cutter compensation modes that are used with D offsets.

They tell the machine to adjust the path of the cutter so that the edge of cutter follows the path given in the CNC program. G41 shifts the cutter left and G42 shifts the cutter right.

illustration that shows how a CNC will act when using cutter compensation left with the G41 code
illustration that shows how a CNC will act when using cutter compensation right with the G42 code

With cutter compensation off using the G40 code, the machine will move the center of the cutter along the path in the program. 

This can make it difficult to get the correct size, especially when using different or multiple cutters.

illustration that shows how a CNC will act when there is no cutter compensation mode active

Telling the machine the size of the cutters with your D offsets allows it to account for them and run the same program with different tools ang get the same size part. 

If you didn’t have cutter compensation, then you would need to create a new version of the program every time you wanted to use a new tool.

Just like tool length compensation with G43, cutter comp with G41 and G42 are modal commands so those adjustments will stay on until switched or turned off with the G40 code.

Work offsets (G54-G59)

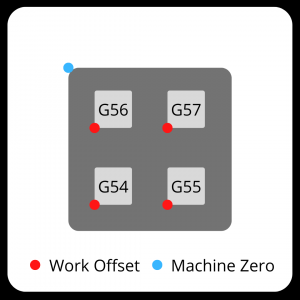
Work offsets are basically the stored location of your part in the machine. 

You use them to set the XYZ zero location when working in absolute positioning mode.

There are multiple work offsets available. 

The six most common are G54 through G59. Most machines will also have others available, but the format varies from machine to machine.

visual to show cnc work offsets G54-G59 with the zero locations shown
Multiple work offsets being used in one CNC machine

Fanuc controls are one of the most common controllers. If they allow additional work offsets, the Fanuc format for using them is G54.1 P1, G54.1 P2 and so on. The P number is the additional offset.

In most cases the six offsets of G54 through G59 that are common on all machines will be more than enough.

One benefit of having multiple work offsets is how easy they make it to run multiple parts at once. You can set the work offset for multiple parts and run the same program with a new work offset each time.

This works well when you a fixture that holds multiple parts in your CNC.

Where are offsets stored?

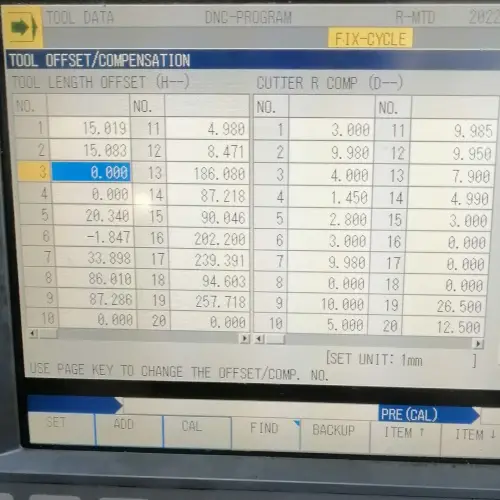
Offsets are stored in the tool offset table or library.

This tool table allows you to describe the different dimensions of the tool that will affect the program.

This includes the tool radius or diameter (D offset) and its length (H offset).

Offset Library
Tool offset library on an Okuma CNC machine

Some machines allow you to store the H and D offsets together in one offset. In this example, tool T01 would use both H01 and D01 as offsets. 

Other machines may require the offsets to be stored individually. 

When the offsets are stored individually, the programmer should maintain a system so that the offset numbers used are consistent. 

In other words, the first H offset would always be stored in the 01 location and the first D offset would always be stored in the 51 location.

Having a system like this will help prevent errors in your program.

Ready to master CNC programming?

Try the free 30 minute intro course to see how simple and easy G code can be. Take the shortcut to becoming a G Code Master today!

First CNC G Codes to Learn [Where to Start for Beginners]

What is a G code?

G code is the programming language used by CNC machines of all types.
This includes everything from mills and lathes to 3D printers and laser engravers.
G code consists of commands made up of letters and numbers that tell the CNC machine what to do. Most letters in the alphabet are used as codes to make the machine do something.
This can be a little confusing because while G code refers to the programming language used by CNC machines, there is also a large group of codes that are frequently used which start with the letter G. This group of codes is often referred to as simply “G codes”.

This post will cover the most common group of codes that start with the letter G, but we also have resources to help with the other letter codes if you need it.

Ready to master CNC programming?

Try the free 30 minute intro course to see how simple and easy G code can be. Take the shortcut to becoming a G Code Master today!

What types of codes are used in CNC programming?

M CNC Code

The two largest groups of codes are G codes and M codes.

G codes are preparatory functions. 

These codes prepare the machine to perform an action by setting various machine modes such as working in inches vs millimeters.

There are dozens of G codes which are used, and they vary somewhat from machine to machine.

The most common G codes are listed below. 

For the most part, the commonly used G codes are consistent across the different machine makes but check your machine manual to be sure.

M codes are miscellaneous functions. 

These are easier to remember as “machine functions” because this group of codes controls different parts of the CNC machine such as turning the spindle or coolant on and off.

The rest of the CNC codes consist of the remaining letters A through Z.

G and M codes are the only ones to worry about that have multiple codes within the same letter. In other words, there is a G01 and a G02 code. This isn’t true for other codes such as F, S, X, Y or Z.

Working with G Codes

G codes set various machine modes including turning them on and off.

Only one G code can be active at a time from each group. 

If you use the G20 code to turn on inch mode then the machine will basically turn off metric (mm) mode. You can’t have both codes active at the same time. 

These are called modal commands.

Some modal commands can be canceled (turned off) without setting another mode. For example, cutter compensation can be set to adjust left with G41 or right with G42. It can also be turned off (canceled) with G40 so there is no cutter compensation.

Inch/metric mode on the other hand can not be turned off. One of the two codes must be active at all times. There is no G code for turning the units the machine is working with off.

The most common G code groups are listed below:

Common G Codes

Movement G Codes

Movement codes are some of the most often used G codes in CNC programming. They are used to move the cutting tool around the machine.

The G codes for movement are:

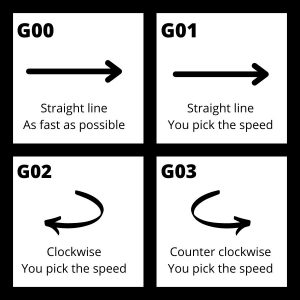
G00 is used for quickly moving the machine around when not cutting. The machine will move at the max allowed speed. This helps reduce the time it takes to run a program.

G01 through G03 are for cutting movements. They will move at the most recently listed feedrate specified with the F code.

a comparison of the type of movement created with G00, G01, G02 and G03 cnc g codes

Unit Modes

There are two unit modes that can be used when CNC machining.

G20 is used for working with imperial (inch) units and G21 is used for working with metric (mm) units.

You want to pay attention to your unit mode because 1 inch is 25.4 times bigger than 1mm so being in the wrong unit mode could be disastrous!

Positioning Modes

There are two types of positioning that can be used by the CNC.

Absolute positioning with G90 treats every new location that the machine reads as a location relative to a fixed point in the machine.

Incremental positioning using G91 reads every new location as a distance from its current location. Every time the machine moves to a new location in incremental mode, the new location becomes the new zero location.

The main body of most CNC programs is written in absolute positioning mode and smaller sections of the program are often written in incremental positioning mode. 

Incremental positioning is usually used for repetitive features such as drilling a number of holes.

The pictures below show how the locations given to the machine differ between the two positioning modes. The numbers in parentheses ( ) are the coordinates that the CNC is given for each new move.

graph paper example of absolute positioning with multiple points as examples
graph paper example of incremental positioning with multiple points as examples

Compensation Modes and Offsets

Offsets and compensation modes allow the CNC machine to be more flexible. Using them allows you to use the same program with multiple machines as well as different cutting tools.

Offsets and compensation modes also make CNC programs easier to read and understand.

Tool Length Compensation

Tool length compensation is how the CNC machine accounts for the length of the cutting tool.

G43 turns tool length compensation on and G49 turns it off. G44 also turns tool length compensations on, but it is almost never used.

Using tool length compensation allows you to tell the CNC machine how long your cutter is. This lets you use the same program across multiple different tools. Each tool will have its own adjustment, or offset value, stored in the machine’s memory.

Tool length compensation uses H offset values stored in the machine.

H offsets are selected using the H code.

illustration of a cnc cutting tool that shows what an H offset is

Cutter Compensation

Just like tool length compensation adjusts for the length of the cutting tool, cutter compensation adjusts for the diameter of the cutter.

If cutter compensation is off with G40 then the machine will move the center of the cutting tool along the path in the CNC program.

If cutter comp is on with either G41 – left compensation, or G42 right compensation then the machine will adjust the location so that the edge of the cutter follows the path given in the CNC program.

Like tool length compensation, this allows multiple different cutters to be used with the same program. Without cutter compensation, the program would need to be rewritten each time you wanted to use a new tool.

Cutter compensation is in the XY direction and tool length compensation is in the Z direction.

Cutter compensation uses D offset values stored in the CNC controller.

D offsets are selected using the D code.

illustration of a cnc cutting tool that shows what an D offset is

Work Offsets

While tool length and cutter compensation modes adjust for the cutting tool, work offsets adjust for the CNC machine itself in the program.

There are many different sized CNC machines available. Because machines vary in size, the location within the machine for a part can change.

Using a work offset such as G54 allows you to set a zero location for the program. This allows a much simpler and easier to read program. Also, work offsets let you use the same program in different machines.

Without work offsets you would need to write a new program for each CNC machine you want to run it on.

Most CNC machines have multiple work offsets available. G54-G59 are the most common.

Using multiple work offsets can be used to run more than one part at a time. The zero location gets switched and the same program is run again.

Multiple work offsets can even be used in a single program.

visual to show cnc work offsets G54-G59 with the zero locations shown
Multiple work offsets used in a single machine

Canned Cycles

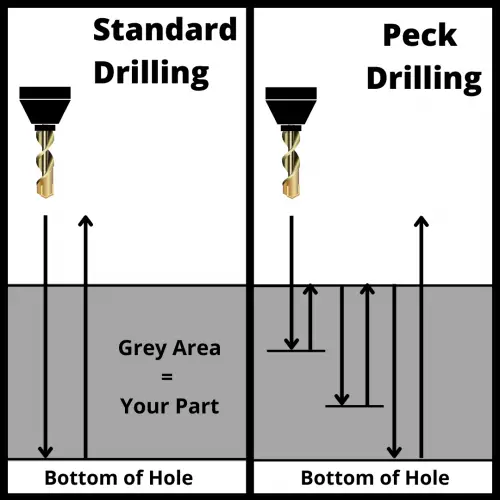
Canned cycles are a single code that allows you to perform common, repetitive machining functions such as tapping or peck drilling.

For example, peck drilling involves drilling into the part, backing up, drilling deeper, backing up again and repeat. 

Using canned cycles allows you to have a simple, easy to read line code that gives the machine instructions for what can be a long process.

illustration that shows the difference between peck drilling and standard drilling in a CNC machine

Using canned cycles can change the length of your program by a large amount. Smaller programs are usually easier to read and programs that are easier to read are usually easier to troubleshoot as well.

Next Steps

That covers the most common G codes, but what about the other letter codes?

Once you’ve mastered the G codes listed above, dive into the list of M codes

There are a lot less M codes that get used and almost all of them are essential to know.

After that, check out the Complete List of CNC Letter Codes. You will likely know some of the common ones such as F for setting feed rates or S for setting spindle speeds through learning about the various G & M codes.

Our complete list of codes rounds them all up and puts them all in one place to make learning easy.

Check out our comprehensive CNC G code training:

Ready to master CNC programming?

Try the free 30 minute intro course to see how simple and easy G code can be. Take the shortcut to becoming a G Code Master today!

First M Codes to Learn [Where to Start for Beginners]

What is an M code in CNC programming?

M codes are miscellaneous codes. They control various functions of the CNC machine such as turning coolant flow or the spindle on and off.

M codes are the second largest group of codes after G codes.

M codes vary from machine to machine, but we have covered the most common ones below with links for more info on each code.

You can expect that these codes will work the same on most machines:

Ready to master CNC programming?

Try the free 30 minute intro course to see how simple and easy G code can be. Take the shortcut to becoming a G Code Master today!

Common M codes

Stops [M00, M01]

The M00 code is called a program stop.

It stops the spindle and coolant flow. 

The M00 program stop also stops all machine movement and pauses reading the program.

It is typically used when changing the tool manually or there is a need or adding tapping oil to a tap before it touches the workpiece.

The machine will continue reading the program after a program stop once the cycle start button is pushed. It doesn’t automatically restart the spindle or coolant though. Those must be turned back on in the program.

The M01 code is an optional stop. It stops everything that the M00 code does but only if the optional stop button or switch is on.

haas cnc control panel with optional stop button highlighted
Optional stop button on a Haas CNC

If the optional stop switch is off, the machine will ignore the optional stop code and keep running the program.

Program end codes [M02, M30]

While the M00 and M01 codes pause the program, the M02 and M30 codes end it.

M30 is the most common program end code. It ends the program and rewinds the program back to the start.

This means that if you press cycle start after the M30 code, the machine will run the program again.

fanuc cnc control panel with cycle start button highlighted
Cycle start button on a Fanuc control

M02 is a program end without rewind.

This is mostly a legacy feature from when programs were run on tape. In fact, many newer machines will treat a M02 code as if it were an M30 code.

Spindle commands [M03, M04, M05]

Spindle direction

M03 turns the spindle on in a clockwise direction.

M04 turns the spindle on in a counterclockwise direction.

M05 turns the spindle off. The spindle should be turned off first before changing the spindle direction.

Coolant commands [M07, M08, M09, M88, M89]

M08 turns flood coolant on. 

This floods the cutting area with coolant to keep heat from building up which can damage the part or the cutter.

It also helps remove chips from the cutting area which can cause issues as well.

The M09 code turns the coolant off.

Many machines will have other coolant options that can be turned on as well. M07 to turn on mist coolant is a common one and so are M88 to turn thru spindle coolant on and M89 to turn it off.

Tool change [M06]

Most machining centers (mills) have automatic tool changers.

Tools get loaded into the ready to change position with the T code.

When the M06 code is used, the machine swaps the tool currently in the spindle with the tool in the ready position.

an automatic tool changer on a dmg mori cnc machine
An automatic tool changer on a DMG Mori CNC

Subprogram codes [M97, M98, M99]

There are two ways to run subprograms: M97 and M98.

The difference between M97 and M98 is the program location they move to.

The M97 code will jump to a new line in the current program.

The M98 code will run an entirely different program.

The format for using both codes is the same. They both use the P code and the L code.

M97 P1234 L3

For a M97 code, the P number is the line number of the subprogram inside the current program.

For a M98 code, the P number is the program number for the subprogram that will be run.

The L code is the number of times that the subprogram will be repeated.

The M99 code ends both types of subprograms and jumps to the next program line after the M97 or M98 code was used. 

Subprograms are not ended with an M30 code like a normal program is.

M codes vs G codes

M codes control different machine function such as the spindle or coolant.

G codes are another type of code used in CNC programming and they are called preparatory functions. This means they prepare the machine to do something.

Usually this involves moving the machine or controlling how it moves. 

Codes such as G00 [rapid travel] or G81 [drilling canned cycle] make the machine move in a certain way. Codes such as G90 [absolute mode] or G21 [metric mode] control how the machine reads the movement.

Both G and M codes are heavily used in CNC programming. It is important to understand both types of codes. 

For this reason we have a post on the First G Codes to Learn as well. Check it out because understanding the codes in that post and this one will give you a good foundation for understanding CNC programming.

Ready to master CNC programming?

Try the free 30 minute intro course to see how simple and easy G code can be. Take the shortcut to becoming a G Code Master today!