Confused? If you’re reading this page then I’m pretty sure you are. Dealing with numbers, values and calculations when machining or 3d printing can be hard for those just starting.
The lingo and terminology used by many people both online or at a new job can be hard to understand. My hope is that after this quick lesson in dealing with machine shop numbers, you will not only be comfortable reading your numbers and measurements but also will know how to perform some simple calculations using them.
Let’s begin
First we need to understand what the numbers we are working with represent.
Whether they are a reading on a micrometer, a spec on a blueprint or a stack of gage blocks, the goal is the same.
We need to know how to read them and work with them.
Below is a graphic that shows the name (including machine shop lingo) for different values.
Pay attention to how far each number is from the decimal place when looking at the chart.
Please note that not everyone will be working down to millionths of an inch but I included them for reference. Many will only work down to the the values shown in this table.
Value
Machinist Lingo
Technical Math Term
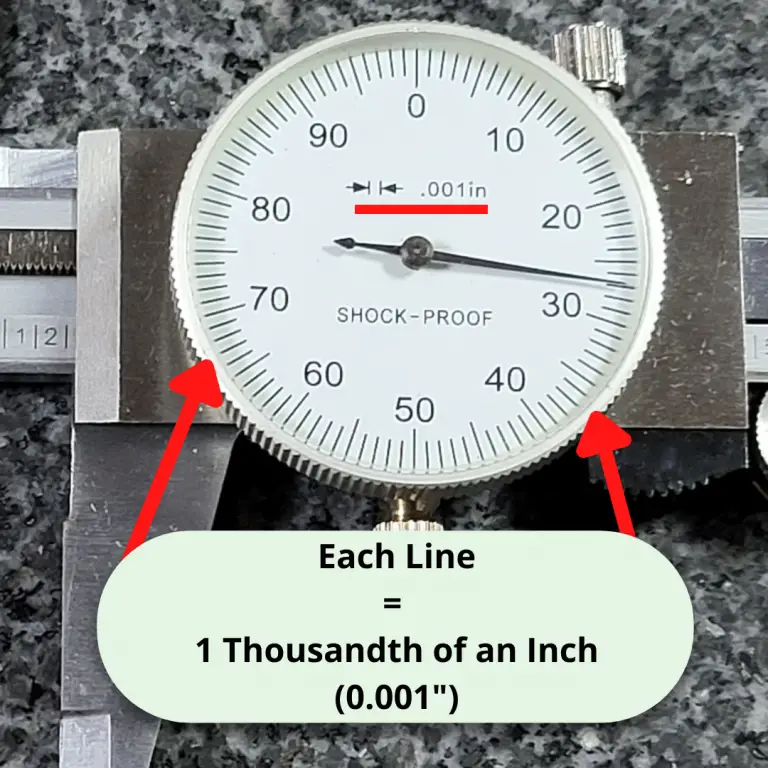
0.001″
Thousandth or Thou
Thousandth of an Inch
0.0001″
Tenth
Ten Thousandth of an Inch
Keep in mind that all these numbers and terms apply to imperial units (inches).
How to say the value
Machine shops usually speak in terms of thousandths of an inch. Because of this when we describe the value to someone else we will read it a little different than you might expect.
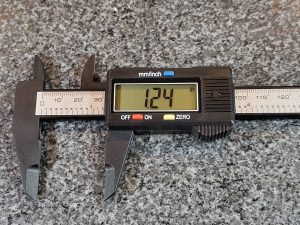
As noted above, if we give the example of 7.489136″ a machinist would describe the value as 7 inch, 489 thousandths, 1 tenth, 36 millionths.
Read that last sentence over a couple times to really understand the terms your typical machine shop speaks in.
As a note, not all machine shops or hobbyists will deal in millionths of an inch and some might not even work with tenths but I have included them for reference.
Note: Thousandths of an inch is often abbreviated as “thou” especially when discussing values verbally.
Machine shop number reading examples
Below are some more examples to show how machinists communicate values:
Value
Machinist Lingo
1.325″
1 inch 325 thousandths
0.5001″
500 thousandths 1 tenth
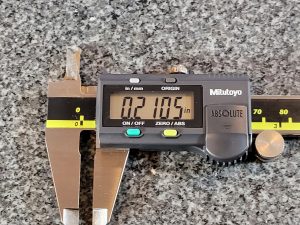
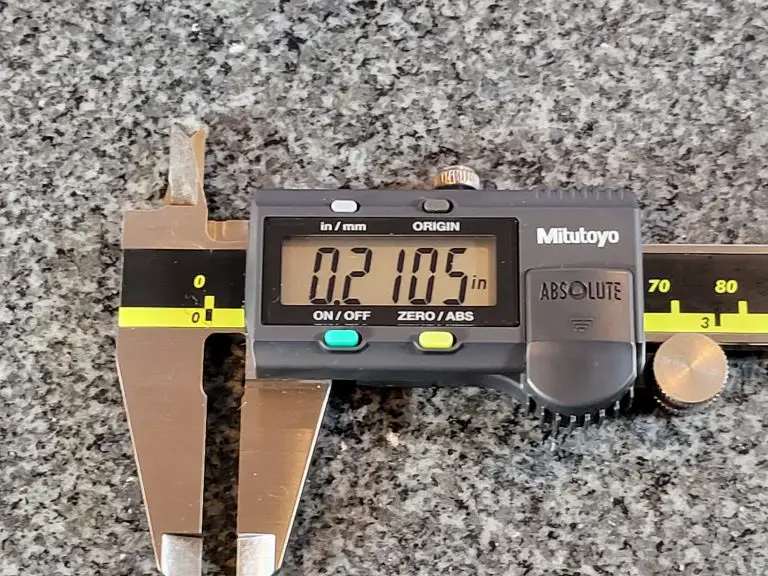
0.021
21 thousandths
0.6532″
653 thousandths 2 tenths
9.792345″
9 inch 792 thousandths 3 tenths 45 millionths
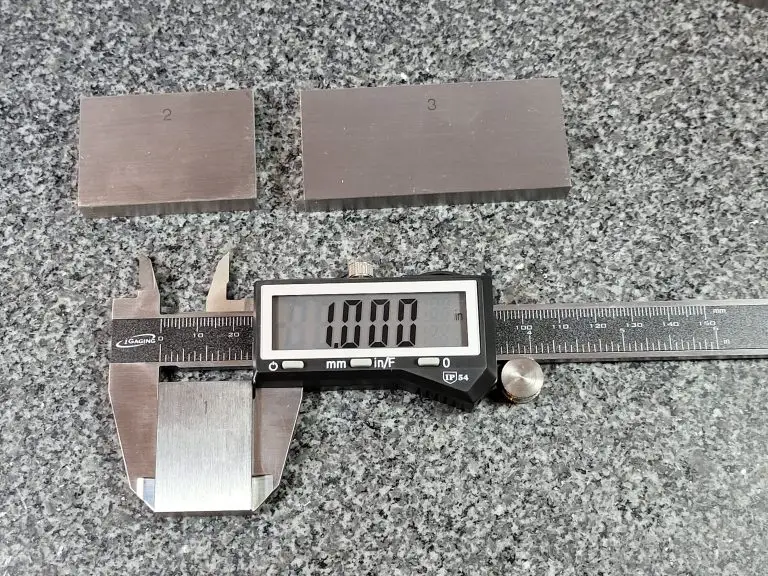
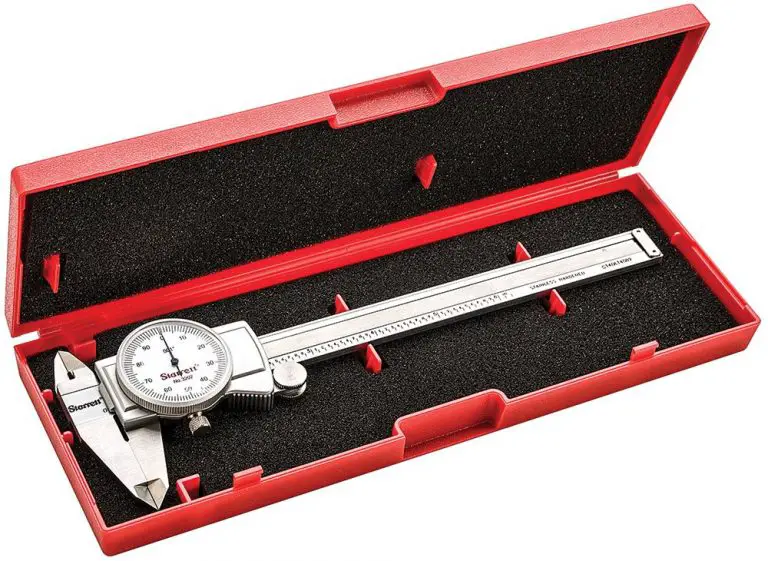
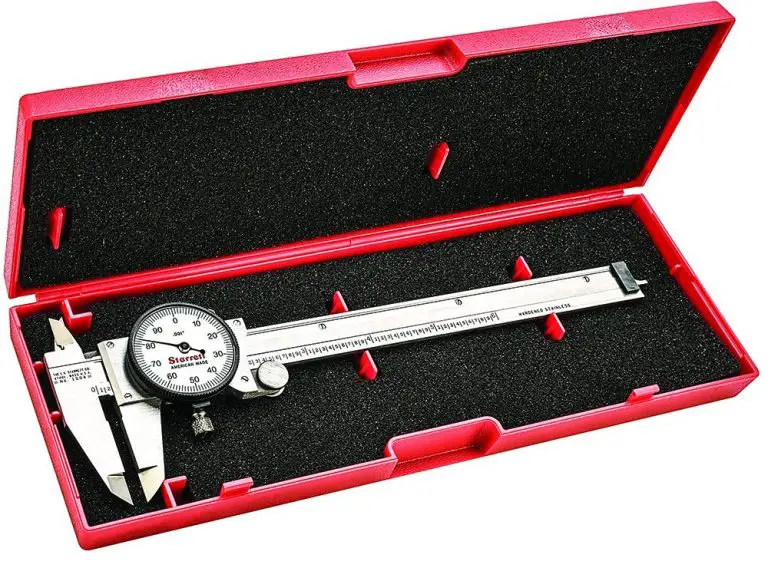
Gage blocks
A common scenario for someone new in a machine shop is learning how to set up a stack of gage blocks.
I’m not going to show you how to pick the right gage blocks for your stack here. If you need those instructions then head over to Starrett’s website. They have great instructions that show you how to select your gage blocks and make a stack of a specific height.
The link also contains information related to the use and care of your gage blocks. Take care of your gage blocks people, those things are expensive.
How to setup calculations
Now I said I would show you how to work with these numbers, so let’s demonstrate how to do that.
The important part when dealing with numbers or values in a machine shop context is to line up the decimal point. Below you will see some examples of addition and subtraction of numbers:
Simple calculation examples
For practice, let’s list out how to say those answers!
That’s it. Now you should know how to speak in terms that a machinist would understand and use the values in simple calculations.
If you need more in depth training when it comes to machine shop math, check out the training linked below. It breaks all the hard subjects down into bite sized pieces to make them easy to understand.
Ready to master machining math?
Get the tips and tricks you need to master the math needed for CNC and manual machining. Includes easy-to-follow guidance to make learning the math you need to succeed a breeze!
Micrometers and calipers are both precision measuring tools.
The difference between these tools lies in their accuracy and the types of measurements they can take.
Check out the table below for the main differences between the two tools and then keep on reading to gain a better understanding of what those differences mean when it comes time to use them.
Micrometers
Calipers
Accuracy
0.0001″
0.001″
Measuring Range
1″ increments
0-6″
Types of Measurements
Outside Measurements
Inside, Outside & Depth Measurements
Micrometer and caliper comparisons
Accuracy
Micrometers are more accurate.
A typical micrometer is accurate to 0.0001″ and a caliper is only accurate to 0.001″.
This makes a micrometer 10x more accurate than a caliper.
Just keep in mind that you can buy cheap versions of both tools that have worse accuracy. Also, if you were to buy a larger versions of these tools they will often have lower accuracy.
A 17-18″ micrometer might only be accurate to +/- 0.0002″ and a 0-24″ caliper may only be accurate to +/- 0.002″.
To sum it up, realize that there is some variation in accuracy but in general you will find that micrometers are 10x more accurate than calipers.
Measuring range
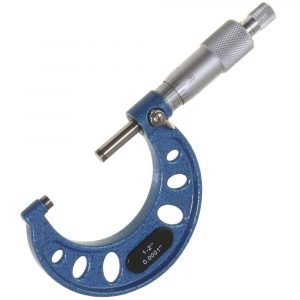
0-6″ Micrometer set
Micrometers come with 1″ measuring ranges. 0-1″, 1-2″, 2-3″ and so on.
The most common measuring calipers measure over a 0-6″ range. Larger varieties can be also be found with 0-12″ and 0-24″ measuring ranges. There are some different ranges available such as 0-4″ and 0-8″ also but they are much less common.
This difference in measuring ranges means that you would need a set of micrometers to measure over the same measuring range a single caliper is capable of.
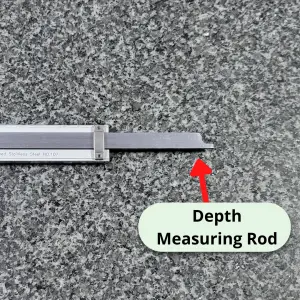
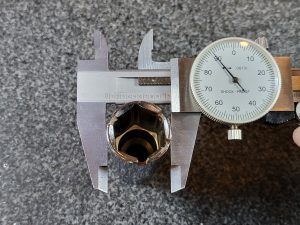
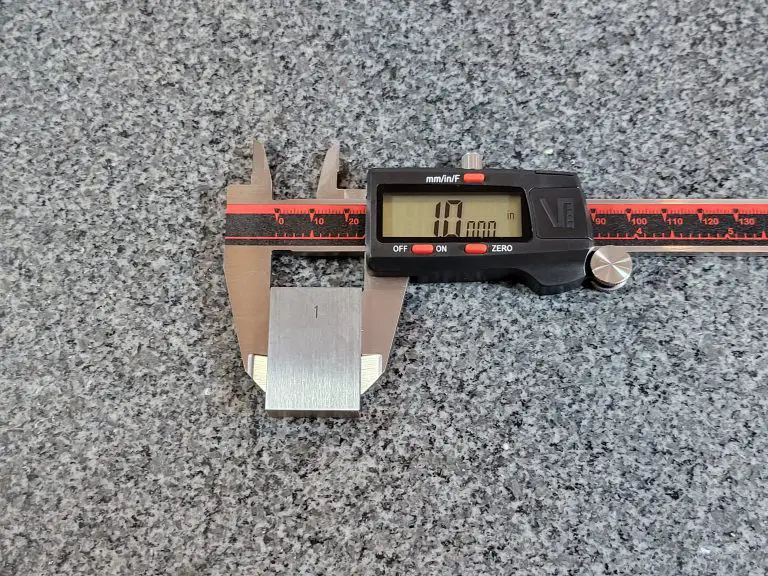
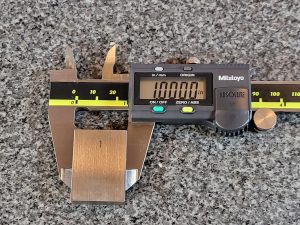
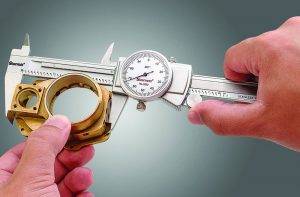
Most calipers will measure inside, outside and depth measurements.
Caliper measuring internal hole
Depth measuring rod extended from caliper – depth base attachment shown
Standard outside diameter being measure with digital caliper
Micrometers are capable of only performing one type of measurement.
The most common type of micrometer is an outside micrometer, usually referred to as simply micrometers or sometimes mics.
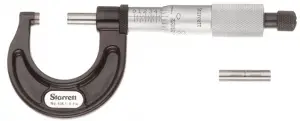
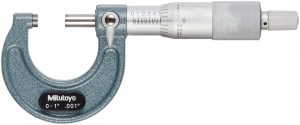
0-1″ outside micrometer
Inside micrometers and depth micrometers are also available to take internal and depth measurements.
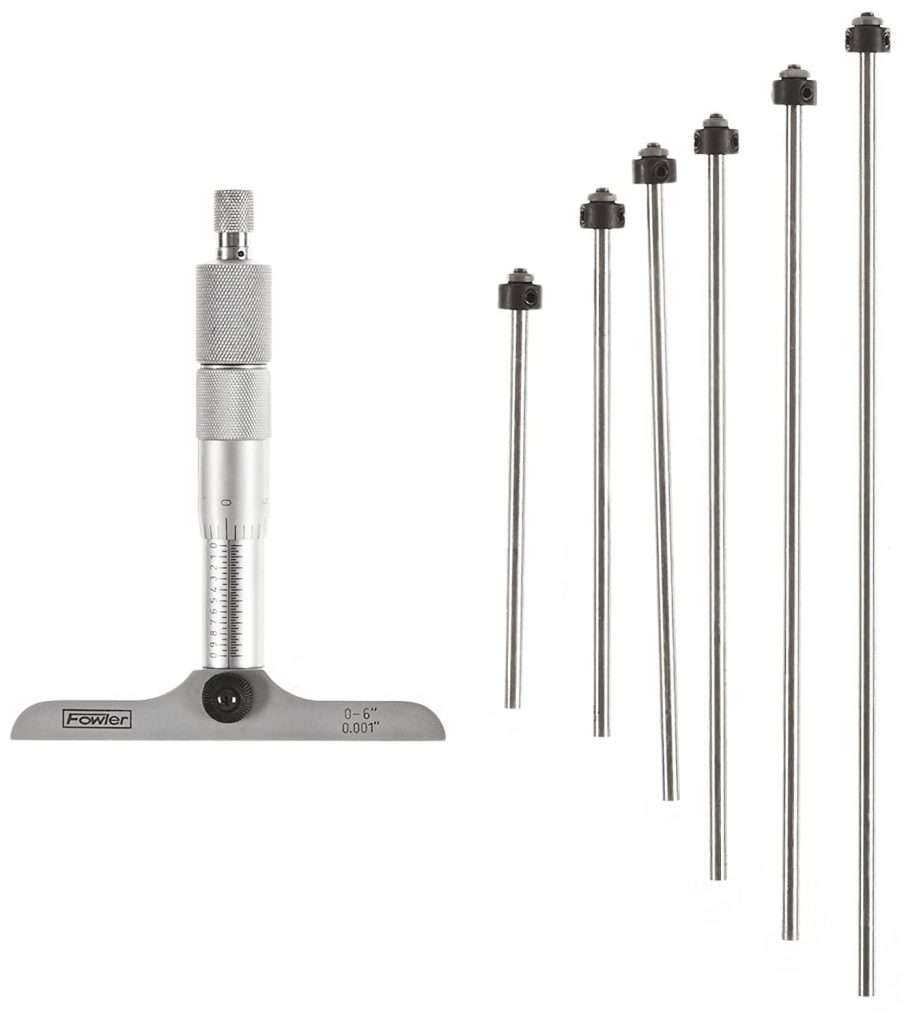
Depth micrometer with multiple rods for different size measurements
Inside micrometer with multiple attachements for different size measurements
Calipers are capable of taking a much larger variety of measurements.
Ease of use
To maintain the added accuracy that a micrometer has requires taking more care when using them.
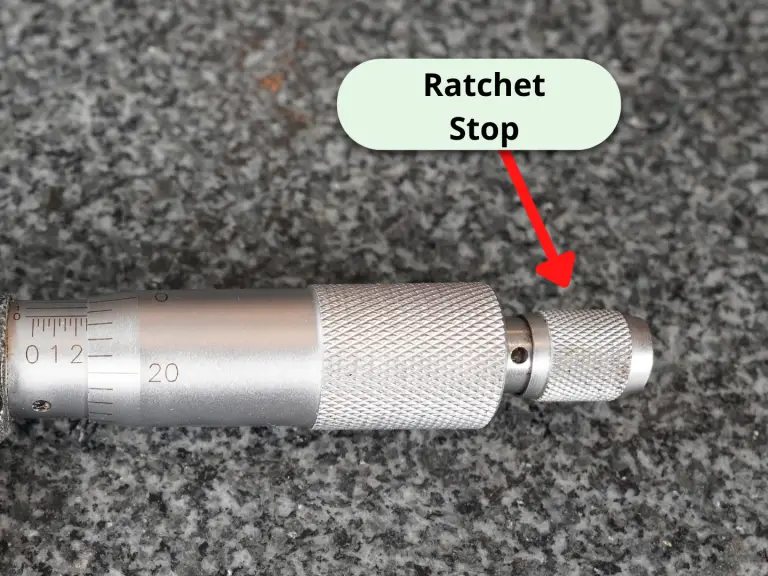
Something as small as the amount of force you use to close the micrometer can change your measurement. Many micrometers will have a ratchet or friction stops that help alleviate this problem.
When you are working down to a tenth (machinist lingo for 0.0001″), even temperature comes into play. Metals expand and contract with changes in temperature. To protect against this, most micrometers have plastic pieces that can be used to help insulate your from the tool.
0-1″ outside micrometer with piece of black plastic for thermal insulation
The difference would be that to cover the same measuring range of a set of calipers, you would need a 0-6″ set of micrometers. A good set of micrometers is going to cost quite a bit more than your typical 0-6″ caliper.
More info about micrometers and calipers
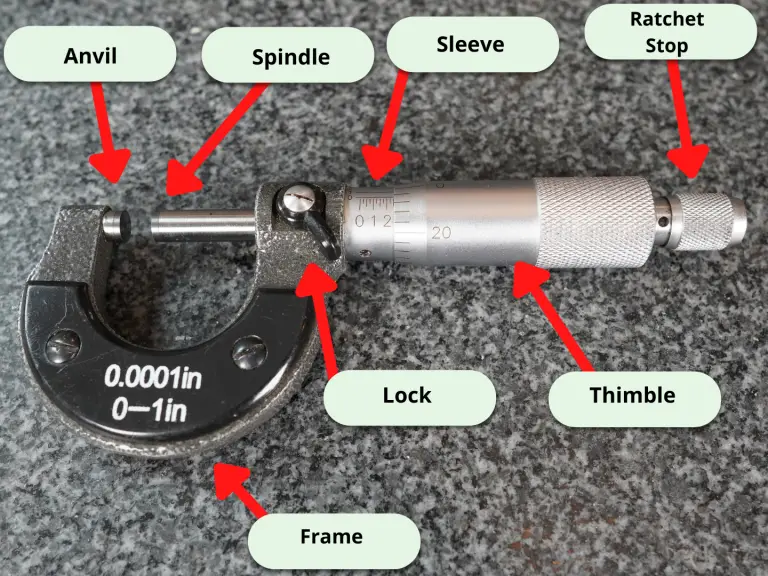
Parts of a micrometer
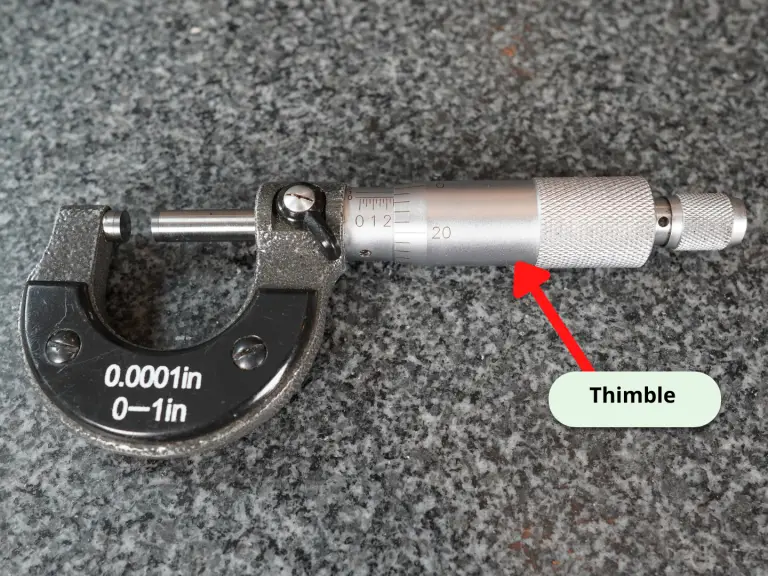
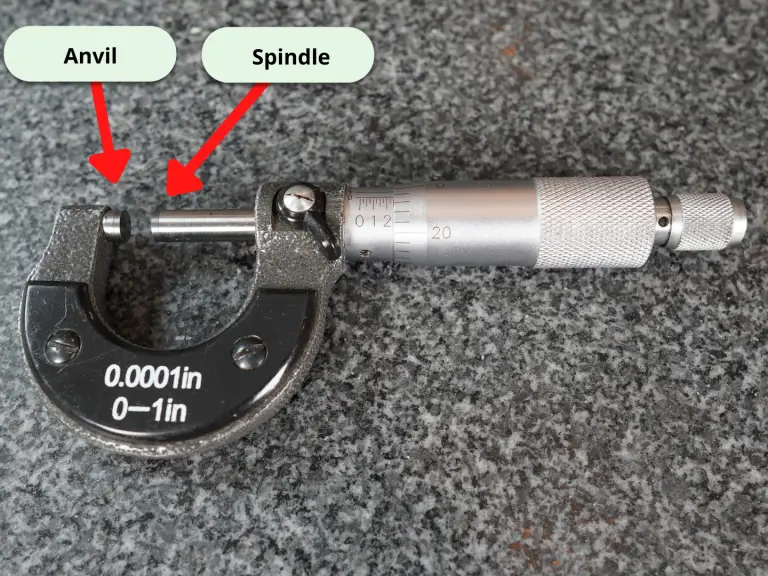
The part being measured will be placed between the anvil and spindle of the micrometer. The spindle is adjusted in and out by turning the thimble clockwise or counterclockwise.
Depending on the micrometer being used, the lock nut, lock ring or lock lever can be used to hold the micrometer at a specific size. Some tools will not have any locking feature.
Measurements are read using the scales on the sleeve and thimble.
The frame of the micrometer can vary across brands and types of micrometers. Some are made specifically to have smaller frames for different measuring applications.
Many micrometers also have a ratchet stop or friction stop that limits the amount of force applied to the thimble. This allows more consistent measurements.
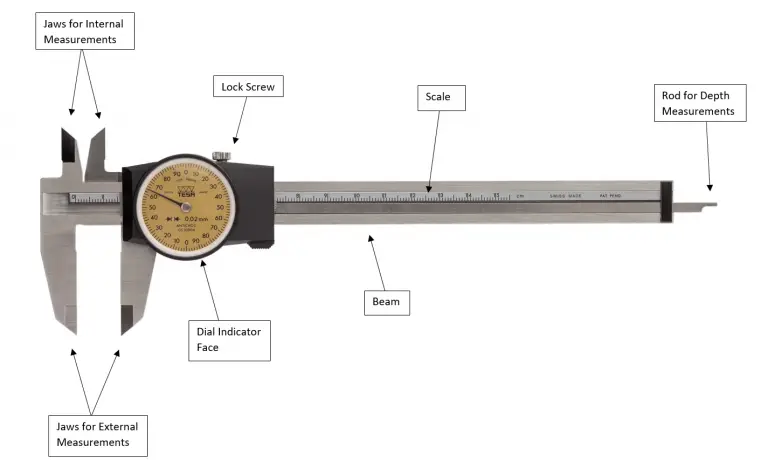
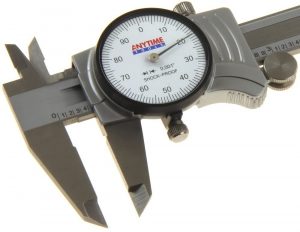
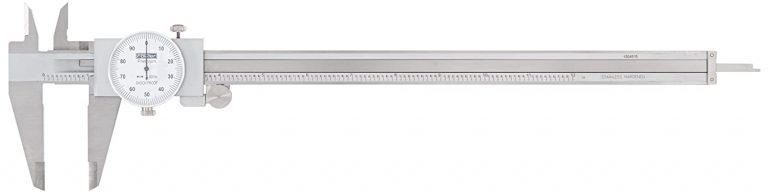
Parts of a caliper
The jaws for external measurements are used to measure features such as length, width and thickness.
The jaws for internal measurement are used for measuring features such as hole sizes and slot or groove widths.
The rod for depth measurements is used for measuring depths of holes, counterbores and step heights.
The scale and dial indicator face are used together to obtain measurement readings.
The slide of the caliper which consists of the moveable jaws along with the dial indicator face are slid along the beam.
The lock screw can be used to hold the caliper at a specific size for repetitive measurements.
Digital vs analog micrometers
Digital micrometers are great for the speed at which measurements can be read. Their display means very little training for the operator.
Another benefit of a digital micrometer is how quickly measurement values can be converted between inch and metric readings. A simple button press can save time and do the conversion for you.
Starrett analog micrometer
Mitutoyo digital micrometer
The downfall is that they tend to be quite a bit more expensive than a standard analog micrometer and they are more susceptible to contaminants such as water and coolant. Some models are offered with resistance or protection from different contaminants.
In recent years, prices have dropped for digital micrometers making them more affordable.
Analog micrometers tend to be a very dependable tool and many have been in use for generations. This also means that there are many used options on the market for analog micrometers.
If cost is your primary concern, I recommend going with an analog micrometer. If ease of use and operation is important then go with a digital micrometer.
Digital vs dial vs vernier calipers
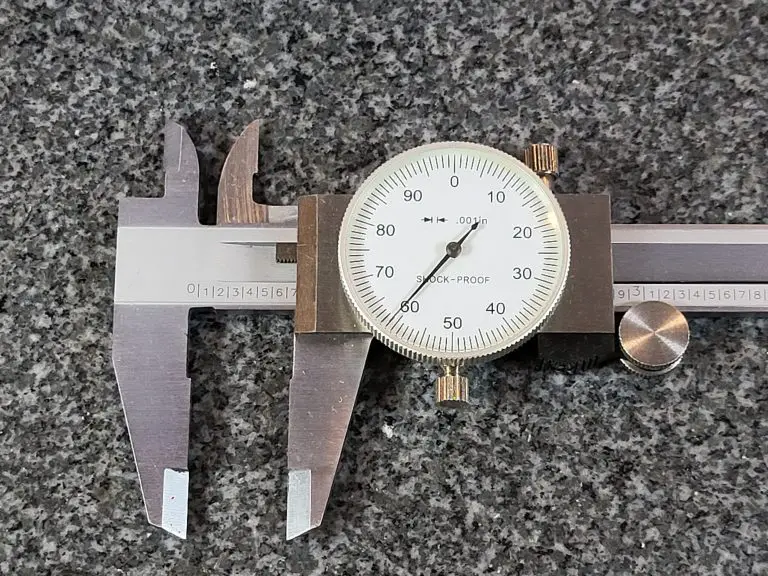
Mitutoyo vernier caliper
Vernier calipers are the most resilient type of calipers. They will be the least affected by things such as dirt and water or coolant. Unfortunately they are the most difficult to take measurements with. Learning to read the scales takes some practice.
Dial calipers are a good middle ground with measurements that are relatively easy to take with the dial indicator face. They are reasonably resistant to contamination though they should still be handled with care.
Dial caliper
Digital calipers are by far the easiest to use. The LCD display takes any guesswork out of reading your measurement. They are also the most susceptible to damage from things such as dirt and coolant.
Unless they are being used in the harshest environment, I recommend getting digital calipers. Digital calipers can be purchased with ingress protection if needed.
Summary
While they are both precision measuring tools, there are some key differences between micrometers and calipers.
Micrometers are more specialized and have a smaller measuring range. As a result they are generally more accurate and often capable of measurements to .0001″.
Calipers are more versatile. They have a much larger measuring range. To achieve this they sacrifice accuracy and most often take measurements to an accuracy of .001″.
As you can see they both have their strengths and weaknesses but in the end they are two of the most important precision measuring tools you can have in your toolbox.
They are used in manufacturing, machine shops, automotive work and the construction industry.
“Mic” is shorthand for micrometer.
Mics are very accurate measuring devices.
Micrometers are used to take measurements with an accuracy of ~.0001″ or better in inches.
Measurements in millimeters can be made down to .01mm or .001mm.
How accurate are micrometers?
Most micrometers have an accuracy of +/- 0.0001″, commonly referred to as a tenth of an inch in machining.
The standard metric versions would come as +/- 0.001mm or +/- 0.002mm.
They can be found with worse or better accuracy but what is usually seen .
When to use a micrometer
Three of the most common precision measuring devices used by a hobbyist or a machine shop are calipers, micrometers and dial test indicators.
Calipers have the least accuracy of the three and the largest measuring range.
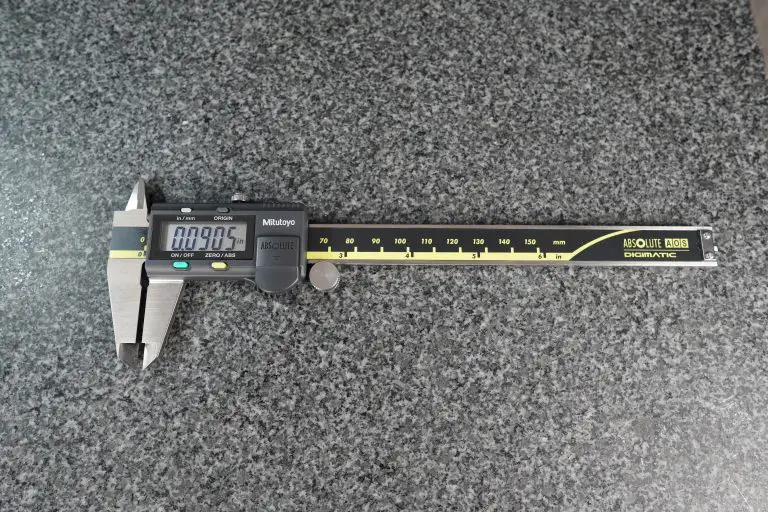
Mitutoyo digital caliper
The dial test indicator has the most accuracy and least measuring range.
Micrometers are in the middle for both accuracy and measuring range.
While still very accurate, one downfall of the micrometer is that they usually come with a 1″ measuring range (3-4″, 4-5″, etc.).
Because of this they are often sold in sets to cover a larger measuring range.
A 0-6″ micrometer set will cover the needs of most applications while a 0-12″ set is more than most people, especially hobbyists will need. 0-3″ sets are also common.
Parts of a micrometer
How to use a micrometer
Before using your micrometer, ensure that the measuring tool and surface to be measured are free of dirt, debris, chips, etc.
Everything should be clean.
The micrometer thimble should spin freely. No hangs up or anything similar.
Open the thimble to place the part you want to measure between the anvil and spindle.
Spin the thimble until it closes on the part.
You aren’t trying to clamp down on the part.
Use a gentle, consistent amount of force when spinning the thimble. Using the ratchet on your micrometer can make this easier. Try spinning the thimble until you get three clicks on your ratchet.
This will help you get repeatable measurements. You want to be consistent in your measuring so you know your readings are good.
This is why taking multiple measurements is so important.
When possible, measure the part multiple times to be confident your readings are accurate.
A little practice on a cheap gauge block can help here. Measure that same gauge block a bunch of times and you will become more repeatable in your measurements. You’ll also see how easy it is to change your reading.
As the spindle closes on the part being measured, it can be beneficial to slightly rock the micrometer in an effort to seat the micrometer on the part.
Be careful: this technique isn’t right for surfaces that could be scratched or damaged easily.
Once you have closed the part in the micrometer, it is time to take your measurement reading.
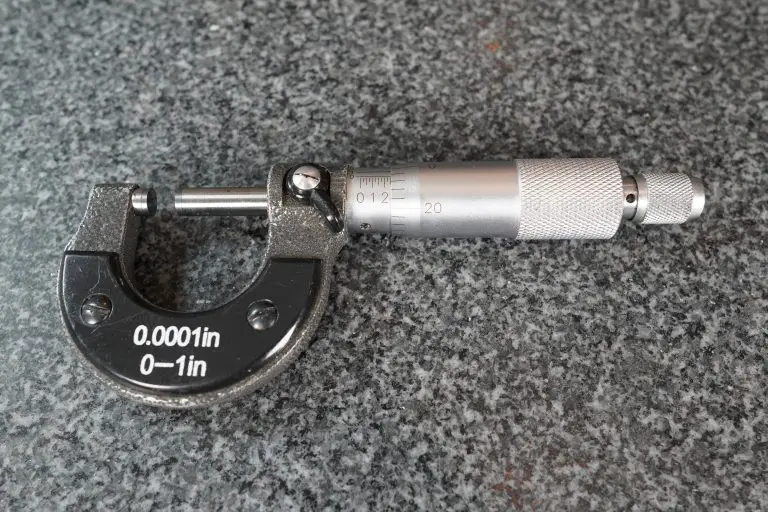
How to read a micrometer
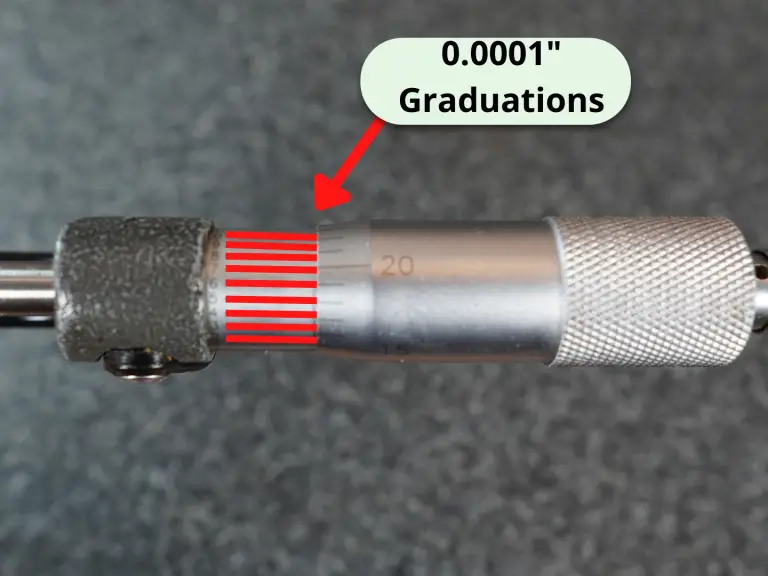
The most common variety of micrometers measures to one ten-thousandth of an inch (.0001″).
Measurements are taken by identifying where the lines on the micrometer line up.
You will need to take 4 readings and add them together to get your measurement.
These readings are the 0.1000″, 0.0250″, 0.0010″ and 0.0001″ readings.
Machinists refer to these as the hundred thousandths, 25 thousandths, 1 thousandths and lastly the tenths readings.
Let’s get started.
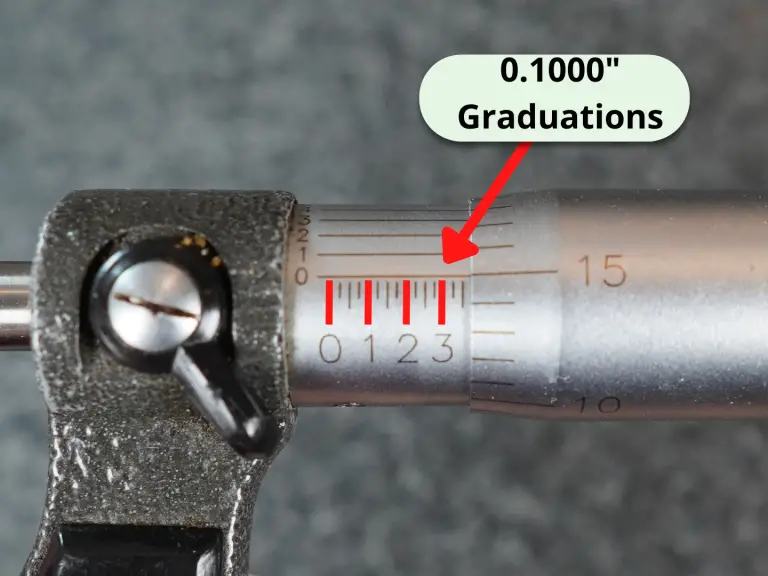
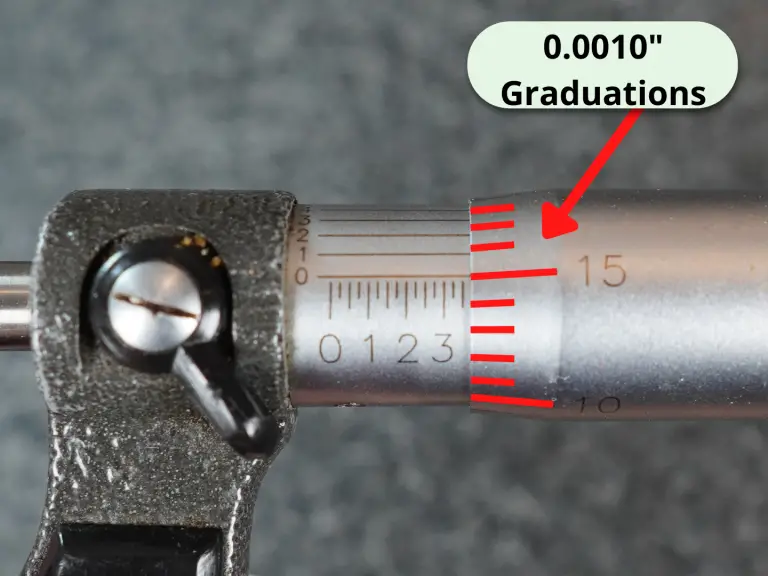
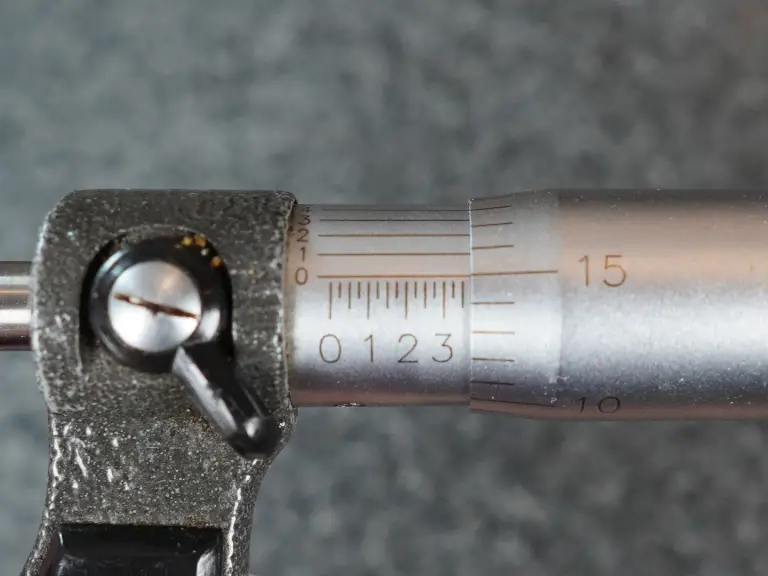
Along the sleeve of the micrometer will be graduations similar to a ruler. The graduations at every fourth interval are most often numbered 0, 1, 2 and so on.
These numbers represent .100″ or one hundred thousandths of an inch.
Whichever hundred thousandths reading you are past is your reading. In the pic above, the hundred thousandths reading would be 3 which equals 0.3000″.
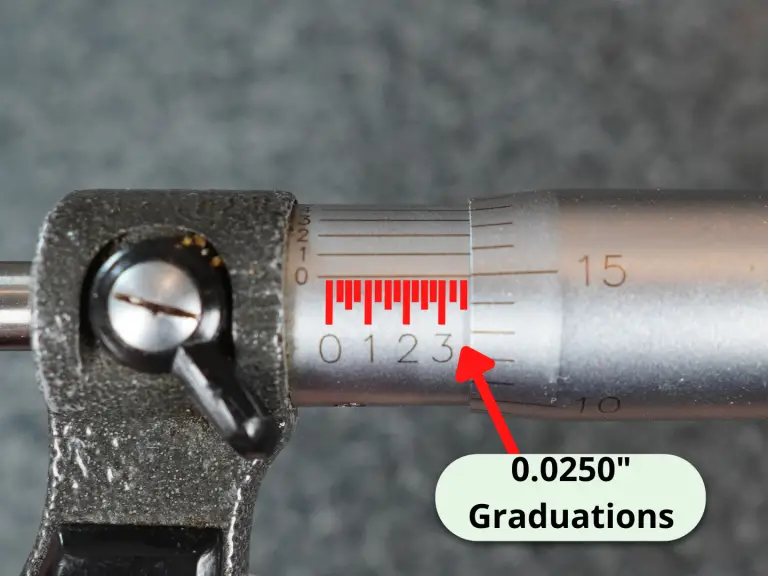
Once you have taken your hundred thousandths reading then you will need to take the 25 thousandths reading.
Each mark along the sleeve is 0.025″ or 25 thousandths.
Next is the reading from the thimble. This is the 0.0010″ reading or one thousandth of an inch reading.
In the pic above two lines are shown past the three so the 0.0250″ graduation value would be 0.0500″.
In the end we are going to add all of our individual measurements up for our final reading.
Note the 0.0010″ reading on the thimble and lastly take the tenths reading from the spindle.
Here we have 15 thousandths.
This makes our measurement so far 0.300″ + 0.0500″ + 0.015″ = 0.3650″.
The last reading to take is the tenths reading. If the lines matched up at the 6 tenths mark, then we would have a reading of 0.0006″ which we need to add to our previous readings.
0.3650″ + 0.0006″ = 0.3656″ or three hundred and sixty five thousandths of an inch and six tenths.
Often specific industries have their own special type micrometers such as the auto related micrometers on our list of the most common micrometers below:
Outside micrometers – measures various lengths, widths, thicknesses and diameters
Thread micrometers – measures various thread characteristics
Crankshaft micrometer – specific measuring range for measuring crankshafts
Disc brake micrometer – measures thickness of brake rotors
Blade micrometer – measures slots, keyways and grooves
Are cheaper micrometers as good as expensive ones?
The cheaper off-brand micrometers have gotten much better in recent year, but they haven’t quite caught up to the best manufacturers yet.
Starrett and Mitutoyo still reign supreme in terms of quality and accuracy.
You can always look for used options on Craigslist or Facebook marketplace to save a buck.
What makes a good micrometer?
A good micrometer needs two things: precision and accuracy.
Some adjustments can be made with most micrometers to account for small errors in accuracy but nothing can be done to fix a tool that isn’t precise.
Quality micrometers will turn smoothly without any drag. This is the telltale sign of a good tool. If your micrometer ever feels like it is rubbing internally, we recommend disassembling the micrometer and cleaning per the manufacturers instructions to eliminate any possible contamination that may be causing the issue
How to adjust a micrometer
If your micrometer is in need of adjustment, most micrometers can be adjusted by using the wrench that came with your tool to spin the sleeve of the micrometer. This is usually done in the zero position. This can be especially useful for adjusting for the touch or feel of a mic when it does not include a ratchet or friction stop.
If you no longer have a wrench or spanner for adjustment, replacement wrenches can be purchased from most manufacturers or on Amazon.
How often should my micrometer be calibrated?
How often you need to calibrate your micrometer will vary depending on a few factors such as what you are measuring with it, how often you are using it, and what type of environment it is in.
Check out our guide to micrometer calibration to get a better understanding of the how, where, when and why of calibrating your mics.
Related articles
For more information check out these related articles:
Are you new to using a micrometer and not sure where to start?
Don’t worry, you’re in the right place! This article will give you a step-by-step guide on how to use a micrometer correctly and with confidence.
You’ll learn about the different parts of the micrometer, how to read the measurements, and even some tips and tricks to help you out.
Check out the secrets to mastering micrometer measurement.
Parts of a micrometer
Before we talk about taking measurements with our micrometer, let’s have a quick refresher on the various parts of the micrometer.
Taking a measurement with your micrometer
Alright, let’s get down to business.
I’m assuming you’re ready to take your measurement now.
If you need tips for getting ready to take your measurement then skip to the bottom where we have some advice laid out.
For everyone else, grab your micrometer and your part to measure.
To take the measurement we are going to take four separate readings from the micrometer and add them up for our final reading.
Put your part between the anvil and spindle
Put the part in between the anvil and spindle of the micrometer.
This might require you to spin the thimble to open the micrometer enough to get the part in there.
Close the micrometer on the part
Now spin the thimble until it closes on the part.
Remember you aren’t trying to clamp down on the part.
Use a gentle, consistent amount of force when spinning the thimble. Using the ratchet on your micrometer can make this easier. Try spinning the thimble until you get three clicks on your ratchet.
We’ve done that now and we have the reading below on our micrometer.
So let’s break down the four parts of this reading.
The 0.100″ reading
The first part of the reading is the 0.1000″ reading. This is our hundred thousandths or “hundred thou” reading.
In the example above we can see that the larger lines on the sleeve of the micrometer are numbered.
Each of these larger lines equals another 0.1000″.
We are taking our readings at the intersection of the lines on the thimble and the sleeve. Because the 3 is the last hundred thousandths graduation shown, the first part of our reading is 0.3000″.
The 0.025″ reading
Next is the 0.0250″ or 25 thousandths reading.
This reading is also taken from the sleeve of the micrometer.
Each of the lines on the sleeve equals another 0.0250″. In our example, we can see two lines after the 3 which equals 2x 0.0250″ = 0.0500″.
This means so far our reading is 0.3000″ + 0.0500″ = 0.3500″.
The 0.001″ reading
There are 25 lines around the thimble of an inch micrometer.
Each of these lines equals 0.0010″ or 1 thousandth.
In our example we can see that we are on the 15 so our reading is 0.0150″.
Let’s check in on our measurement so far.
We have 0.3000″ + 0.0500″ + 0.0150″ = 0.3650″.
The 0.0001″ reading
The last part of our reading is the tenths (0.0001″) reading.
Note: some micrometer don’t have a 0.0001″ reading. This is more common on older or very cheap micrometers.
To take the tenths measurement we look at the numbers that go around the sleeve of the micrometer.
We take the reading where the number on the sleeve lines up best with a line on the thimble.
In the pic above you can see that it looks like the 6 on the sleeve lines up best with a number on the thimble. This would make the final part of our reading 0.0006″.
We now have all four parts of our reading. The 1, 25 and 100 thousandths readings as well as the tenths reading.
If we add them all up we get 0.3000″ + 0.0500″ + 0.0150″ + 0.0006″ = 0.3656″
Note: our measurement was taken using a 0-1″ micrometer. If we used a 1-2″ micrometer then we would add 1″ to our measurement. If we used a 4-5″ micrometer then we would add 4″ and so on.
Taking multiple measurements
One last thing to keep in mind when taking micrometer measurements is that you should take multiple readings.
These are very accurate measurements and it is easy for something to go wrong.
Clamping too hard, being a little off angle or a piece of dust or lint can really throw off your measurement.
Taking multiple measurements helps build confidence that your measurements are correct.
Micrometer reading examples
To give you a little more practice let’s look at a few more readings.
All of these examples assume you are using a 0-1″ micrometer.
Example #1
Here we have 0.1000″ + 0.0250″ + 0.0120″ = 0.1370″.
The tenths reading lines up with the zero so we don’t add any tenths.
Example #2
Here we have 0.5000″ + 0.0500″ = 0.5500″.
The 1 thousandths (0.0010″) and tenths (0.0001″) readings lines up with the zeroes so we don’t add them to our measurement.
Example #3
Here we have 0.7000″ + 0.0140″ + 0.0001″ = 0.7141″.
The 25 thousandths (0.0250″) reading doesn’t have any lines shown beyond the 0.1000″ reading so we don’t add anything to our measurement for the .
If our tenths reading lined up at the 9 as shown below. Our reading would instead be 0.7000″ + 0.0140″ + 0.0009″ = 0.7149″.
Tips for preparing to take your measurement
Reading your measurement correctly is important but so isn’t preparing to take your reading.
Pay attention to these factors before taking your measurement to help make sure your readings are accurate.
Make sure everything is clean
Dust and lint might seem small but they can make a huge difference in your measurement.
A human hair measures about 0.003″. Micrometers take measurements to an accuracy of 0.0001″ which is 30 times smaller. This is why everything has to be extremely clean.
Make sure the micrometer spins freely
You want to make sure your micrometer is in good working order.
Get a feel for it, literally!
If it feels like your micrometer is dragging or rubbing at any point when spinning the thimble, there is a good chance it could affect your measurement.
Pay attention to the angles
You want to take your measurements perpendicular (90 degrees) to the surface you are measuring.
Measuring at an off angle will skew your measurements and tend to give you a larger reading than the actual size.
Verify your micrometer – checking the zero
Your micrometer should be calibrated but it also a good idea to check it right before using it.
The simplest way is to check the zero. Close the micrometer and check the reading to make sure it isn’t a tenth or two off.
If you have a larger micrometer then use a gauge block to check your zero.
Frequently asked questions about taking readings with micrometers
How to take readings with different types of micrometers
Our examples are shown using a typical outside micrometer. However, there are many different types of micrometers available.
They all get read the same way.
Depth micrometers are probably the second most common type of micrometer. For most depth micrometer you will find that they don’t have a tenths (0.0001″) reading. Follow all of the same steps to read them but skip adding any tenths to your measurement.
What’s the difference between a micrometer and a caliper?
Generally, calipers are less accurate and more versatile. Check out the comparison below to see how they match up.
Reading a dial caliper doesn’t have to be difficult.
There are two main parts to using a dial caliper:
Understanding the parts of the caliper
Reading measurements from the tool
Parts of a dial caliper
It is going to be hard to use a dial caliper if you don’t know what the different parts of the caliper are called.
Here is a quick run through for anyone who doesn’t already know the parts of a dial caliper.
The jaws of the caliper are the parts that will come in contact with your part when taking a measurement.
There is one set for taking inside (internal) measurements and one set for taking outside (external) measurements.
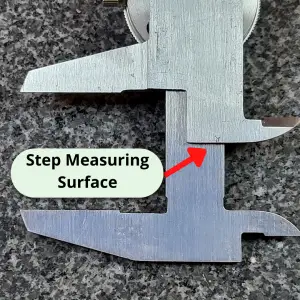
Most calipers can also take depth measurements with the depth measuring rod and step measurements using the back of the caliper.
Parts on the body of the caliper:
Dial face – Half of your measurement will be read from the dial. The other half will be from the scale on the beam of the caliper.
Lock screw – For locking the caliper in place. Measure, lock, read the measurement. Not needed with all measurements, but handy when working with parts that make reading your dial caliper difficult.
Bezel adjustment – Allows you to spin the dial face. For use when zeroing your caliper.
Thumb roller – Use this to apply an even amount of force when taking your measurement.
The beam of the caliper is the part that the body/dial face slides along.
The beam has a scale which is used to take half of the measurement. The scale reading gets added to the dial reading for your final measurement.
Reading your measurement
Now that we know what to call everything, let’s go through the steps to take a measurement with your dial caliper.
Get ready to measure
Measure your part
Take a reading from the scale
Take a reading from the dial
Add the two readings
Step 1: Get ready to measure
Before you take a measurement with the dial caliper, make sure things are set up to allow you to get an accurate measurement.
You want:
A clean caliper. No dirt, dust, crud, rust, etc.
A working caliper. Inspect for damage. Make sure the lock screw is loosened and the caliper body slides freely.
Good lighting. If you can’t see good, it will be hard to tell the difference between a 1.000″ and 1.001″. Proper lighting is your friend.
Good luck taking this measurement
Step 2: Measure your part
Most dial calipers are capable of taking 4 types of measurements:
Inside
Outside
Depth
Step
Inside measurement
Outside measurement
Depth measurement
Step measurement
Make sure your not taking measurements off angle. If you have an angle on your part or your caliper, it can give you false readings.
With a little practice, it will be easy to get a feel for when your caliper is straight.
Step 3: Take a reading from the scale
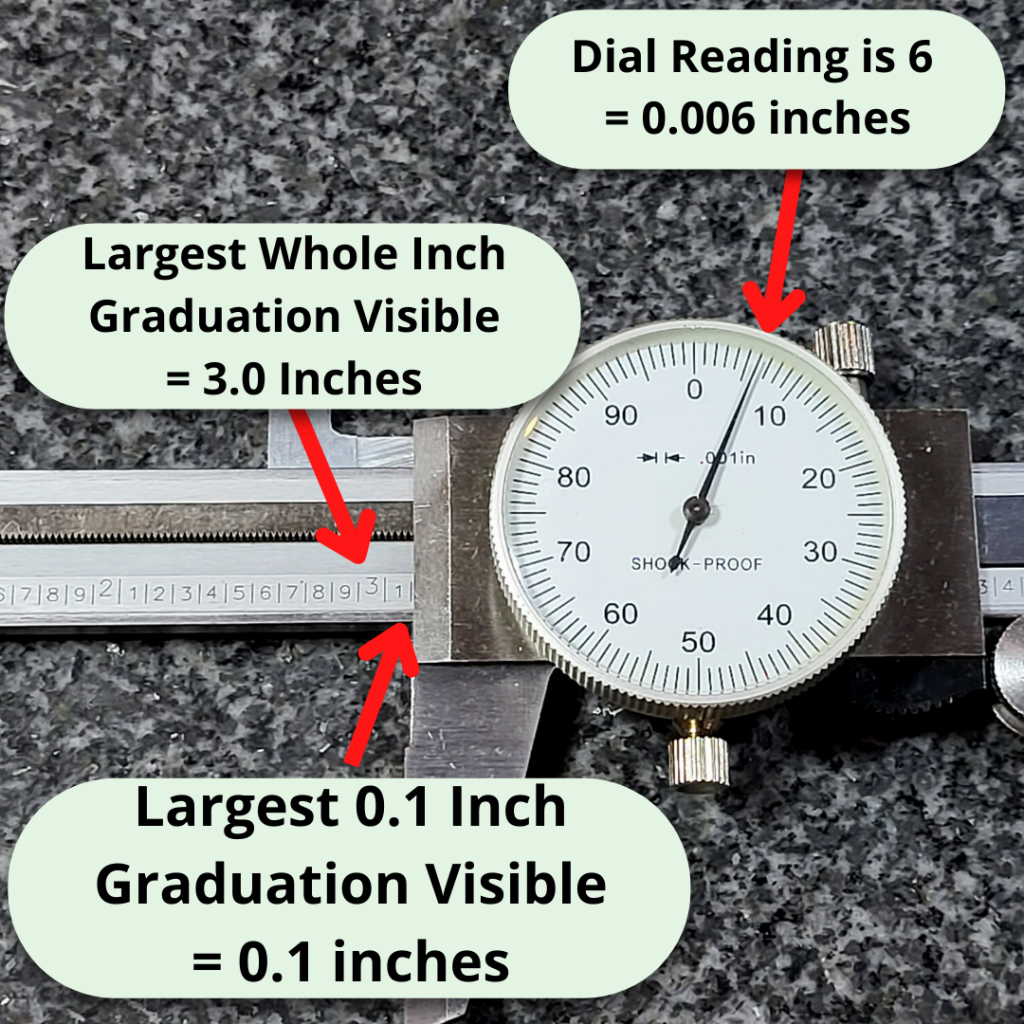
The scale on the beam of the dial caliper has lines that mark the graduations.
Most dial calipers will have them in increments of one hundred thousandths of an inch (0.100″).
You will take the reading of the last visible graduation. In the picture above, the line that would equal 3.100″ is not visible. This means that the the measurement is under 3.100″. Because the line isn’t visible, our reading from the scale would be 3.000″.
Step 4: Take a reading from the dial
The dial face of most dial calipers has 100 graduations that each equal one thousandth of an inch (0.001″).
Simply count the number of lines. In the picture above, the dial reading is 0.027″.
Step 5: Add the scale and dial reading
Now you have your scale reading and your dial reading, add the two together.
Let’s try another example.
In the pic below, you can see that this time the 3.100″ graduation line is visible. This gives us a scale reading of 3.100″.
The needle of the dial is on the 6th graduation which equals 0.006″.
3.100″ + 0.006″ = 3.106″
Easy peasy lemon squeezy.
And if you still need more practice, check out the Dial Caliper Practice Quiz to make sure you have the process down.
Micrometers are amazingly accurate measuring tools.
But for anyone just starting out it can be hard to know which ones are good and which ones are bad.
This has only gotten trickier in recent years as some of the once great manufacturers have moved their production to China and various other countries known for lesser quality. On top of that some of the Chinese manufacturers have really upped their game and are producing quality tools.
We’ll break it down for you and let you know which micrometers are best with some tips on what to avoid.
One last tip if you are very new to micrometers.
Think about what you plan to measure. What are the sizes involved? Most of the time people don’t need huge sets of micrometers.
My advice for someone new would be to get the best set of 0-1” micrometers that they can afford. This is the tool that will get the most use.
A common mistake the newbies make is thinking they need a micrometer when a caliper will do the job just fine.
0-6″ Mitutoyo digital caliper
If your tolerances are +/- .001” or more then you can likely get by with a dial or digital caliper. These can be had for prices well below the cost of a good micrometer.
Another benefit is that calipers are much more versatile and have larger measuring ranges.
Digital micrometers are a good choice because they are quick to read. This is especially helpful for anyone just starting out.
It’s not that hard to read an analog micrometer but some people struggle a little learning to read a micrometer. For a little help learning to read a standard analog micrometer, see our post that walks you through the process – How to Read a Micrometer
Digital mics simplifies the process of reading your mic, but it is still a good idea to learn how to read a standard analog micrometer.
Digital micrometers also have the added benefit that they can be easier to see the readings. If your vision isn’t great up close or you need a new set of readers, you might want to stick with a digital micrometer.
Analog micrometers have the benefit of always being ready to use. Digital mics require a battery and some are better than others when it comes to battery life.
An analog mic will always be ready to pick up and use. If you only use your digital micrometer occasionally then it might be a good idea to take the battery out when not in use. This way it isn’t dead when you need to use it.
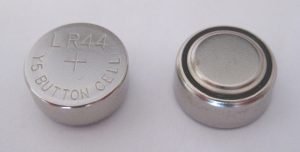
Typical button cell battery used in digital micrometers
Measurement units
Unless you are purchasing a digital micrometer, you will only get a reading in one set of units. Take note of the units you will be working with and buy accordingly.
This seems pretty self explanatory. I include it only as a reminder to double check your units before purchasing and to contemplate getting a digital micrometer if you are going to be working in both units constantly.
Measuring range
Micrometers typically are capable of taking measurements over a one inch measuring range. You will find them available individually, such as a micrometer that can take measurements from 4″-5″ and you can also find them sold as sets.
0-6″ micrometer set
Set sizes are generally sold in 0-3″, 0-6″ and 0-12″ varieties. They are available in many different configurations but these sets are the most common. Sets will usually start at 0″ and go up. Some of the bigger sets differ and only include larger size micrometers such as with a 12″-18″ set.
As the set gets bigger and the micrometers get larger, the cost gets significantly higher.
Because this is the case, don’t go out and buy a set that contains tools you won’t be using. In many instances a 0-3″ micrometer set will be sufficient for taking the majority of your measurements.
Think about the sizes you will need to measure and don’t overspend on a set larger than you really need.
Calibration certificates
Does your micrometer need to be calibrated?
Yes, but also no.
What you will want to do is check the calibration yourself. Use a known standard such as a set of gage blocks to verify the accuracy of the tool over its measuring range. At a minimum, verify the micrometer with the standard provided by the manufacturer.
What you should not do is pay extra to get a calibration certificate from the micrometer seller. Many sellers will offer a NIST traceable calibration certificate at a substantial upcharge. In reality, all the calibration certificate tells you is that the tool was found to be accurate at the time of calibration.
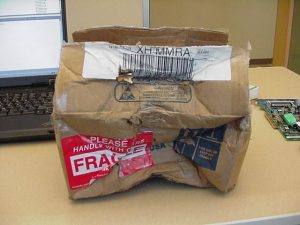
Damaged shipping box
In between the time you receive it and the time the calibration was performed, the tool passed through many hands, most notably the hands of a shipping company. I shouldn’t need to tell you that those shipping companies are not always gentle in the transportation of your precision measuring instrument.
It will probably be packaged well and everything will be fine. Remember many micrometers have withstood harsh machine shop environments for decades and continued to measure as accurately as a brand new tool.
Should you buy a used micrometer?
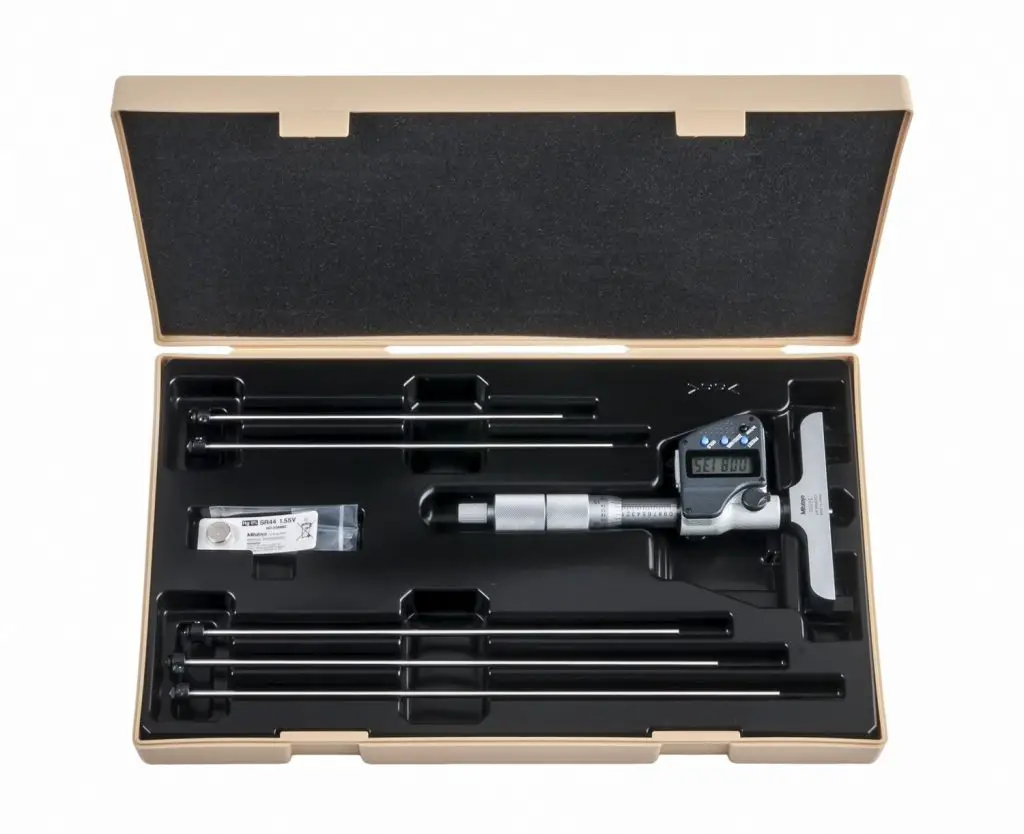
Used tools are an excellent way to save money when it comes to micrometers. This is even more true when talking about depth micrometers, if you can find the right deal.
Generally, I have found prices for used tools fall into two categories; cheap and priced like new. Avoid the like new prices. It just isn’t worth it. Some people just want way to much for their tools.
Personally, I wouldn’t be too excited about a standard used outside micrometer unless it was pristine and from a brand like Starrett or Mitutoyo.
There are plenty of other brands out there that put out quality tools for years. The tricky thing is that over the years some of these manufacturers have taken a step down in quality. Case in point, Fowler and Browne & Sharpe. The older stuff is much better.
If you’re looking to pick up some good tools on a budget, then keep an eye on Facebook marketplace and Craigslist along with hitting up some local yard sales. I’m sure it depends on your area, but yard sales have always been where I find the best deals.
Micrometer with a case
A good tip when looking for used tools is to look for ones that still have the original case or box. It is usually a sign that they were well cared for.
For more info about used micrometers, see our post about the best micrometer brands to find out which ones stand the test of time and the brands you should avoid.
Carbide vs non-carbide tipped micrometers
Stainless steel tips
Carbide tips
Carbide tips have the benefit of increased resistance to wear. The downfall is that they are more prone to chipping of the anvil face.
If you are careful with either type, it is unlikely that wear or chipped anvils will be an issue.
Micrometer cases
A good case will go a long ways towards keeping your tool protected and safe. Whether you’re working in a machine shop or using it in your garage, there are hazards everywhere. Coolant isn’t something you want on most precision tools. The same can be said of dirt and brake dust.
Give them a good wipe down after use and keep them safely in a case or toolbox to make sure they will be in working order for years to come.
Micrometer ratchets
Friction thimble stop
Click ratchet stop
A good ratchet makes a big difference when it comes to micrometers. If the ratcheting mechanism is bad, then the tool could give bad readings.
Micrometer ratchet mechanisms come in many forms. The most common types are the click style ratchet and the friction thimble.
Personally, I prefer to use the click style or no ratchet over the friction thimble. Just a matter of personal preference.
Some companies claim that the friction thimble, which simply spins freely once it is at the correct size, is more accurate but I have never known this to be the case.
If possible, try out both the click style ratchet and the friction thimble and determine what you prefer. If this isn’t possible, I recommend starting with a click style ratchet for your micrometer.
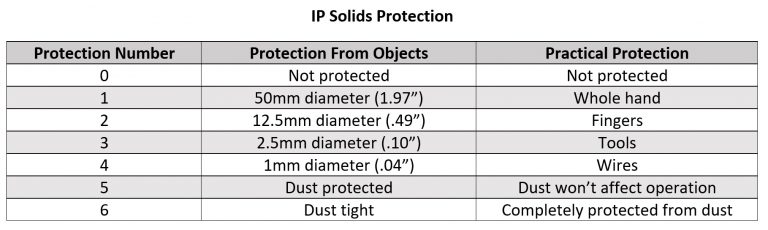
IP ratings
If you go with a digital micrometer, pay attention to the IP rating of the tool. The tables below show how well protected the device is from the elements.
The first number is for protection from solids such as chips and dust. The second number is for protection from liquids such as oil and coolant.
Both of the Mitutoyo digital micrometers recommended above are rated IP65. This is a very high level of protection. The next level down that is commonly seen is a IP54 rating which would be sufficient for most environments as well.
Data transfer
Many micrometers are capable of transferring measurement data to a computer. I don’t believe this is something that will prove useful for most users unless they are working in a high volume industrial setting so I will be brief on the topic.
Please note that there are multiple ways of transferring measurements to a computer including:
USB
SPC
RS232
Wireless, including Bluetooth
Other proprietary wired and wireless formats
If data transfer is a feature you are interested in then please pay attention to the manner in which the tools communicates and the price of any required accessories. The cost of a simple cable can often be half the cost of the micrometer itself or more.
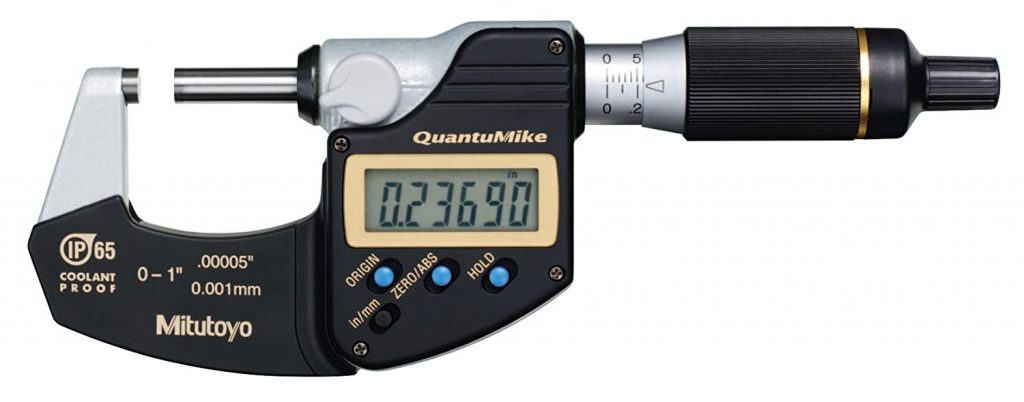
Mitutoyo has long been one of the very best micrometer manufacturers. They make top of the line tools across the board. Standard micrometers, digital mics, depth mics. You name it and they are leading the pack.
Every micrometer on our best of list is incredibly accurate but the digital micrometers from Mitutoyo, including this one, are on another level. With accuracy of .00005” or .001mm, Mitutoyo’s digital micrometers measure tolerances 2x tighter than most standard micrometers.
For reference, the human hair is about .003”. Take a strand of your hair and split it into 60 pieces and that is how accurate these micrometers are.
Besides the accuracy, the other standout feature of the QuantuMike is the speed. Anyone who has used a micrometer knows they aren’t quick to open or close.
The QuantuMike is unlike any other micrometer on the market and opens and closes four times faster. Each turn of the thimble moves the tool .100” instead of the normal .025”. No arm rolling needed.
Combining speed and accuracy is not a feat easily accomplished but Mitutoyo’s QuantuMike has done just that and more.
For a more in depth look at what makes the QuantuMike so special, see our full review.
I am a huge fan of Mitutoyo’s digital micrometer line. Across the board they are quality all around.
Rather than gush over the quality of these things for paragraphs on end. I am just going to include a bulleted list of what makes them so good:
Extremely accurate
Quick to use and take measurements
Battery life is long
IP65 rating means they are protected from dust and splashing water
Great build
Excellent durability
If the price is too high, I would recommend going with a standard analog micrometer instead. If you must get digital, then go with one from one of the bigger budget brands such as iGaging.
Unlike standard analog micrometers, the cheap ones are not as close in quality to the budget tools. A budget digital micrometer is going to be a significant step down. That doesn’t mean it’s bad. It just means that the gap is bigger.
If you are still on the fence, re-read the bulleted list and contemplate whether its better to “buy once, cry once” or not.
There was a time where Chinese made knockoff micrometers were bad. I mean real bad. This isn’t the norm anymore though.
Many manufacturers such as Anytime Tools have made a name for themselves by providing quality measuring instruments at a fraction of the price of higher end tools.
And quality wise there just isn’t a big difference between the cheaper tools and the more expensive ones anymore. At least when it comes to the best of the budget tools. If the pricier tools from companies like Starrett or Mitutoyo are 5% better, honestly most won’t notice the difference.
One note about budget priced micrometers, don’t go buy some random mic made in China and expect it to have the same quality. The good brands that are cheaper are usually American companies that are purchasing the tools from Chinese manufacturers. They have performed the quality control to ensure you get a good product.
If you want a quality tool that is accurate and built to last but your budget doesn’t allow for the best from Starrett or Mitutoyo check out Anytime Tools.
For standard analog micrometers, Starrett has put out a line of excellent measuring tools for a very long time. Founded in 1880, they were one of the creators of the modern micrometer and it shows.
Having never used a micrometer from the 1800s, I can not attest to their quality from 100 years ago. What I do know is that anything made on this side of the 1950s has been excellent. In machine shops all over the world, Starrett micrometers bought decades ago are still in use.
They are built to last. Often the only tell-tale sign of their age is a slight polishing of the frame or thimble from heavy use.
The quality does come at a price though. If you won’t be using this tool all day every day or for an extremely critical measurement, it might be best to think about our best budget micrometer below. If you are going to put this tool to use constantly, you would be hard pressed to find a better tool.
Depth micrometers are another monster. Certainly more difficult to manufacture, as a result they are quite a bit higher in price.
Because they are so expensive, I am going list a few different options.
As a side note, when it comes to depth mics think about looking for used options. Many people take excellent care of their tools and you can save a pretty penny by picking up a second hand set. My only recommendation would be to find a way to verify them before buying. Bringing a set of gage blocks along could save you quite a bit of headache in the future.
Just like their outside micrometers, the digital depth mics from Mitutoyo are excellent.
They are easy to use and easy to read. Most importantly, they are extremely accurate. Unlike normal micrometers, depth mics are one tool that the Chinese knock offs have really struggled to replicate. Many times cheaper depth mics are not accurate. The quality simply isn’t there.
This is not the case with Mitutoyo depth mics.
Mitutoyo depth mics, like their other digital micrometers, are in a league of their own. Unfortunately, their cost reflects this.
These depth mics are the best of the best but I only recommend them if you plan to put them to heavy use. If not, look into one of the non-digital options below to save more than a few bucks.
Both Starrett and Mitutoyo make great depth micrometers of the non-digital variety. Both companies make depth mics that are strikingly similar to their standard outside micrometers.
Really the differences are minor. Both are highly accurate. The ratchet on the Starrett is a little better. Additionally, the base is slightly smaller which I prefer.
The Mitutoyo depth micrometers have two types of bases. One that is larger such as what is seen on the digital version above. The other type is smaller. This makes it slightly more tipsy. The base of the Starrett depth mic feels like it is just right, smack in the middle.
It really is only small differences that give the Starrett depth micrometer the edge. You can’t go wrong with either, especially if you can find a good deal on it somewhere or pick one up used for a good price.
I’m sure you have noticed that the prices are pretty high on all of the listed depth mics so far.
This is because the quality and accuracy don’t come cheap with depth micrometers. This depth mic from Fowler is the about the closest thing you will find to cheap and accurate.
I don’t know about all of their tools but many of Fowler’s gauges seem to be made in China. Nothing wrong with that in particular as seen with some of our other mic recommendations. Unfortunately, Chinese made depth mics are not something that they have perfected.
I have used Fowler depth mics that are every bit as accurate as Starrett or Mitutoyo, I just wouldn’t count on every single one coming off the line that good.
The nice thing about many online retailers is that they have good return policies. So if you absolutely need a depth mic and need it as cheap as possible then order away. Just make sure you check it for accuracy when you get it and send it packing if it isn’t up to snuff.
A good set of digital calipers is an invaluable tool for any machinist or hobbyist. Calipers can take a wide range of measurements. And do it with a ton of accuracy.
For many people, finding the best digital caliper is important because they get used so much. When you can measure inside, outside and depth measurements the tool gets a good amount of use.
I used digital calipers almost every day for 15 years and there isn’t much competition.
There is solid competition in the value department, but Mitutoyo has the most well-made caliper on the market.
If you don’t plan on using it day in and day out then consider this caliper from iGaging.
It has good build quality and is closer in price to a budget pick than the Mitutoyos. If you have a special use case or an extremely limited budget then keep reading to find the right digital caliper for you.
Name
Awards
IP Rating
Where to Buy
Mitutoyo 500-196-30 0-6" Digital Caliper
Best Overall Digital Caliper, Most Accurate, Easiest to Use
Accuracy is the single most important feature of your digital caliper.
They are measuring tools and they need to measure correctly.
Mitutoyo digital caliper
The accuracy is the ability of the caliper to give the true value of a given measurement.
The accuracy of the best calipers is usually +/- .001.
Cheaper alternatives will have an accuracy between +/- .002″ to +/- .010″. For some this may be fine, but it will depend on what level of accuracy you need for your project.
I also recommend that you do not blindly trust the claimed accuracies touted by the budget manufacturers. If Starrett or Mitutoyo specify an accuracy level, you can trust it but this is not the case
Keep in mind the type of tolerances you will be working with to help you decide how accurate your caliper needs to be.
A 0-6″ caliper maintains a nice balance of measuring range and ease of measurement.
As the measuring range of a caliper gets larger, it becomes more difficult to use.
Using a 0-24″ caliper to measure a 1″ hole diameter would be quite difficult.
Even if you require the ability to measure larger sizes, you will want a 0-6″ caliper for many measurements because of its ease of use.
Display size
Look For A Large Display
The display on your caliper plays an important role in how easy it is to use. Being able to quickly read your measurements will save you time in the long run.
Let’s be real, some of us don’t have the best eyes. Larger displays make getting your reading simpler. This is one area that digital calipers have a nice advantage over dial calipers. The dial and indicator needle can be hard for some to read on your average dial caliper.
The best displays have large uniform digits as shown on the Mitutoyo caliper above.
Measuring units
Most digital displays are capable of showing measurements in inches as well as millimeters. Some calipers will also read measurements in fractional units.
Fractional units are generally not the best way to take measurements because the displays don’t round and instead will display a measurement of something similar to 53/128″. That isn’t a very helpful way to display the data. If the display rounds to something useful such as 1/16 or 1/32 it would be more useful but most don’t.
Battery life
Typical digital caliper battery
Battery life should be a prime consideration when examining the quality of a digital caliper.
An auto on and auto shut off feature can greatly extend the longevity of a calipers battery life.
The best digital calipers will have battery life that is measured in months or years. Most of the budget options available have much shorter battery lives. If you go the budget route with your caliper, make sure to keep some extra batteries on hand and maybe think about taking the battery out when the tool is not in use.
Good battery life means the caliper will be ready to use when you need it.
Dial vs digital calipers
Dial caliper face
Dial calipers make a good option for a measuring device as well. The main benefit they possess is that they don’t require batteries so they are always ready to use.
Dial calipers can’t switch measuring units at the press of a button though. There are some dial calipers that measure in mm as well as inches at the same time but they haven’t been proven to be particularly reliable.
Ingress protection rating or IP rating for short is the amount of resistance a device has to things such as dirt and water.
Many digital calipers have no protection rating at all.
For the ones that do, IP54 is the most common rating. This equates to limited protection from dust and protection from splashing water which will be more than most users require.
The less frequent IP67 rating is excellent and means they are almost impervious to everyday dirt and water.
Keep in mind though that IP ratings don’t protect the tool from physical damage such as being dropped.
The chart below outlines how protected a tool is. The first digit in any IP rating is for the solids protection and the second digit covers the protection from liquids.
Materials
Carbon fiber digital caliper from Adoric
For most applications you will want to get a caliper made of stainless steel. Other materials available include carbon fiber composites and plastic.
While tools made of carbon fiber and plastic are generally not as nice in quality as those made of stainless steel, they do have some benefits. Carbon fiber and plastic calipers are less likely to scratch or damage softer materials such as wood or plastic.
Stainless steel calipers tend to have sharp jaws that can scratch some materials but if you are careful in their use, there shouldn’t be any issues. Carbon fiber composites and plastic also have the benefit of being non-magnetic.
Calibration certificates
Some calipers are sold with a calibration certificate for a decent upcharge. Skip it. The tool should be accurate when purchased, regardless of whether it comes with a certificate or not.
The best practice is to verify the accuracy of the caliper when you receive it. Check the tool against a known standard such as a set of gauge blocks. At a bare minimum, verify the zero position before using your gauge.
Cases
A Case Provides Much Needed Protection
A case is an important accessory for a digital caliper. These are precision measuring instruments after all and all too often they get knocked off a workbench or dropped by a careless coworker.
Keeping them in a case will add a layer of protection to help keep them safe. Cases come standard with calipers from the the best toolmakers such as Starrett, Mitutoyo, Fowler and Brown and Sharpe.
They do not come standard for cheaper tools so keep that in mind when looking at those budget friendly options.
Data transfer
An RS232 port can be a handy addition to your caliper, but is certainly not a necessity. A RS232 port allows the transfer of data/measurements from your caliper to your computer.
For most users this is an unneeded feature, but for some applications it can be handy to record the data directly to your computer.
Our top picks
Now that you know what we consider when reviewing the best calipers, let’s find out who is making the best in class calipers.
Accuracy: +/- 0.001”/.0254 mm Measuring units: Inches, mm Warranty length: One year Battery used: 1 SR44 (included)
Amazing accuracy, excellent battery life and protection from dirt, water and oil. Mitutoyo makes a digital caliper that is everything you would want in a precision measuring tool.
These calipers from Mitutoyo are a reliable and consistently accurate measuring instrument. Perfect for reloading, engine work or every day use in a machine shop.
Basically, Mitutoyo has set the standard for what a digital caliper should be and maintained that standard for a long time. In fact, if you can find a used set do be afraid to pick them up.
These calipers are heirloom quality.
That isn’t something you would normally say about something electronic, but these digital calipers from Mitutoyo break the mold and are built to last.
Everything about these calipers is well-made.
Quality stainless steel frame
Solid plastic body
Buttons that just feel nice and are easy to use
Large, easy to read LCD display
Better battery life than any other caliper I have seen (Mitutoyo claims 3.5 years – it might be longer)
Combine these things with the dependable accuracy and you got a tool that is truly best in class.
Accuracy: +/- 0.001”/.0254 mm Measuring units: Inches, mm, fractions Warranty length: One year Battery used: LR44 (included)
If you’re just getting into machining and you’re a bit nervous about dropping a lot of money on a high-end caliper like the one above, then this budget-friendly VINCA just might be the tool for you.
First and foremost, it’s a very accurate caliper for the price, with an accuracy of +/- 0.001″/.0254 mm. These are measuring devices after all. They need to be accurate.
While it is made of stainless steel, you’ll also be happy that this caliper comes with a heavy-duty case to keep it protected at all times when it’s not in use.
The LCD display face is fairly large, however you should note that the way the values are displayed is a little awkward, especially when measuring in inches. It appears VINCA did this to allow fractional measurements.
This isn’t something that is a deal breaker but worth noting because some of the numbers you will be reading are only half the size of the screen.
Battery life is good on these VINCA calipers. Take note that they automatically turn on when the caliper moves which can cause them to drain the battery faster even when not in use. Using the lock to gently keep them in place will go a long way towards extending your battery life and keeping them ready to use when you need them.
An excellent bonus feature of this caliper is the RS232 port which allows you to plug the caliper right into your computer. This is something that is rarely seen with budget priced calipers.
Digitally transferring readings can be super helpful, because it’s so easy to fat-finger a measurement if when entering them manually.
Overall, these VINCA digital calipers are a great value for the price. They aren’t quite on the same level as some of the higher end measuring tools but they make an excellent starter set that doesn’t break the bank.
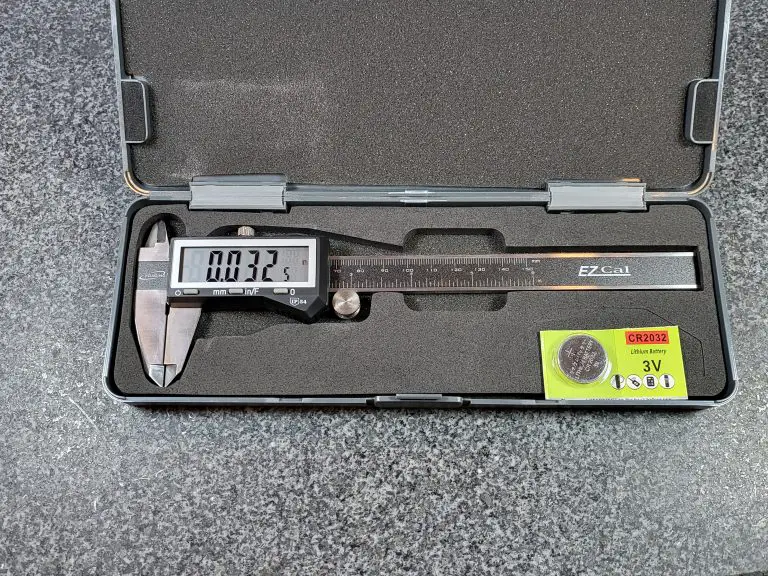
Accuracy: +/- 0.001”/.0254 mm Measuring units: Inches, mm Warranty length: One year Battery used: CR 2032 3V (included)
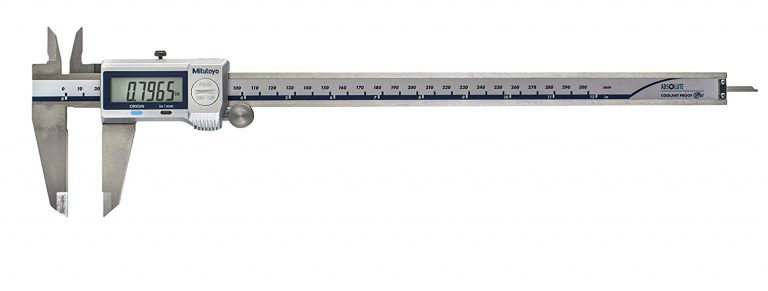
It’s tough to do a review about calipers and not include anything made by Starrett. Starrett is an industry leader, and for decades has carried a solid reputation for making incredible products.
This heavy-duty digital caliper from them has an accuracy of 0.001″, or 0.254 mm and a resolution 0.0005″ or 0.010 mm. Exactly the type of precision you would expect in a quality measuring tool.
When it comes to build quality, the stainless steel bar of this caliper is designed to last just like many other Starrett tools and the case it comes with only helps to extend the life of your caliper by keeping it safe when you’re not using it.
This display is easy to read and quite large. The buttons work as designed and overall the 798A-6 functions exactly as intended and just feels very well built.
However, the real reason you’ll want to buy this caliper is because of how rugged this thing is.
The 798A-6 is rated IP67. IP stands for ingress protection. This is a measure of the amount of resistance a device has to dirt, water, and other contaminants. For a full breakdown of IP ratings, see our rundown in the Things to Consider section.
Just know that most digital calipers, especially lower priced models, often offer no IP rating at all. The better models that do offer some form of IP rating are usually rated IP54. The IP67 rating of this Starrett is a significant jump up in protection.
One thing to keep in mind is that the IP rating doesn’t protect against damage from drops or other physical damage. You’re going to still need to treat it carefully. But let’s face it, we aren’t always working in the most pristine environments.
While the added protection that the Starrett caliper offers is welcome, it does come at a cost. Mechanics and machinists have known for a long time the value of a tool that can withstand a little abuse. Whether that is necessary for you situation is something you will need to decide.
I can’t say that I know of anyone who has regretted spending the extra to step up and get a tool from Starrett.
Accuracy: +/- .001”/0.02mm Measuring units: Inches, mm, fractions Warranty length: Two years Battery used: CR 2032 3V (included with spare)
While they are a budget tool manufacturer, iGaging has been around awhile and made quite a name for themselves providing decent tools for a much lower price.
Made of stainless steel, this iGaging caliper has an accuracy of +/- .001” or .02mm, and a resolution of .0005” or .01mm which is directly in line with the capabilities of higher priced tools. Fractional measurements are taken in increments of 1/128″
We tested the accuracy and it performed wonderfully reading spot on in all inside, outside and depth measurements taken across the measuring range. It even comes with a calibration certificate. Most budget priced tools skip this.
This is a solid set of calipers, especially for the price. The LCD display is large and skips the weirdness that other calipers such as the VINCA DCLA-0605 has because of the fractional units.
But the real standout feature of this caliper is just how tough it is given its price. The iGaging caliper has an IP54 rating, which, as we mentioned earlier, is the average rating for calipers with an IP score.
However, given the price point, this is a very uncommon feature for calipers in this price range. Most will have no IP rating at all.
Being a budget caliper, but still offering protection from dust, oil, water, and other contaminants is what sets this caliper apart from others in its class.
Another nice thing about this caliper is the 2-year warranty. You’ll notice that a lot of the calipers on this list are given a 1-year warranty which is still higher than the average warranty. 2 years provides quite a bit of assurance that the caliper will function for a good long time.
One small drawback of this caliper is that the on/off power function is manual. What this means is that you need to remember to hit the power button every time you are done using it or else you’ll drain the battery. Many digital calipers will feature an auto off feature to extend the battery life.
Overall, the IP rating this tool has offsets any issues with battery life. iGaging has done a great job of making a budget priced tool that stacks up well in most areas against some of the most well known measuring tool manufacturers.
Accuracy: +/- .0015”/0.0385mm. Measuring units: Inches, mm Warranty length: One year Battery used: 1 SR44 (included)
We’ve included another Mitutoyo caliper on this list because this caliper is a bit different than the other one. For one, it’s got a much larger measuring range, going from 0-12″.
While measuring above 6″ is less likely, especially for beginners, this caliper gives you the option for larger measurements when needed.
Keep in mind that you wouldn’t want this as a replacement for a 6″ caliper, instead larger calipers such as a 12 or 24″ model will get used in addition to a 6″ caliper.
There are situations where you might need to measure something larger and the 6″ caliper just won’t do. But anytime you are measuring a smaller size, a large format caliper such as this will be difficult and awkward to use. Not to mention it won’t fit into tight spaces well.
You should also take not that the accuracy is slightly reduced because it needs to maintain that accuracy over a larger measuring range. This caliper has an accuracy of +/- .0015″/0.0385mm which is pretty good.
You will find that some of the budget tool makers will spec their 12″ digital calipers with an accuracy of +/- .001″, which on paper looks like they are better than this Mitutoyo. In reality, they are often far worse than that. This is especially true if you move up to a 24″ caliper.
The Mitutoyo 500-754-20 comes with a whopping IP67 rating, meaning it’s super water and dust resistant. Having that level of protection on a tool that costs this much is important because you wouldn’t a splash of coolant or oil to destroy your prized measuring tool.
While it’s an expensive tool, if you have bigger projects that you plan on working with, then it’s well worth the money. And, as we touched on earlier, Mitutoyo is a premium brand in the industry, so if you do pull the trigger and decide to buy this caliper you won’t be disappointed in the quality of the product.
If you must go the budget route with a large range digital caliper, then be extremely aware of the accuracy you need and what the tool can actually provide. They might not line up.
I know everyone doesn’t have unlimited budgets so if you need to keep costs down, think about looking for a used Mitutoyo or Starrett digital caliper (good luck) or maybe going with a good quality dial caliper instead. Remember, that your large calipers are going to see much less use than a standard 6″ version.
The Starrett name is synonymous with precision measuring instruments. Known for making quality micrometers and calipers as well as many other tools for well over a century. They are a premier machine tool manufacturer.
Their calipers are top shelf across the board. They have long been exceptionally accurate and well made.
Many of the features of Starrett’s caliper seem like simple things to get right. What makes this set of calipers better than all the others is the way that they are able to get all those little things right all at once and on a consistent basis.
As anyone who has used a set of calipers can attest to, the feel of a good set of calipers is where the tool shines. Starrett has been able to put it all together through the years and make calipers that provide top notch accuracy while maintaining an amazing level of smoothness in the mechanical workings.
Depth measurements are one area in which dial calipers from many manufacturers struggle. This is not the case with Starrett. Depth measurements from these calipers are every bit as accurate as any inside or outside measurement.
The accuracy is easier to attain with a tool as good as this one from Starrett. The thumb roller is smooth and with a little practice allows the user to gain a high level of precision in their measurements.
The easy-to-read dial face helps as well. The bright white face makes it easier to read your measurement even in lower light situations such as in your garage or leaning in to take readings in a dimly lit machine.
Overall, there are only positives for Starrett’s dial calipers. They just feel right and on top of it all are built to last. This truly is an heirloom quality tool.
Anytime Tools has quietly worked their way up to be one of the higher quality inspection tool makers. They have found a way to balance making a consistently good measurement device while still keeping the overall cost down. This is not an easy feat.
Easily the best budget friendly caliper. They have been able to create a tool that mirrors the same characteristics of calipers that cost almost twice as much.
As the best dial caliper under $50, it is amazing that they are still able to come packed with extras that other brands like to skip in an effort to keep the cost down. This caliper from Anytime Tools comes with a nice padded case that helps to keep the precision tool safe from accidental damage.
The dial face on this tool is one of the nicest. The lines are sharp and contrast nicely with the white background which makes reading the caliper easier.
The most important aspect is that they have been able to maintain the same accuracy of tools that cost almost twice as much. Nothing matters more than accuracy when it comes to inspection and measuring tools.
One thing you should know about any precision measuring tool such as a dial caliper is that as the measuring range goes up, the price can climb steeply.
You might think that the cost of a 0-12” caliper would be twice as much as a 0-6” set. Unfortunately, this isn’t the case and that 0-12” set can be 5-10x more expensive. This is especially true with sets from the most well-known manufacturers.
Luckily, Starrett makes a great 0-12” caliper that doesn’t completely break the bank. It has all the same great features of their 6-inch caliper but in a larger package. Another instance of a truly remarkable measuring tool. If you need a large caliper and trusted accuracy, then look no further.
One thing to keep in mind with larger calipers is that they will likely see much less use than a 0-6” set. Whenever possible you will want to use a smaller set of calipers for your measurements because they are so much easier to maneuver. It can be quite difficult to measure a small hole with a set of 12″ calipers.
Because they will be used less often, for some this may mean that they can sacrifice a little in accuracy and go with a cheaper set of 0-12” calipers.
The Starrett 3202-12 is accurate to +/- 0.001″ which means it is an extremely capable measuring tool.
Just like any other measurement, you should pay attention to the tolerances you need before making any purchases.
There is only so much that can be said about any dial caliper. They are all constructed roughly the same.
The biggest difference between any make or model dial caliper is the accuracy.
Most will want a caliper that is capable of taking measurements to +/- 0.001″ but if you know you can get away with a little less then there are some cheaper options available such as the 52-008-712-0 from Fowler.
Fowler has made/imported measuring tools for decades and done it well. Lately, they have skewed towards the lower end of the pricing range. Often they are not as cheap as the Chinese made tools and aren’t as accurate as the American, Japanese or European made tools.
Where they have really been successful is in making some of the tools that are more complex at a lower price point than most of their competition. Depth micrometers and dial calipers are two of the tools they have done well.
This dial caliper makes a great budget friendly choice for anyone who can sacrifice a little accuracy. Most will find this isn’t an issue because as parts get larger, they do tend to have looser tolerances. Pay attention though because this isn’t always the case.
Things to consider when purchasing a set of dial calipers
Measuring range
Dial calipers come in a large variety of sizes. The most common size has a measuring range of 0-6”. Less common ranges of 0-4” and 0-8” are also available.
Larger sized calipers such as 0-12” and 0-24” are available as well but they are most often used in conjunction with a 0-6” set of calipers. This is because taking smaller measurements with a large set of calipers can be extremely awkward. In most instances, the larger sets get pulled out when other measuring tools just won’t do.
Sets of calipers with measuring ranges above 24” are available but are much less common than sizes under 24”.
Accuracy
A good set of 0-6″ dial calipers is accurate to +/- .001”. Any 6 inch calipers which are less accurate should be ignored.
As the measuring range of the caliper gets larger, the accuracy of the caliper will often be reduced. Pay attention to the specs because it isn’t uncommon for a 24″ set of calipers to only be accurate to +/- 0.002″.
If you are in need of accuracy that is greater than this, you will need to find a nice set of micrometers for your application.
Micrometers are commonly available with an accuracy of +/- .0001”. Some cheaper sets of micrometers will not quite meet this accuracy, but you can rest assured that a set from the most well-known manufacturers such as Starrett and Mitutoyo will more than meet this standard.
Dial calipers sacrifice some accuracy to gain versatility in measurement.
Dial vs digital calipers
Our pick for best digital calipers - Mitutoyo 500-196-30 0-6" Digital Caliper
Both dial and digital calipers have their advantages. For dial calipers, their lack of batteries mean they are always ready to take a measurement.
Digital calipers have the benefit of taking instant measurements as well as switching between units at the press of a button.
There is no difference between the accuracy of digital and dial calipers and they are both available with similar measuring ranges. Ultimately, the choice between which is better comes down to a matter of preference.
For a more complete guide to the differences between dial and digital calipers see our guide on the topic.
Micrometers vs calipers
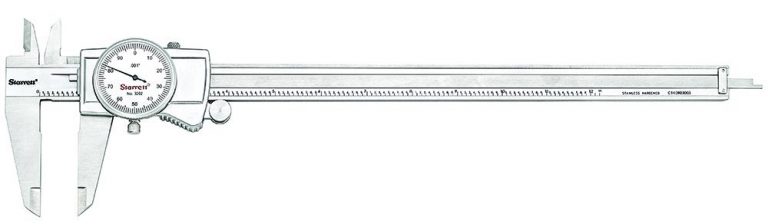
Starrett 0-1" Micrometer
The differences between micrometers and calipers lie in their accuracy and versatility. Micrometers are more accurate but with a much smaller measuring range.
Micrometers are generally ten times more accurate than calipers and have a measuring range that is 1/6 of the range of a typical caliper.
Don’t be afraid to look for a good set of used calipers. Brands such as Starrett, Mitutoyo, Brown and Sharpe, and Fowler have made quality calipers for years.
This is especially true if you know where the tool is coming from. Often retiring machinists are more than willing to part with their tools if they know someone is entering the trade with a passion for it.
If you don’t know the history of the tools, make sure to check the accuracy before buying. Not everyone treats their tools as gentle as they should. If you have access, check any potential purchase against a known standard such as a calibrated set of gauge blocks.
One item to look for when purchasing used tools is a case. If someone has kept the case and/or original box for a number of years, then it is likely that they have treated it carefully and it is every bit as good as new.
What can a dial caliper be used to measure?
Dial calipers can be used for a large variety of measurements. Most models will take inside, outside, step and depth measurements.
The inside, outside and step measurements are fairly standard and will be consistent among many manufacturers, but the depth measurement is what sets many quality calipers apart from the pack.
Note: Some calipers with larger measuring ranges such as 0-24” will come without the ability to take depth measurements. This is true as well for outside measurements. Some calipers will come with the ability to only take outside measurements thought this is usually only for calipers with measuring ranges over 12”.
How to reset or zero a set of dial calipers
To adjust a dial caliper, move the caliper until the jaws are closed.
Once in the zero position, check your reading on the indicator needle. If it lines up on zero, then no adjustment is needed. You can proceed to verifying the tools repeatability as noted below.
If it does not line up on zero, loosen the bezel lock screw and turn the dial face until it lines up on zero. Once aligned, tighten the lock screw.
Now open and close the jaws to verify that the caliper repeatedly returns a zero reading.
Once this is verified, if available use a set of known reference standards such as a gauge block set to verify different readings across the calipers measuring range. For a 0-6” caliper, 0”, 2”, 4” and 6” would be a good start.
After the tool has been verified as accurate across its measuring range, you can proceed to take your part measurements.
How to calibrate dial calipers
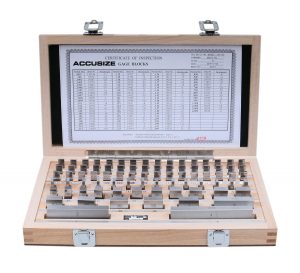
Gauge block set
Calipers should be calibrated periodically at an interval of your choosing. In a machine shop atmosphere, this will be determined by the company. Normal calibration intervals will range from 3 months to 1 year and everything in between. Some shops will even base the calibration frequency on tool use as opposed to length of time.
For home use, I recommend verifying them before each measurement.
With critical measurements, at home or in the shop, this verification becomes even more important. You don’t want to find out that your engine was bored oversize because you neglected to check your caliper before using it right?
Verify your tools and if possible, check them against a known calibrated standard such as a set of gauge blocks.
Please don’t pay more for anyone to provide a calibration certificate with your caliper. It just isn’t necessary.
Any extra money that would be spent on calibration costs would be much better spent on a set of gauge blocks so you can calibrate the tool yourself. Buying your own set of gauge blocks allows you to check the caliper regularly.
This can be especially important because it allows you to verify the accuracy of your measuring device, or measuring devices if you have more, right before taking a critical measurement so you know the readings are accurate.
Skip the calibration certs, if you think you might need it, get a set of gauge blocks and calibrate the tool yourself instead.
Maintenance and care tips
Lubricating your dial calipers
Starrett Tool and Instrument Oil
Most dial calipers will be made of stainless steel and therefore be resistant to rust. Not all types of stainless steel are created equal. Because of this it can be a good idea to have a light oil coating on some of the surface of the tool such as the beam.
Starrett makes a tool and instrument oil that works very well for lubricating all types of precision tools such as dial calipers.
Storage
It may be an old wives tale but many stand by not storing their calipers and micrometers with the measuring faces closed. Some say the surfaces in contact will corrode quicker. Others say it stresses the frame.
It is simple enough to back the tool off a little when you put it away and that is why we recommend doing it. If you plan to store the tool for extended periods of time, think about storing them with one of those little desiccant bags to absorb any rogue moisture.
Handle with care
Dial calipers are precision measuring tools, treat them like they are. They should be handled carefully and protected from shock damage as well as elements such as moisture and dirt.
Putting them away when not in use will go a long way towards keeping them out of harm’s way.
Cases
Dial calipers are precision measuring tools so the best thing you can do with them is protect them from damage as much as possible. Cases provide some damage from shocks and contaminants such as dirt, water, oil and/or coolant.
When not in use, the best place for quality measuring tools such as these is in a toolbox and the next best thing is in a decent case. Stash the case in your toolbox and you can double up the protection.
Depth base attachments
Caliper with depth base attachment
Calipers are notoriously difficult to use to take depth measurements. The nature of the tool makes it top heavy and therefore easy to get an incorrect reading when taking those depth measurements.
A depth base attachment makes the tool more stable and much more capable of taking accurate and repeatable measurements when it comes to things such as hole depths.
Dial caliper diagram and part names
Jaws
They are the primary measuring faces. They come into contact with your part. Make sure they are sitting square on your surface. You don’t want to twist the caliper at an angle because you won’t get an accurate reading.
Scale
The scale is used in conjunction with the dial indicator face to get your measurement reading. The scale reads in increments of .100” while the dial face reads in increments of .001”. They get added together to determine your measurement size.
Dial indicator face
Where you will look for the most important part of your measurements. The dial face reads in increments of .001”. The reading on the dial face gets added to the reading on the scale to get your measurement.
Beam
The beam is the surface along which the body of the caliper moves.
Depth rod
Not present on all calipers, though most have them especially at smaller sizes. The depth rod is the part of the caliper that extends out the end of the tool to take depth measurements.
Lock screw
Not present on all calipers, the lock screw allows the caliper to be locked in place to take readings that may be in hard-to-reach positions that may not allow the caliper to be read while measuring the part.
Related articles
For more information check out these related articles:
Before using your caliper, check to make sure that the measuring tool and surface to be measured are free of dirt, debris, chips, etc. The body of the caliper should slide freely along the scale or bar.
For an outside measurement, slide the jaws of the caliper open until they are far enough apart to be placed over the part to be measured.
Now proceed to close the jaws while trying to keep the jaws perpendicular to the surface being measured.
Multiple measurements should be taken to verify that the caliper has yielded the true reading.
For example, if a measurement is taken where the jaws of the caliper are not perpendicular to the surface being measured then the reading obtained can be larger than the true size.
Note: Do not use a large amount of force on the caliper in the direction of measurement. This can cause the tool to flex and give an incorrect reading. It is best to place the same amount of force that is used to zero the caliper.
How to read a dial caliper?
Reading a dial caliper is easy, though not as easy as a digital caliper.
If a digital caliper isn’t in the cards either because of budget or because you are working with an inherited tool then keep reading.
Typical digital caliper display
Dial calipers come in a few varieties, but most have their measurement read in the same way.
Dial calipers have graduations along the bar that are in increments of 0.1″ or one hundred thousandths of an inch.
Often the 1,2,3, and so on whole inch increments are marked with a number and the 0.1″ increments will be marked with a line.
This dial caliper has the 0.1" increments marked too
To read the caliper, combine the largest visible whole inch and 0.1″ increments on the beam with the dial reading.
Your reading = Largest whole inch + largest 0.1 inch + dial reading
In the example below, the 3 inch graduation (line) is visible. So is the 0.1 inch graduation after the 3.
If we add them together we get 3.1 inches. Now we need to add the dial reading to our beam reading.
The dial reading is 0.006 inches. 3.1″ + 0.006″ = 3.106″
The dial caliper measurement reading is 3.106″
A dial caliper with a measurement reading of 3.106"
How accurate are dial calipers?
A good set of 0-6″ dial calipers is accurate to +/- .001”. Any 6 inch calipers which are less accurate should be ignored.
As the measuring range of the caliper gets larger, the accuracy of the caliper will often be reduced. Pay attention to the specs because it isn’t uncommon for a 24″ set of calipers to only be accurate to +/- 0.002″.
If you are in need of accuracy that is greater than this, you will need to find a nice set of micrometers for your application.
Mitutoyo Micrometer
Micrometers are commonly available with an accuracy of +/- .0001”. Some cheaper sets of micrometers will not quite meet this accuracy, but you can rest assured that a set from the most well-known manufacturers such as Starrett and Mitutoyo will more than meet this standard.
Dial calipers sacrifice some accuracy to gain versatility in measurement.
Dial vs digital calipers
Mitutoyo digital caliper
Both dial and digital calipers have their advantages. For dial calipers, their lack of batteries mean they are always ready to take a measurement.
Digital calipers have the benefit of taking instant measurements as well as switching between units at the press of a button.
There is no difference between the accuracy of digital and dial calipers and they are both available with similar measuring ranges. Ultimately, the choice between which is better comes down to a matter of preference.
For a more complete guide to the differences between dial and digital calipers see our guide on the topic.
Somebody is going to get mad about this one. I just know it.
I have had many discussions with coworkers over the advantages and disadvantages of dial vs digital calipers.
What I have learned is that most people have a preference and that there isn’t anything that will change it. I am going to try and put aside any preference I have as I outline the differences between these two types of calipers.
Keep reading to find out more about the differences between digital and dial calipers. When you’re done, maybe you’ll have your own preference. But please, keep a more open mind than my coworkers.
What is a dial caliper?
A dial caliper is a mechanical inspection tool for measuring sizes accurately. Most models are capable of taking internal, external, step and depth measurements to an accuracy of +/- .001” or +/- .02mm.
The most common variety measures from 0-6” but they come in many different measuring ranges including 0-4”, 0-8”, 0-12” and 0-24”.
They can take quick measurements and are a very versatile inspection tool. For many machinists, a set of calipers will be the most frequently used measurement device.
The biggest differentiator for a dial caliper is the rack and pinion system which drives the indicator needle seen on the dial face.
Advantages
No batteries required
Tried and true design
Disadvantages
Can’t switch between inches and mm
What is a digital caliper?
Mitutoyo Digital Caliper
Digital calipers are the same sort of inspection tool as a dial caliper. They have similar accuracies and are available in comparable measuring ranges.
The main difference is that digital calipers require batteries which power their LCD display. The difference in displays between a dial and digital caliper can be thought of as the same as the difference between a standard analog clock and a digital version.
Advantages
Instant measurements
Can measure inches and mm
Disadvantages
Dead batteries
Electronics susceptible to damage
Are dial calipers more accurate than digital?
This can be a tricky question to answer because there are so many different models and manufacturers of both dial and digital calipers out there. In saying that, the short answer is no.
When comparing dial and digital calipers from the same manufacturer there is generally no difference in the accuracy of the tool.
Are digital calipers easier to use than dial calipers?
Digital Caliper Display - Notice the Button to Switch Between Units
Yes, digital calipers are easier to use than dial calipers. This is because the LCD display gives readings that can be instantly interpreted. Dial calipers require reading both the dial face as well as the scale to determine your measurement value.
Another added benefit of digital calipers that makes them easier to use is that most models are capable of switching between inches and mm at the push of a button. This saves the user from needing to convert measurements to another form of units.
This is an excellent feature for many users because it removes a step from the process which cuts down on the time needed to take a measurement. Removing the conversion step also eliminates the possibility that an error is made in the conversion calculation.
How to adjust or zero a dial caliper
To adjust a dial caliper, move the caliper until the jaws are closed.
Once in the zero position, check reading on the indicator needle. If it lines up on zero, then no adjustment is needed. You can proceed to verifying the tools repeatability as noted below.
If it does not line up on zero, loosen the bezel lock screw and turn the dial face until it lines up on zero. Once aligned, tighten the lock screw.
Now open and close the jaws to verify that the caliper repeatedly returns a zero reading.
Once this is verified, if available use a set of known reference standards such as a gauge block set to verify different readings across the calipers measuring range. For a 0-6” caliper, 0”, 2”, 4” and 6” would be a good start.
After the tool has been verified as accurate across its measuring range, you can proceed to take your part measurements.
How to adjust or zero a digital caliper
To adjust a digital caliper, move the caliper until the jaws are closed.
Once in the zero position, check reading on the digital display. If the display reads zero, then no adjustment is needed. You can proceed to verifying the tools repeatability as noted below.
If it does not read zero, press the zero button, sometimes identified as the origin button on some calipers.
Now open and close the jaws to verify that the caliper repeatedly returns a zero reading on its display.
Once this is verified, if available use a set of known reference standards such as a gauge block set to verify different readings across the calipers measuring range. For a 0-6” caliper, 0”, 2”, 4” and 6” would be a good start.
Once the tool has been verified as accurate, you can proceed to take your part measurements.
Things to consider when purchasing dial or digital calipers
Accuracy
Dial and digital calipers have comparable accuracies. There is some variation between makes and models of calipers, but most are accurate to +/- .001” or +/- .02mm. If you need something more accurate then you will likely need to look into purchasing a quality micrometer or micrometer set.
Most micrometers are accurate to +/- .0001” which makes them ten times more accurate than a typical caliper. The downfall is that they are more specialized and therefore are only capable of taking a single type of measurement (inside, outside, etc.) and have a smaller measuring range which is why a micrometer set is often needed to cover the measuring range of a single caliper.
Please note that cheap digital calipers often have reduced accuracy when compared to the usual gauge manufacturers such as Starrett and Mitutoyo. At the very least keep in mind the accuracy you need when purchasing because some of the budget priced tools are only half as accurate.
Measuring units
An Example of a Dual Unit Dial Caliper - Notice How It Has Two Indicator Needles
There are exceptions but most dial calipers are capable of measuring in a single set of units, either imperial (inches) or metric units (millimeters).
Some dial calipers are available that take measurements in both types of units, but they are clunky and often can not be calibrated so that both units are accurate. Stick with a single unit version.
Digital calipers are capable of taking measurements in both inches and millimeters while switching between the two at the push of a button. This is one of their primary advantages.
Many models are also able to take fractional measurements which can come in handy for some applications.
Measuring range
The measuring range of digital and dial calipers is similar. The most common version for both is a 6” caliper. Additionally, they can be found in ranges from 0-3” all the way up to 0-24” and beyond. Most will not find a need for measuring over 24”.
One point to keep in mind is that the cost goes up and the ease of use goes down as the caliper gets longer. For this reason, it is recommended to have multiple sets of calipers if you need to measure large sizes.
Imagine trying to measure a two-inch hole with a 0-24” caliper. It is going to be awkward and can easily lead to erroneous measurements. If you are in need of a set capable of measuring larger than six inches, then think about purchasing a quality 0-6” caliper as well as a 0-12” or 0-24” set.
The six-inch set will get the majority of the work and be easy to use and the larger set can be pulled out for use when the time is right.
Batteries
Digital Caliper Battery Example
Dial calipers do not require batteries. This means they will always be ready to use, no matter how long they sit in your toolbox between uses.
Digital calipers on the other hand do require batteries and unfortunately not the types most people keep on hand.
Digital calipers typically use a LR44, SR44 or CR2032 battery. They are available at most department stores as well as online.
Modern digital calipers, especially the high-quality ones from Starrett and Mitutoyo, have extremely long battery life. Many people have reported going years between battery changes with a Mitutoyo digital caliper.
For peace of mind think about keeping an extra battery or two around in your toolbox or junk drawer if you decide to go with a digital caliper. This way it will always be ready to use when you need it.
Cases
Digital Caliper with Case
Both dial and digital calipers are precision measuring instruments. You will find that most are built well and have no problem handling everyday use.
Unfortunately, the precision nature of these tools means that they are susceptible to damage from contamination such as coolant, oil, or metal chips as well as damage from physical shock.
A caliper that has been bumped off a workbench or dropped on accident can easily damage the jaws of the caliper or affect the internal workings resulting in invalid readings.
Calibration
Gauge Block Set
Calipers should be calibrated periodically at an interval of your choosing. In a machine shop atmosphere, this will be determined by the company. Normal calibration intervals will range from 3 months to 1 year and everything in between. Some shops will even base the calibration frequency on tool use as opposed to length of time.
For home use, I recommend verifying them before each measurement.
With critical measurements, at home or in the shop, this verification becomes even more important. You don’t want to find out that your engine was bored oversize because you neglected to check your caliper before using it right?
Verify your tools and if possible check them against a known calibrated standard such as a set of gauge blocks.
Some of the caliper manufacturers and resellers offer a calibration certificate with their tool. My recommendation would be to skip this unnecessary add-on.
At a minimum you should be verifying your tool when you receive it. Ideally, you would calibrate the tool yourself with a set of calibrated gage blocks.
A calibration certificate will only serve as proof that the caliper was accurate at the time of calibration. Since many tools get ordered online or through a catalog, the tool will get be in a shipping company’s hand between the time of calibration and when you receive it. They aren’t always known for being gentle.
A calibration certificate doesn’t provide much peace of mind when buying a new tool. It should be accurate anyways, that is what you bought it for after all. It would be better to take the added expense of calibration and apply it towards a set of gauge blocks or other reference standard.
Depth base attachments
A Caliper Depth Base Attachment
Depth measurements with a caliper can be quite tricky. The size and shape of the tool means it is top heavy and as a result it can be easy to get incorrect readings when taking depth measurements.
A depth caliper base attachment can help alleviate some of this by providing a wider, more stable base to take your measurements from. Adding one will make it easier to get consistent, accurate readings.
The base provides stability that is more in line with that of a depth micrometer, thought the tool will still be less accurate than a quality depth mic.
Related articles
For more information check out these related articles:
To provide the best experiences, we use technologies like cookies to store and/or access device information. Consenting to these technologies will allow us to process data such as browsing behavior or unique IDs on this site. Not consenting or withdrawing consent, may adversely affect certain features and functions.
Functional
Always active
The technical storage or access is strictly necessary for the legitimate purpose of enabling the use of a specific service explicitly requested by the subscriber or user, or for the sole purpose of carrying out the transmission of a communication over an electronic communications network.
Preferences
The technical storage or access is necessary for the legitimate purpose of storing preferences that are not requested by the subscriber or user.
Statistics
The technical storage or access that is used exclusively for statistical purposes.The technical storage or access that is used exclusively for anonymous statistical purposes. Without a subpoena, voluntary compliance on the part of your Internet Service Provider, or additional records from a third party, information stored or retrieved for this purpose alone cannot usually be used to identify you.
Marketing
The technical storage or access is required to create user profiles to send advertising, or to track the user on a website or across several websites for similar marketing purposes.